Lexmark C720 User's Guide - Page 175
If you feel you have cleared all the paper from the paper path, but the paper jam
 |
View all Lexmark C720 manuals
Add to My Manuals
Save this manual to your list of manuals |
Page 175 highlights
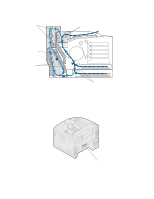
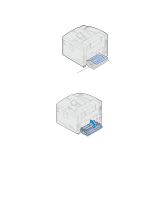
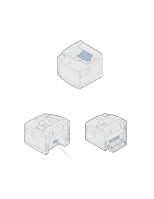
path. The illustration of the paper path may help you. For paper jams occurring in the duplex unit, see Clearing paper jams in the duplex unit. Top output bin Tray 1 Tray 2 After you have cleared all the paper, close the printer rear door and top door, and then press Go to clear the message. The Jam Recovery setting in the Setup Menu determines whether the printer reprints the jammed page. See Auto Continue for more information. Note: If you feel you have cleared all the paper from the paper path, but the paper jam message is still displayed, remove the paper trays and check for jammed paper inside the paper tray cavity, replace the paper trays, open and close the rear and top door, and then press Go. 175
-
 1
1 -
2
-
3
-
4
-
5
-
6
-
7
-
8
-
9
-
10
-
11
-
12
-
13
-
14
-
15
-
16
-
17
-
18
-
19
-
20
-
21
-
22
-
23
-
24
-
25
-
26
-
27
-
28
-
29
-
30
-
31
-
32
-
33
-
34
-
35
-
36
-
37
-
38
-
39
-
40
-
41
-
42
-
43
-
44
-
45
-
46
-
47
-
48
-
49
-
50
-
51
-
52
-
53
-
54
-
55
-
56
-
57
-
58
-
59
-
60
-
61
-
62
-
63
-
64
-
65
-
66
-
67
-
68
-
69
-
70
-
71
-
72
-
73
-
74
-
75
-
76
-
77
-
78
-
79
-
80
-
81
-
82
-
83
-
84
-
85
-
86
-
87
-
88
-
89
-
90
-
91
-
92
-
93
-
94
-
95
-
96
-
97
-
98
-
99
-
100
-
101
-
102
-
103
-
104
-
105
-
106
-
107
-
108
-
109
-
110
-
111
-
112
-
113
-
114
-
115
-
116
-
117
-
118
-
119
-
120
-
121
-
122
-
123
-
124
-
125
-
126
-
127
-
128
-
129
-
130
-
131
-
132
-
133
-
134
-
135
-
136
-
137
-
138
-
139
-
140
-
141
-
142
-
143
-
144
-
145
-
146
-
147
-
148
-
149
-
150
-
151
-
152
-
153
-
154
-
155
-
156
-
157
-
158
-
159
-
160
-
161
-
162
-
163
-
164
-
165
-
166
-
167
-
168
-
169
-
 170
170 -
 171
171 -
 172
172 -
 173
173 -
 174
174 -
 175
175 -
 176
176 -
 177
177 -
 178
178 -
 179
179 -
 180
180 -
181
-
182
-
183
-
184
-
185
-
186
-
187
-
188
-
189
-
190
-
191
-
192
-
193
-
194
-
195
-
196
-
197
-
198
-
199
-
200
-
201
-
202
-
203
-
204
-
205
-
206
-
207
-
208
-
209
-
210
-
211
-
212
-
213
-
214
-
215
-
216
-
217
-
218
-
219
-
220
-
221
-
222
-
223
-
224
-
225
-
226
-
227
-
228
-
229
-
230
-
231
-
232
-
233
-
234
-
235
-
236
-
237
-
238
-
239
-
240
-
241
-
242
-
243
-
244
-
245
-
246
-
247
-
248
-
249
-
250
-
251
-
252
-
253
-
254
-
255
-
256
-
257
-
258
-
259
-
260
-
261
-
262
-
263
-
264
-
265
-
266
-
267
-
268
-
269
-
270
-
271
-
272
-
273
-
274
-
275
-
276
-
277
-
278
-
279
-
280
-
281
-
282
-
283
-
284
-
285
-
286
-
287
-
288
-
289
-
290
-
291
-
292
-
293
-
294
-
295
-
296
-
297
-
298
-
299
 |
 |

175
path
. The illustration of the paper path may help you. For paper jams occurring in the duplex unit, see
Clearing paper jams in the duplex unit
.
After you have cleared all the paper, close the printer rear door and top door, and then press
Go
to
clear the message.
The Jam Recovery setting in the Setup Menu determines whether the printer reprints the jammed
page. See
Auto Continue
for more information.
Note:
If you feel you have cleared all the paper from the paper path, but the paper jam
message is still displayed, remove the paper trays and check for jammed paper
inside the paper tray cavity, replace the paper trays, open and close the rear and
top door, and then press
Go
.
Top output bin
Tray 1
Tray 2