Lexmark MS517 Embedded Web Server--Security: Administrator s Guide - Page 20
Using a security template to control function access, Setting date and time - manual
 |
View all Lexmark MS517 manuals
Add to My Manuals
Save this manual to your list of manuals |
Page 20 highlights
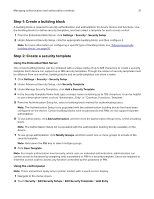
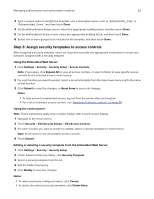
Managing authentication and authorization methods 20 • To view the Kerberos configuration file for the selected device, click View File. • To verify that the Kerberos configuration file for the selected device is functional, click Test Setup. Setting date and time Kerberos servers require key requests to have a recent time stamp (usually within 300 seconds). Therefore, the printer clock must be in sync or closely aligned with the KDC system clock. You can update the printer clock settings manually. You can also set it to use Network Time Protocol (NTP) to sync automatically with a clock that is also used by the Kerberos server. Note: We recommend using an NTP server. 1 Access the date and time settings. Do either of the following: • From the Embedded Web Server, click Settings > Security > Set Date and Time. • From the home screen, navigate to the menu screen, and then click Security > Set Date and Time. Note: When accessing the menu screen, log in as an administrator. 2 To manage the settings manually, enter the correct date and time in YYYY-MM-DD HH:MM format, and then select a time zone from the drop‑down menu. Notes: • Entering manual settings automatically disables the use of NTP. • If you select (UTC+user) Custom from the Time Zone list, then you need to configure more settings under Custom Time Zone Setup. 3 If daylight saving time (DST) is observed in your area, then select Automatically Observe DST. 4 If you are located in a nonstandard time zone or an area that observes an alternate DST calendar, then adjust the Custom Time Zone Setup settings. 5 If you want to sync to an NTP server rather than update the clock settings manually, then select Enable NTP. Then type the IP address or host name of the NTP server. 6 If the NTP server requires authentication, then select the preferred method from the Authentication menu. Then click Install MD5 key or Install Autokey IFF params to browse to the file containing the matching NTP authentication. 7 Click Submit to save the changes, or click Reset Form to restore the default settings. Using a security template to control function access Note: This feature is available only in advanced‑security devices. Each access control can be set to require no security (default) or to use any of the building blocks in the drop‑down menu for that function. Only one method of security can be assigned to each access control.
-
 1
1 -
2
-
3
-
4
-
5
-
6
-
7
-
8
-
9
-
10
-
11
-
12
-
13
-
14
-
 15
15 -
 16
16 -
 17
17 -
 18
18 -
 19
19 -
 20
20 -
 21
21 -
 22
22 -
 23
23 -
 24
24 -
 25
25 -
26
-
27
-
28
-
29
-
30
-
31
-
32
-
33
-
34
-
35
-
36
-
37
-
38
-
39
-
40
-
41
-
42
-
43
-
44
-
45
-
46
-
47
-
48
-
49
-
50
-
51
-
52
-
53
-
54
-
55
-
56
-
57
-
58
-
59
-
60
-
61
-
62
-
63
-
64
-
65
-
66
-
67
-
68
-
69
-
70
-
71
-
72
-
73
-
74
-
75
-
76
-
77
-
78
-
79
-
80
-
81
-
82
-
83
-
84
-
85
-
86
-
87
-
88
-
89
-
90
-
91
-
92
-
93
 |
 |
