Lexmark MS517 Embedded Web Server--Security: Administrator s Guide - Page 8
Simple-security device access controls
 |
View all Lexmark MS517 manuals
Add to My Manuals
Save this manual to your list of manuals |
Page 8 highlights
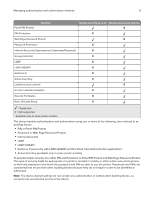
Managing authentication and authorization methods 8 To obtain the printer IP address, print a network setup page, and then locate the TCP/IP section. For more information on printing a network setup page, see the printer User's Guide. We recommend using HTTPS when connecting to the Embedded Web Server to prevent network viewing of the data being entered. For example, type HTTPS://ip_address. Note: When you access the Embedded Web Server, a warning message may appear. Proceed by continuing to connect to the device IP address. Simple-security device access controls Creating a Web page password and applying access control restrictions For simple‑security devices, Web page access control is limited to creating a password and applying access restrictions through "Web Page Password Protect" on the device Embedded Web Server. Note: This feature is available only in simple‑security devices. 1 From the Embedded Web Server, click Settings > Security > Web Page Password Protect. 2 Create a user and administrator password. • Under "Basic Security Setup: Create User Password," type a password in the appropriate box, then retype the password to confirm it, and then click Modify. • Under "Basic Security Setup: Create Admin Password," type a password in the appropriate box, then retype the password to confirm it, and then click Modify. Notes: • Functions or settings protected by a user‑level password can be accessed using any administrator‑level password. • To delete the password, click Delete Entry. 3 From the function drop‑down menu, select one of the following security template settings: • Admin Password Protected • Admin and User Password Protected • No Security • Disable Note: This setting is only usable by some functions. 4 Click Submit.
-
 1
1 -
2
-
 3
3 -
 4
4 -
 5
5 -
 6
6 -
 7
7 -
 8
8 -
 9
9 -
 10
10 -
 11
11 -
 12
12 -
 13
13 -
14
-
15
-
16
-
17
-
18
-
19
-
20
-
21
-
22
-
23
-
24
-
25
-
26
-
27
-
28
-
29
-
30
-
31
-
32
-
33
-
34
-
35
-
36
-
37
-
38
-
39
-
40
-
41
-
42
-
43
-
44
-
45
-
46
-
47
-
48
-
49
-
50
-
51
-
52
-
53
-
54
-
55
-
56
-
57
-
58
-
59
-
60
-
61
-
62
-
63
-
64
-
65
-
66
-
67
-
68
-
69
-
70
-
71
-
72
-
73
-
74
-
75
-
76
-
77
-
78
-
79
-
80
-
81
-
82
-
83
-
84
-
85
-
86
-
87
-
88
-
89
-
90
-
91
-
92
-
93
 |
 |
