Lexmark MS517 Embedded Web Server--Security: Administrator s Guide - Page 25
Configuring the device for certificate information, Sample certificate request data
 |
View all Lexmark MS517 manuals
Add to My Manuals
Save this manual to your list of manuals |
Page 25 highlights
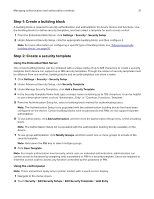
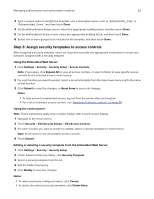
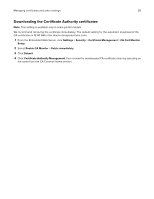
Managing certificates and other settings 25 Configuring the device for certificate information The printer has a self‑generated certificate. For some operations (such as 802.1X and IPSec), the printer certificate needs to be upgraded to a certificate that has been signed by a certificate authority. The printer includes a process of generating a certificate signing request that can be viewed or downloaded, which facilitates the process of obtaining the signed certificate for the printer. 1 From the Embedded Web Server, click Settings > Security > Certificate Management > Set Certificate Defaults. 2 Update the information on the device to fit your organization, and then click Submit. For more information, see "Setting certificate defaults" on page 27. 3 From the Certificate Management page, click Device Certificate Management. Notes: • This window lets the device administrator load a new device certificate, delete all device certificates, and view previously installed device certificates. To view more details of an installed device certificate or delete a device certificate, click on the certificate common name link under Friendly Name. • If you are configuring a new device, then a default self‑signed certificate can be viewed on this page. 4 Select the link for the preferred device certificate to obtain the certificate signing request information. Notes: • You may use the link to the default certificate created in step 2 or another named certificate. The certificate information is displayed. • To create other certificates, select New to open a Certificate Generation Parameters page. For more information, see "Creating a new device certificate" on page 26. 5 Click Download Signing Request, and then save and open the .csr file with a text editor. Note: The file data is displayed in a standard format that includes the base‑64 representation in the application window. Copy and save that information for later use. Sample certificate request data -----BEGIN CERTIFICATE REQUEST----MIIC+TCCAeECAQAwaDEQMA4GA1UEChMHTGV4bWFyazEOMAwGA1UECxQFUFMmU0Qx EjAQBgNVBAcTCUxleGluZ3RvbjELMAkGA1UECBMCS1kxCzAJBgNVBAYTAlVTMRYw FAYDVQQDEw1MZXhtYXJrIE1YODEyMIIBIjANBgkqhkiG9w0BAQEFAAOCAQ8AMIIB CgKCAQEAtqZYnFpgp9CfvK9cp4WY+jcerPHZkqTdCmyo8TcVArItFXPZk0XwzirZ UvdA6lgnEc2lA9QG4M9ldm2Kg48qnUvTq8qGbs09FtoS3ayYfY6HxF5NXiQdkJTh 8coS3E3k8ZdM5kP4UFBL3dTf1POTbn1FEQf5YwVCmjxFjDv48xXobzSfu/cqC42e KZsH4EK6thVOy0KoScPbO5DfI5m0xm6ZRlPjaA6NXu/4pZQYtcuur2hhI/7mrkTb flX6P9aa2rYL+WDypaNyKJxfygfk090bI+L1rRWHKEKu+GOGfO1+NjFvlm6Kr82C nOIpV/x8fU6WRFbG7z2gVHisTW1tCwIDAQABoEwwSgYJKoZIhvcNAQkOMT0wOzAP BgNVHREECDAGhwT/////MAkGA1UdEwQCMAAwHQYDVR0OBBYEFLOZMlQBnxiCfLx3 6VDLpC88HgSzMA0GCSqGSIb3DQEBBQUAA4IBAQBwTHx62ROkOh8IbUv5tTWyYeUc ayiPW+8ekGyHXajFybXTzKxu2KMUCeQen6CIeGq6MJWiQ1BvpVrIlPsCH8H2mbxD 1dWutSMtDJR6W9Cgk/TLXzKbdhVwd7yY8XhGkigj6c4k2C6dxRNaxvNWU06JCrVp nfFQvyQq88M7tZuhHbvD8+AkCOsub1hceGSQPhtdo8Ctlu1uDKe99u5uCFabiHs0 sbQJFUkEkA9AJBGLEUjRWl8B+bauYn2eSCgF8+tppgMSKFRays5M3Kt7UPiT5WiE afQqHR4K/E0mzx+++1S+4yriryt7gNw6ofoJwV4i7YVBOJWHDN5S9e/TIxdX -----END CERTIFICATE REQUEST----- 6 Open another Web browser, and go to the CA Web site.
-
 1
1 -
2
-
3
-
4
-
5
-
6
-
7
-
8
-
9
-
10
-
11
-
12
-
13
-
14
-
15
-
16
-
17
-
18
-
19
-
 20
20 -
 21
21 -
 22
22 -
 23
23 -
 24
24 -
 25
25 -
 26
26 -
 27
27 -
 28
28 -
 29
29 -
 30
30 -
31
-
32
-
33
-
34
-
35
-
36
-
37
-
38
-
39
-
40
-
41
-
42
-
43
-
44
-
45
-
46
-
47
-
48
-
49
-
50
-
51
-
52
-
53
-
54
-
55
-
56
-
57
-
58
-
59
-
60
-
61
-
62
-
63
-
64
-
65
-
66
-
67
-
68
-
69
-
70
-
71
-
72
-
73
-
74
-
75
-
76
-
77
-
78
-
79
-
80
-
81
-
82
-
83
-
84
-
85
-
86
-
87
-
88
-
89
-
90
-
91
-
92
-
93
 |
 |