Lexmark Pro4000c Quick Reference - Page 12
Understanding the parts of the printer, Use
 |
View all Lexmark Pro4000c manuals
Add to My Manuals
Save this manual to your list of manuals |
Page 12 highlights
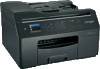
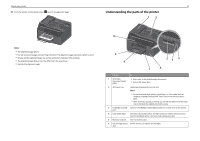
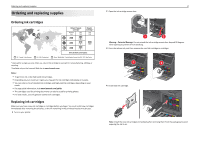
About your printer 27 From the printer control panel, press OK to print an alignment page. 12 Understanding the parts of the printer 1 2 Address Boko Dial Toen Pause Redial SD/MS/xD/MMC Notes: • The alignment page prints. • Do not remove the page until printing is finished. The alignment page may take a while to print. • Streaks on the alignment page are normal and not an indication of a problem. • The alignment page that prints may differ from the one shown. • Recycle the alignment page. 10 Address Boko Dial Toen Pause Redial SD/MS/xD/MMC 9 8 54 3 7 6 Use the To 1 Automatic Document Feeder (ADF) • Scan, copy, or fax multiple‑page documents. • Access ADF paper jams. 2 ADF input tray Load original documents into the ADF. Notes: • Do not load postcards, photos, small items, or thin media (such as magazine clippings) into the ADF. Place these items on the scanner glass. • After scanning, copying, or faxing, you can lift the right end of the input tray to retrieve the original documents easily. 3 PictBridge and USB Connect a PictBridge-enabled digital camera or a flash drive to the printer. port 4 Card reader light Check the card reader status. The light comes on when a memory card is inserted and blinks when a memory card is being accessed. 5 Memory card slot Insert a memory card. 6 Ink cartridge access Install, remove, or replace ink cartridges. door
-
 1
1 -
2
-
3
-
4
-
5
-
6
-
 7
7 -
 8
8 -
 9
9 -
 10
10 -
 11
11 -
 12
12 -
 13
13 -
 14
14 -
 15
15 -
 16
16 -
 17
17 -
18
-
19
-
20
-
21
-
22
-
23
-
24
-
25
-
26
-
27
-
28
-
29
-
30
-
31
-
32
-
33
-
34
-
35
-
36
-
37
-
38
-
39
-
40
-
41
-
42
-
43
-
44
-
45
-
46
-
47
-
48
-
49
-
50
-
51
-
52
-
53
-
54
-
55
-
56
-
57
 |
 |