Lexmark Pro4000c Quick Reference - Page 39
Faxing, Sending faxes, Tips for sending faxes, Sending faxes using the printer control panel
 |
View all Lexmark Pro4000c manuals
Add to My Manuals
Save this manual to your list of manuals |
Page 39 highlights
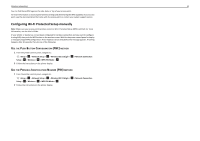
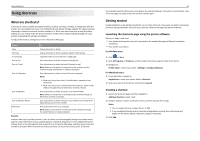
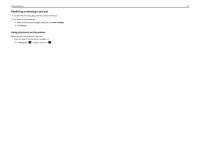
Faxing Faxing CAUTION-SHOCK HAZARD: Do not use the fax feature during a lightning storm. Do not set up this product or make any electrical or cabling connections, such as the fax feature, power cord, or telephone, during a lightning storm. Sending faxes Tips for sending faxes • Make sure the printer is on and connected to a working telephone, DSL, or VoIP line. The line is working if you hear a dial tone. • Make sure the exit bin is fully extended and the bin extender is flipped out. • Depending on your printer model, use the ADF when scanning two‑sided (duplex) pages. • To easily retrieve a document after copying or scanning, lift the ADF input tray. • When using the ADF, adjust the paper guide on the ADF to the width of the original document. • When using the scanner glass, close the scanner cover, if possible, to avoid dark edges on the scanned image. • Do not load postcards, photos, small items, transparencies, photo paper, or thin media (such as magazine clippings) into the ADF. Place these items on the scanner glass. • When the document to be faxed is in place with the settings you want, press to send the fax. Sending faxes using the printer control panel 1 From the printer control panel, navigate to: > Fax 2 Enter a fax number, or press Address Book to select a number from the Speed Dial or Group Dial list. 3 If you want to send a fax to a single recipient, then press OK . If you want to send a fax to a group of numbers (broadcast fax), then press the left or right arrow button to enter another number, and then press OK . Repeat this step to add more numbers. 4 Press the Color/Black button to select a color or black‑and‑white fax. 5 Press to start the fax job. Warning-Potential Damage: Do not touch the cables or the and fax. ports while actively sending a Tip: • You can send a broadcast fax to up to 30 recipients. 39 Sending faxes using the computer For Windows users 1 With a document open, click File > Print. 2 Make sure the appropriate printer is selected, and then click Properties, Preferences, Options, or Setup. 3 Click the Fax tab, and then make sure Enable Fax is selected. 4 Enter the recipient fax number or numbers in the "Fax number(s)" field. You can enter fax numbers manually or by using the Phone Book feature. 5 If necessary, enter a prefix in the Dialing Prefix dialog. 6 Select the appropriate paper size and page orientation. 7 Select Include Cover Page with Fax, and enter the appropriate information if you want to include a cover page with the fax. 8 Click OK. For Macintosh users 1 With a document open, choose File > Print. 2 From the Printer pop‑up menu, select the fax version of your printer. Note: In order to see the fax options on the Print dialog, you must use the fax driver for your printer. If the fax version of the printer is not on the list, then choose Add a printer, and then choose the fax version of the printer. 3 Enter the name and number of the recipient. 4 Click Fax. Receiving faxes Tips for receiving faxes When receiving faxes: • Make sure that the printer is on and connected to a working telephone, DSL, or VoIP line. The line is working if you hear a dial tone. • If you set the printer to receive faxes manually (Auto Answer Off), then make sure that the ringer volume is not set to Off. • If you have set the printer to receive faxes automatically (Auto Answer On), then load paper in the printer.
-
 1
1 -
2
-
3
-
4
-
5
-
6
-
7
-
8
-
9
-
10
-
11
-
12
-
13
-
14
-
15
-
16
-
17
-
18
-
19
-
20
-
21
-
22
-
23
-
24
-
25
-
26
-
27
-
28
-
29
-
30
-
31
-
32
-
33
-
 34
34 -
 35
35 -
 36
36 -
 37
37 -
 38
38 -
 39
39 -
 40
40 -
 41
41 -
 42
42 -
 43
43 -
 44
44 -
45
-
46
-
47
-
48
-
49
-
50
-
51
-
52
-
53
-
54
-
55
-
56
-
57
 |
 |