Lexmark Pro4000c Quick Reference - Page 13
Using the printer control panel, Warning-Potential Damage
 |
View all Lexmark Pro4000c manuals
Add to My Manuals
Save this manual to your list of manuals |
Page 13 highlights
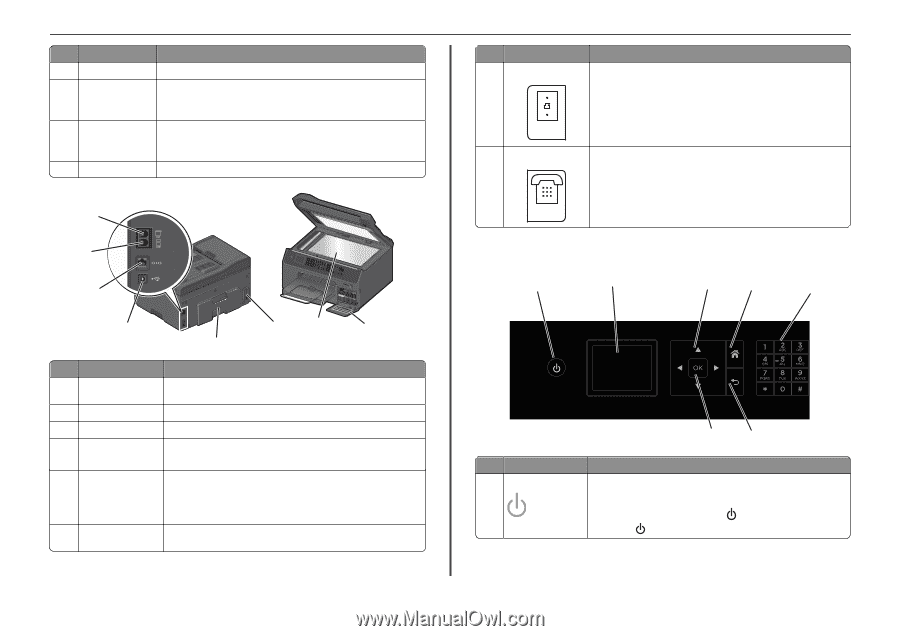
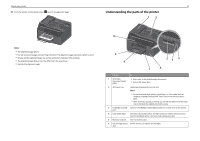
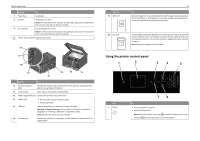
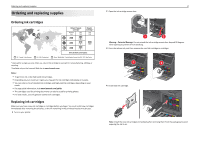
About your printer Use the To 7 Paper tray Load paper. 8 Exit bin Hold paper as it exits. Note: For the printer to be ready for any print job, make sure to fully extend the exit bin and to flip out the bin extender. 9 Bin extender Catch the paper as it exits. Note: For the printer to be ready for any print job, make sure to fully extend the exit bin and to flip out the bin extender. 10 Printer control panel Operate the printer. 18 17 16 Address Boko Dial Toen Pause Redial SD/MS/xD/MMC 15 13 12 11 14 Use the To 11 Customer support label Identify the model number of the printer, the customer support hot line, and the ink cartridge information. 12 Scanner glass Scan, copy, or fax photos and documents. 13 Power supply with port Connect the printer to the power cord. 14 Duplex unit • Print on both sides of a sheet of paper. • Access paper jams. 15 USB port Connect the printer to a computer using a USB cable. Warning-Potential Damage: Do not touch the USB port except when plugging in or removing a USB cable or installation cable. Note: Remove the sticker to access the port. 16 Ethernet port Connect your printer to a computer, a local network, an external DSL, or a cable modem. Use the 17 LINE port 13 To Connect the printer to an active telephone line through a standard wall jack (RJ‑11), DSL filter, or VoIP adapter, or any other adapter that allows you to access the phone line to send and receive faxes. 18 EXT port Connect additional devices (telephone or answering machine) to the printer and the telephone line. Use this port if you do not have a dedicated fax line for the printer and if this connection method is supported in your country or region. Note: Remove the plug to access the port. Using the printer control panel 1 2 3 4 5 Use 1 Power 76 To • Turn the printer on and off. • Switch to Sleep mode. Note: When the printer is on, press to switch to Sleep mode. Press and hold for three seconds to turn off the printer.
-
 1
1 -
2
-
3
-
4
-
5
-
6
-
7
-
 8
8 -
 9
9 -
 10
10 -
 11
11 -
 12
12 -
 13
13 -
 14
14 -
 15
15 -
 16
16 -
 17
17 -
 18
18 -
19
-
20
-
21
-
22
-
23
-
24
-
25
-
26
-
27
-
28
-
29
-
30
-
31
-
32
-
33
-
34
-
35
-
36
-
37
-
38
-
39
-
40
-
41
-
42
-
43
-
44
-
45
-
46
-
47
-
48
-
49
-
50
-
51
-
52
-
53
-
54
-
55
-
56
-
57
 |
 |