Lexmark X203n User's Guide - Page 21
Verifying printer setup, Printing a menu settings Printing a network setup - reviews
 |
View all Lexmark X203n manuals
Add to My Manuals
Save this manual to your list of manuals |
Page 21 highlights
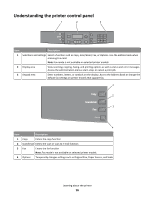
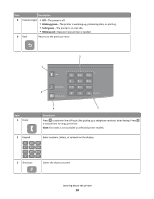
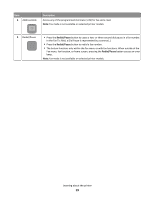
For Macintosh users 1 Close all open software applications. 2 Insert the Software and Documentation CD. 3 From the Finder desktop, double-click the printer CD icon that automatically appears. 4 Double-click the Install icon. 5 Follow the instructions on the screen. Using the World Wide Web 1 Go to the Lexmark Web site at www.lexmark.com. 2 From the Drivers & Downloads menu, click Driver Finder. 3 Select your printer, and then select your operating system. 4 Download the driver and install the printer software. Verifying printer setup If your printer is a network model and is attached to a network, print a network setup page to verify the network connection. This page also provides important information that aids network printing configuration. Printing a menu settings page Print a menu settings page to review the current menu settings. Note: If you have not made any menu item settings changes yet, then the menu settings page lists all the factory default settings. Once you select and save other settings from the menus, they replace the factory default settings as user default settings. A user default setting remains in effect until you access the menu again, choose another value, and save it. 1 Make sure the printer is on and Ready appears. 2 From the printer control panel, press . 3 Press the arrow buttons until Reports appears, and then press . 4 Press the arrow buttons until Menu Settings Page appears, and then press . After the menu settings page prints, Ready appears. Printing a network setup page If the printer is attached to a network, print a network setup page to verify the network connection. This page also provides important information that aids network printing configuration. 1 Make sure the printer is on and Ready appears. 2 From the printer control panel, press . 3 Press the arrow buttons until Reports appears, and then press . Additional printer setup 21
-
 1
1 -
2
-
3
-
4
-
5
-
6
-
7
-
8
-
9
-
10
-
11
-
12
-
13
-
14
-
15
-
 16
16 -
 17
17 -
 18
18 -
 19
19 -
 20
20 -
 21
21 -
 22
22 -
 23
23 -
 24
24 -
 25
25 -
 26
26 -
27
-
28
-
29
-
30
-
31
-
32
-
33
-
34
-
35
-
36
-
37
-
38
-
39
-
40
-
41
-
42
-
43
-
44
-
45
-
46
-
47
-
48
-
49
-
50
-
51
-
52
-
53
-
54
-
55
-
56
-
57
-
58
-
59
-
60
-
61
-
62
-
63
-
64
-
65
-
66
-
67
-
68
-
69
-
70
-
71
-
72
-
73
-
74
-
75
-
76
-
77
-
78
-
79
-
80
-
81
-
82
-
83
-
84
-
85
-
86
-
87
-
88
-
89
-
90
-
91
-
92
-
93
-
94
-
95
-
96
-
97
-
98
-
99
-
100
-
101
-
102
-
103
-
104
-
105
-
106
-
107
-
108
-
109
-
110
-
111
-
112
-
113
-
114
-
115
-
116
-
117
-
118
-
119
-
120
-
121
-
122
-
123
-
124
-
125
-
126
-
127
-
128
-
129
-
130
-
131
-
132
-
133
-
134
-
135
-
136
-
137
-
138
-
139
-
140
-
141
-
142
-
143
-
144
-
145
-
146
-
147
-
148
-
149
-
150
-
151
-
152
-
153
-
154
-
155
-
156
-
157
-
158
-
159
-
160
-
161
-
162
-
163
-
164
-
165
-
166
-
167
-
168
-
169
-
170
-
171
-
172
-
173
-
174
-
175
-
176
-
177
-
178
-
179
-
180
-
181
-
182
-
183
-
184
 |
 |