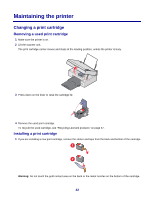
Lexmark X2450 User's Guide - Page 41
Networking the printer, Shared printing
 |
View all Lexmark X2450 manuals
Add to My Manuals
Save this manual to your list of manuals |
Page 41 highlights
Networking the printer Installing a network printer lets users at different workstations print to a common printer. Shared printing Installing software and sharing the printer on the network (on the host computer) 1 Connect the printer to a network computer using a USB cable. If the Found New Hardware dialog appears, click Cancel. 2 Insert the printer software CD. 3 Click Install. 4 Click Continue. 5 Select Yes to share your printer. 6 Assign a shared printer name. 7 When prompted, select Test Page to make sure that the computer can print to the printer. 8 Follow the directions on the computer screen until installation is complete. Installing the shared printer on other network computers (on the client computers) Using the peer-to-peer method Using the point-and-print method a Go to a network computer that you want to enable a Go to a network computer that you want to enable to print to the shared printer. to print to the shared printer. b Insert the printer CD. b Browse the Network Neighborhood until you find c Click Install. the name of the shared printer assigned in step 6 d From the "Connect Your Printer" dialog, select the on page 41. network option. c Right-click the printer icon, and select Open or e From the "Networking Setup" dialog, select Connect. Peer-to-Peer. d This will copy a subset of the printer software from f Enter the shared names of both the printer and the network computer you assigned in step 6 on the host computer. A printer object will be created in the Printers folder of the client. page 41. e When prompted, select Test Page to make sure g When prompted, select Test Page to make sure the computer can print to the shared printer. the computer can print to the shared printer. h Follow the instructions on the computer screen until installation is complete. i Repeat this procedure for each network computer you want to access the shared printer. 41
-
 1
1 -
2
-
3
-
4
-
5
-
6
-
7
-
8
-
9
-
10
-
11
-
12
-
13
-
14
-
15
-
16
-
17
-
18
-
19
-
20
-
21
-
22
-
23
-
24
-
25
-
26
-
27
-
28
-
29
-
30
-
31
-
32
-
33
-
34
-
35
-
 36
36 -
 37
37 -
 38
38 -
 39
39 -
 40
40 -
 41
41 -
 42
42 -
 43
43 -
 44
44 -
 45
45 -
 46
46 -
47
-
48
-
49
-
50
-
51
-
52
-
53
-
54
-
55
-
56
-
57
-
58
-
59
-
60
-
61
-
62
-
63
-
64
-
65
-
66
-
67
-
68
-
69
-
70
 |
 |
