Lexmark X3330 Service Manual - Page 39
Diagnostic aids, Single test
 |
View all Lexmark X3330 manuals
Add to My Manuals
Save this manual to your list of manuals |
Page 39 highlights
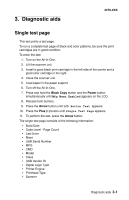
3. Diagnostic aids 4479-XXX Single test page This test prints a test page. To run a complete test page of black and color patterns, be sure the print cartridges are in good condition. To enter the test: 1. Turn on the All-In-One. 2. Lift the scanner unit. 3. Install a good black print cartridge in the left side of the carrier and a good color cartridge in the right. 4. Close the scanner unit. 5. Load paper in the paper support. 6. Turn off the All-In-One. 7. Press and hold the Black Copy button and the Power button simultaneously until Mfg Menu Enabled appears on the LCD. 8. Release both buttons. 9. Press the Arrow button until LCD Button Test appears. 10. Press the Plus (+) button until Single Test Page appears. 11. To perform the test, press the Arrow button. The single test page consists of the following information: • Build Date • Code Level - Page Count • Last Error • Maint • USB Serial Number • MFG • CMD • Model • Class • USB Vendor ID • Digital Logic Type • Printer Engine • Printhead Type • Scanner Diagnostic aids 3-1
-
 1
1 -
2
-
3
-
4
-
5
-
6
-
7
-
8
-
9
-
10
-
11
-
12
-
13
-
14
-
15
-
16
-
17
-
18
-
19
-
20
-
21
-
22
-
23
-
24
-
25
-
26
-
27
-
28
-
29
-
30
-
31
-
32
-
33
-
 34
34 -
 35
35 -
 36
36 -
 37
37 -
 38
38 -
 39
39 -
 40
40 -
 41
41 -
 42
42 -
 43
43 -
 44
44 -
45
-
46
-
47
-
48
-
49
-
50
-
51
-
52
-
53
-
54
-
55
-
56
-
57
-
58
-
59
-
60
-
61
-
62
-
63
-
64
-
65
-
66
-
67
-
68
-
69
-
70
-
71
-
72
-
73
-
74
-
75
-
76
 |
 |