Lexmark X342N Service Manual - Page 92
Fuser removal
 |
UPC - 734646256292
View all Lexmark X342N manuals
Add to My Manuals
Save this manual to your list of manuals |
Page 92 highlights
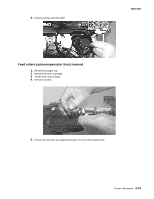
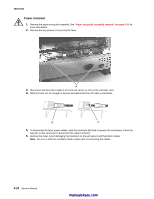
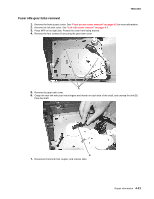
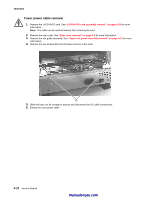
7003-XXX Fuser removal 1. Remove the paper exit guide assembly. See "Paper exit guide assembly removal" on page 4-31 for more information. 2. Remove the two screws (A) securing the fuser. 3. Disconnect the thermistor cable at J15 and exit sensor at J10 on the controller card. 4. Slide the fuser out far enough to expose and disconnect the AC cable connections. B C 5. To disconnect the fuser power cables, slide the insulation (B) back to expose the connectors. Press the tang (C) on the connector to disconnect the cable connector. 6. Remove the fuser. Avoid damaging the insulation on the exit sensor and thermistor cables. Note: Be sure to slide the insulation back in place after reconnecting the cables. 4-20 Service Manual manuals4you.com
-
 1
1 -
2
-
3
-
4
-
5
-
6
-
7
-
8
-
9
-
10
-
11
-
12
-
13
-
14
-
15
-
16
-
17
-
18
-
19
-
20
-
21
-
22
-
23
-
24
-
25
-
26
-
27
-
28
-
29
-
30
-
31
-
32
-
33
-
34
-
35
-
36
-
37
-
38
-
39
-
40
-
41
-
42
-
43
-
44
-
45
-
46
-
47
-
48
-
49
-
50
-
51
-
52
-
53
-
54
-
55
-
56
-
57
-
58
-
59
-
60
-
61
-
62
-
63
-
64
-
65
-
66
-
67
-
68
-
69
-
70
-
71
-
72
-
73
-
74
-
75
-
76
-
77
-
78
-
79
-
80
-
81
-
82
-
83
-
84
-
85
-
86
-
 87
87 -
 88
88 -
 89
89 -
 90
90 -
 91
91 -
 92
92 -
 93
93 -
 94
94 -
 95
95 -
 96
96 -
 97
97 -
98
-
99
-
100
-
101
-
102
-
103
-
104
-
105
-
106
-
107
-
108
-
109
-
110
-
111
-
112
-
113
-
114
-
115
-
116
-
117
-
118
-
119
-
120
-
121
-
122
-
123
-
124
-
125
-
126
-
127
-
128
-
129
-
130
-
131
-
132
-
133
-
134
-
135
-
136
-
137
-
138
-
139
-
140
-
141
-
142
-
143
-
144
-
145
-
146
-
147
-
148
-
149
-
150
-
151
-
152
-
153
-
154
-
155
-
156
-
157
-
158
-
159
-
160
-
161
-
162
-
163
 |
 |
4-20
Service Manual
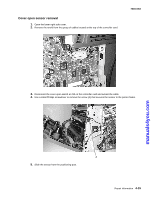
7003-XXX
Fuser removal
1.
Remove the paper exit guide assembly. See
“Paper exit guide assembly removal” on page 4-31
for
more information.
2.
Remove the two screws (A) securing the fuser.
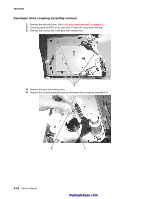
3.
Disconnect the thermistor cable at J15 and exit sensor at J10 on the controller card.
4.
Slide the fuser out far enough to expose and disconnect the AC cable connections.
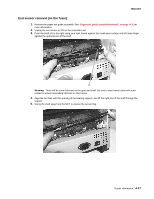
5.
To disconnect the fuser power cables, slide the insulation (B) back to expose the connectors. Press the
tang (C) on the connector to disconnect the cable connector.
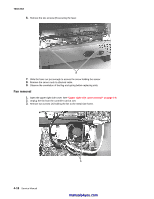
6.
Remove the fuser. Avoid damaging the insulation on the exit sensor and thermistor cables.
Note:
Be sure to slide the insulation back in place after reconnecting the cables.
C
B
manuals4you.com
manuals4you.com