Lexmark X644E IPDS Printer and Host Setup Guide - Page 6
AS/400 and iSeries LAN Printing Using the Printer Standard Network Port or MarkNet Internal Print - troubleshooting
 |
UPC - 734646093156
View all Lexmark X644E manuals
Add to My Manuals
Save this manual to your list of manuals |
Page 6 highlights
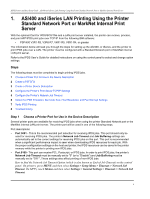
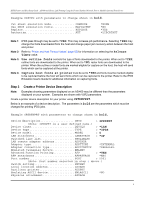
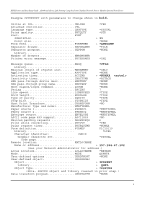
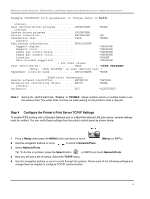
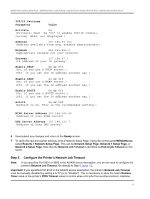
IPDS Printer and Host Setup Guide AS/400 and iSeries LAN Printing Using the Printer Standard Network Port or MarkNet Internal Print Server 1. AS/400 and iSeries LAN Printing Using the Printer Standard Network Port or MarkNet Internal Print Server With the optional Card for IPDS/SCS/TNe and a LAN print server installed, the printer can receive, process, and print AFP/IPDS print jobs over TCP/IP from the following IBM software: • PSF/400 V3R1-R3, V3R6-R7, V4R1-R5, V5R1-R4, or greater The information below will lead you through the steps for setting up the AS/400, or iSeries, and the printer to print IPDS jobs over a LAN. The printer must be configured with a Standard Network port or MarkNet internal LAN print server. Refer to the IPDS User's Guide for detailed instructions on using the control panel to select and change option settings. Steps The following steps must be completed to begin printing IPDS jobs. 1 Choose a Printer Port for Use in the Device Description 2 Create a PSFCFG 3 Create a Printer Device Description 4 Configure the Printer's Print Server TCP/IP Settings 5 Configure the Printer's Network Job Timeout 6 Select the IPDS Emulation, Bar Code Size, Host Resolution, and Fax Interrupt Settings 7 Verify IPDS Printing 8 Troubleshooting Step 1 Choose a Printer Port for Use in the Device Description Several printer ports are available for receiving IPDS jobs when using the printer Standard Network port or the MarkNet internal LAN print server. The printer port will be used in one of the following steps. Port descriptions: • Port 5001 - This is the recommended port selection for receiving IPDS jobs. This port should only be used for receiving IPDS jobs. The printer's Network Job Timeout and Job Buffering settings are automatically set to the correct settings for receiving IPDS jobs on this port. This port is recommended when a significant performance impact is seen when downloading IPDS resources for each job. With the proper configuration settings on the host and printer, the IPDS resources can be saved in the printer memory while the printer is printing non-IPDS jobs. • Port 9100 - This port can receive PCL, Postscript, or IPDS jobs. In order to print IPDS jobs, the printer's Network Job Timeout must be manually set to "0" (or to "Disable") and Job Buffering must be manually set to "OFF". These settings also affect printing of non-IPDS jobs. How to find the Network Job Timeout Option (which is also known as End-of-Job Timeout) on the control panel: On printers, press MENU and then select Settings > Setup Menu > Timeouts > Network Job Timeout. On MFPs, touch Menus and then select Settings > General Settings > Timeouts > Network Job Timeout. 6
-
 1
1 -
 2
2 -
 3
3 -
 4
4 -
 5
5 -
 6
6 -
 7
7 -
 8
8 -
 9
9 -
 10
10 -
 11
11 -
 12
12 -
13
-
14
-
15
-
16
-
17
-
18
-
19
-
20
-
21
-
22
-
23
-
24
-
25
-
26
-
27
-
28
-
29
-
30
-
31
-
32
-
33
-
34
-
35
-
36
-
37
-
38
-
39
-
40
-
41
-
42
-
43
-
44
-
45
-
46
-
47
-
48
-
49
-
50
-
51
-
52
-
53
-
54
-
55
-
56
-
57
-
58
-
59
-
60
-
61
-
62
 |
 |