LiftMaster SL930 SL930 Manual - Page 12
Alternate Installation
 |
View all LiftMaster SL930 manuals
Add to My Manuals
Save this manual to your list of manuals |
Page 12 highlights
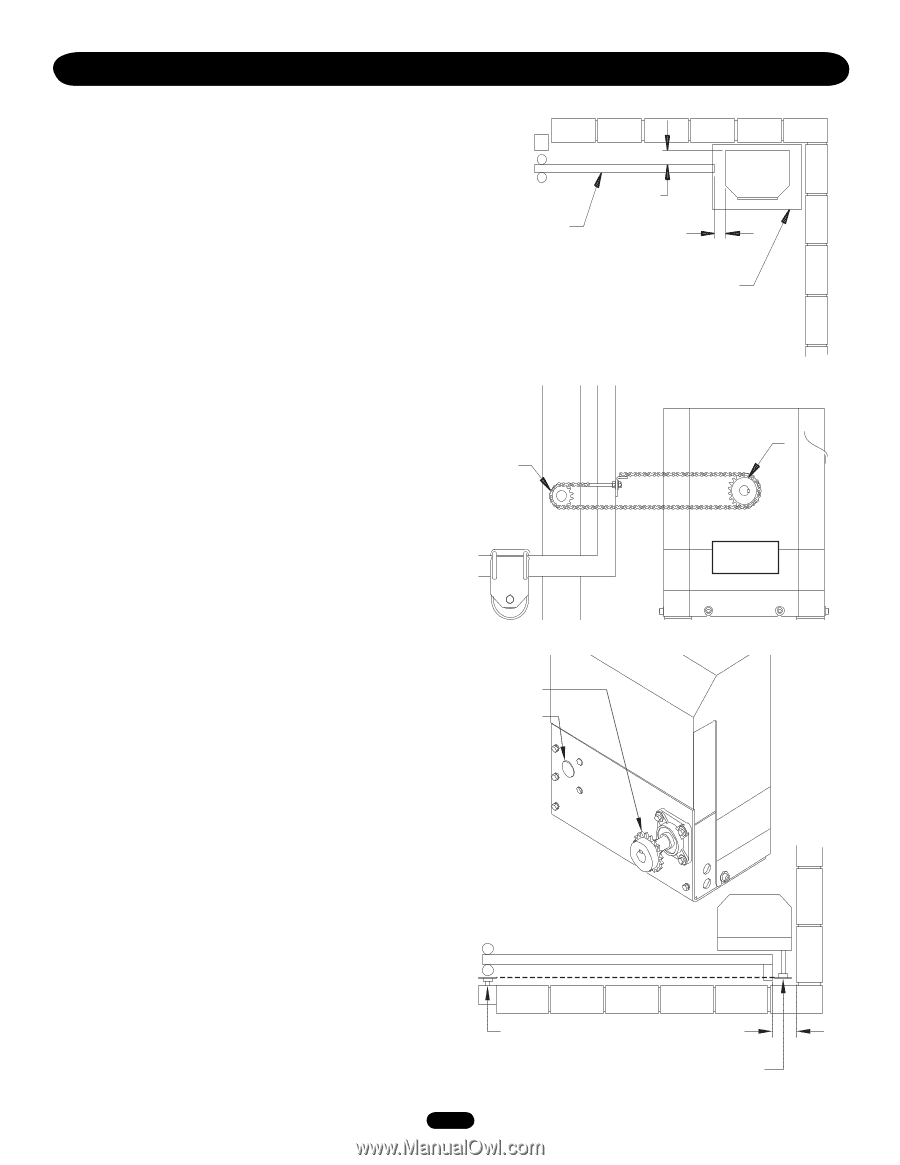
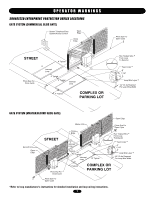
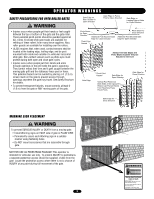
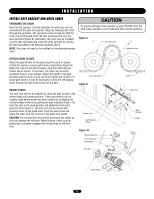
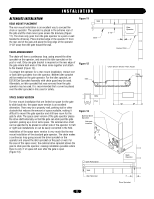
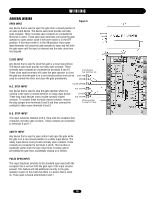
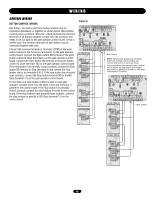
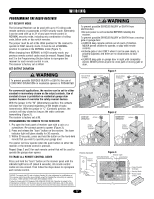
INSTALLATION ALTERNATE INSTALLATION REAR MOUNT PLACEMENT The rear mount installation is an excellent way to conceal the chain or operator. The operator is placed in the extreme rear of the gate and the chain never goes across the driveway (Figure 11). The chain only goes from the gate operator to a post or wall beside the driveway. Place shortest edge of the operator 3" from the rear end of the gate and place the long edge of the operator 3-1/2" away from the gate toward the wall. Figure 11 Wall Gate CHAIN ARRANGEMENT The chain will form a continuous loop, going around the drive sprocket on the operator, and around the idler sprocket on the post or wall. Only one gate bracket is required on the rear edge of the gate where both ends of the chain come together and attach to the bracket (Figure 12). To prepare the operator for a rear mount installation, remove one or both idler sprockets from the operator. Neither idler sprocket will be needed on the gate operator. For the idler sprocket, an ES130 End Sprocket Assembly with chain guard may be used. Alternately, an idler sprocket that was removed from the gate operator may be used. It is recommended that a cover be placed over the idler sprocket in this case for safety. Figure 12 Idler SPACE SAVER VERSION For rear mount installation that are limited on space for the gate to slide back into, the space saver version is an excellent alternative. There may be a property wall, parking stall or other obstacle that reduces the amount of space available, making it difficult to mount the gate operator and still have room for the gate to slide. The space saver version of the gate operator places the drive shaft externally so that the gate can slide past the gate operator, picking up a lot of extra space. The external drive shaft can be specified to be placed on either side of the operator for left or right side installations or can be easily converted in the field. Installation of the space saver version is very much like the rear mount installation of the standard gate operator. The chain makes a continuous loop going around the drive sprocket on the operator and around the idler sprocket on the post or wall. For the case of the space saver, the external drive sprocket allows the gate to slide past the operator, making installation possible where there is only 4" of space left over after the gate is open (Figure 13). Gate Post Figure 13 External Drive Sprocket Alternate Location Gate Fully Open Wall Idler Sprocket 12 3-1/2" Gate Operator 3" Cement Pad Chain Shown Shorter Than Actual Drive Sprocket Gate Operator 4" Drive Sprocket
-
 1
1 -
2
-
3
-
4
-
5
-
6
-
 7
7 -
 8
8 -
 9
9 -
 10
10 -
 11
11 -
 12
12 -
 13
13 -
 14
14 -
 15
15 -
 16
16 -
 17
17 -
18
-
19
-
20
-
21
-
22
-
23
-
24
-
25
-
26
-
27
-
28
-
29
-
30
-
31
-
32
 |
 |