Linksys WRT51AB User Guide - Page 16
The Router's Web-based Utility - review
 |
UPC - 745883553051
View all Linksys WRT51AB manuals
Add to My Manuals
Save this manual to your list of manuals |
Page 16 highlights
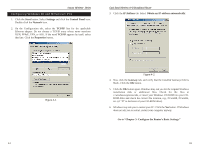
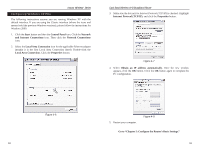
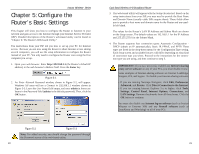
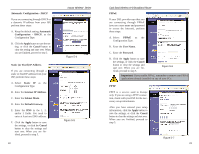
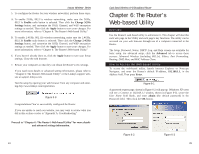
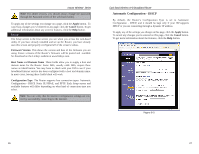
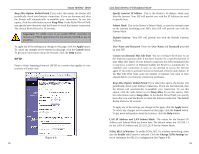
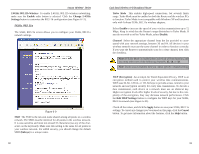
Instant Wireless® Series 5. To configure the Router for your wireless network(s), perform these steps: A. To enable 5GHz, 802.11a wireless networking, make sure the 5GHz, 802.11a Enable radio button is selected. Then click the Change 5GHz Settings button, and customize the SSID, Channel, and WEP encryption settings as needed. Then click the Apply button to save your changes. For more information, refer to "Chapter 6: The Router's Web-based Utility." B. To enable 2.4GHz, 802.11b wireless networking, make sure the 2.4GHz, 802.11b Enable radio button is selected. Then click the Change 2.4GHz Settings button, and customize the SSID, Channel, and WEP encryption settings as needed. Then click the Apply button to save your changes. For more information, refer to "Chapter 6: The Router's Web-based Utility." 6. If you haven't already done so, click the Apply button to save your Setup settings. Close the web browser. 7. Restart your computers so that they can obtain the Router's new settings. If you need more details or advanced setting information, please refer to "Chapter 6: The Router's Web-based Utility" or the Linksys support website at support.linksys.com. Test the setup by opening your web browser from any computer and entering http://www.linksys.com/registration. Figure 5-8 Congratulations! You've successfully configured the Router. If you are unable to reach our website, you may want to review what you did in this section or refer to "Appendix A: Troubleshooting." Proceed to "Chapter 6: The Router's Web-based Utility" for more details and advanced settings information. 24 Dual-Band Wireless A+B Broadband Router Chapter 6: The Router's Web-based Utility Overview Use the Router's web-based utility to administer it. This chapter will describe each web page in the Utility and each page's key functions. The utility can be accessed via your web browser through use of a computer connected to the Router. The Setup, Password, Status, DHCP, Log, and Help screens are available for basic setup. For advanced setup, click the Advanced tab to access these screens: Advanced Wireless (including 802.1x), Filters, Port Forwarding, Routing, DMZ Host, and MAC Address Clone. How to Access the Web-based Utility To access the web-based utility, launch Internet Explorer or Netscape Navigator, and enter the Router's default IP address, 192.168.1.1, in the Address field. Then press Enter. Figure 6-1 A password request page, shown in Figure 6-2 will pop up. (Windows XP users will see a Connect to 192.168.1.1 window, shown in Figure 6-3). Leave the User Name field blank, and enter admin (the default password) in the Password field. Then click the OK button. Figure 6-2 Figure 6-3 25
-
 1
1 -
2
-
3
-
4
-
5
-
6
-
7
-
8
-
9
-
10
-
 11
11 -
 12
12 -
 13
13 -
 14
14 -
 15
15 -
 16
16 -
 17
17 -
 18
18 -
 19
19 -
 20
20 -
 21
21 -
22
-
23
-
24
-
25
-
26
-
27
-
28
-
29
-
30
-
31
-
32
-
33
-
34
-
35
-
36
-
37
-
38
-
39
-
40
-
41
-
42
-
43
-
44
-
45
-
46
-
47
-
48
-
49
-
50
-
51
-
52
-
53
-
54
-
55
-
56
-
57
-
58
-
59
-
60
-
61
-
62
-
63
-
64
-
65
-
66
-
67
-
68
-
69
 |
 |
