Linksys WRT51AB User Guide - Page 33
TCP Protocol, IP Address, Enable, Apply, Cancel, Applications, External Port, Customized Applications
 |
UPC - 745883553051
View all Linksys WRT51AB manuals
Add to My Manuals
Save this manual to your list of manuals |
Page 33 highlights
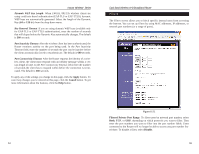
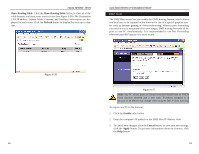
Instant Wireless® Series Port Forwarding The Port Forwarding screen sets up public services on your network, such as web servers, ftp servers, e-mail servers, or other specialized Internet applications. (Specialized Internet applications are any applications that use Internet access to perform functions such as videoconferencing or online gaming. Some Internet applications may not require any forwarding.) Figure 6-24 Note: Any PC whose port is being forwarded should have its DHCP client function disabled and a new static IP address assigned to it because its IP address may change when using the DHCP function. Customized Applications In the field provided, enter the name you wish to give each application. External Port For each application, enter the number of the External Ports (the port numbers seen by users on the Internet) in the appropriate fields. (To find out the port range, check your application's documentation.) If there is only one External Port, enter its number in both External Port fields. 58 Dual-Band Wireless A+B Broadband Router TCP Protocol Click this checkbox if you want to forward the data transmissions that use the TCP protocol. UDP Protocol Click this checkbox if you want to forward the data transmissions that use the UDP protocol. IP Address For each application, enter the IP Address of the PC running the specific application. Enable Click the Enable checkbox to enable port forwarding for the relevant application. The following table shows the typical port forwarding settings for common Internet applications. Applications FTP Telnet SMTP DNS TFTP Finger HTTP POP3 NNTP SNMP External Port 21 23 25 53 69 79 80 110 119 161 TCP Protocol Ö Ö Ö Ö Ö Ö Ö UDP Protocol Ö Ö Ö To apply any of the settings you change on this page, click the Apply button. To cancel any changes you've entered on this page, click the Cancel button. To get more information about the features, click the Help button. 59
-
 1
1 -
2
-
3
-
4
-
5
-
6
-
7
-
8
-
9
-
10
-
11
-
12
-
13
-
14
-
15
-
16
-
17
-
18
-
19
-
20
-
21
-
22
-
23
-
24
-
25
-
26
-
27
-
 28
28 -
 29
29 -
 30
30 -
 31
31 -
 32
32 -
 33
33 -
 34
34 -
 35
35 -
 36
36 -
 37
37 -
 38
38 -
39
-
40
-
41
-
42
-
43
-
44
-
45
-
46
-
47
-
48
-
49
-
50
-
51
-
52
-
53
-
54
-
55
-
56
-
57
-
58
-
59
-
60
-
61
-
62
-
63
-
64
-
65
-
66
-
67
-
68
-
69
 |
 |
