Linksys WRT54GP2 User Guide - Page 34
through your local network. For each route, the Destination LAN IP address, Subnet Mask
 |
UPC - 745883559336
View all Linksys WRT54GP2 manuals
Add to My Manuals
Save this manual to your list of manuals |
Page 34 highlights
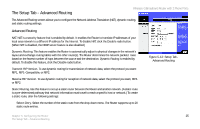
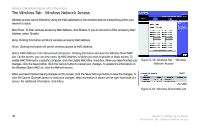
Wireless-G Broadband Router with 2 Phone Ports Enter Route Name. Enter a name for the static route, using a maximum of 25 alphanumeric characters. Destination LAN IP. The Destination LAN IP Address is the address of the remote network or host to which you want to assign a static route. Enter the IP address of the host for which you wish to create a static route. Subnet Mask. The Subnet Mask determines which portion of a Destination IP address is the network portion, and which portion is the host portion. Gateway. This is the IP address of the gateway device that allows for contact between the Router and the remote network or host. Hop Count. This determines the maximum number of steps between network nodes that data packets will travel. A node is any device on the network, such as PCs, print servers, routers, etc. Interface. Select Local or Internet, depending on the location of the static route's final destination. Delete Entry. If you need to delete a route, select its number from the drop-down menu, and click the Delete Entry button. Show Routing Table. Click the Show Routing Table button to open a screen displaying how data is routed through your local network. For each route, the Destination LAN IP address, Subnet Mask, Default Gateway, Hop Count, and Interface are displayed. Click the Refresh button to update the information. Figure 5-13: Routing Table Entry List When you have finished making changes to this screen, click the Save Settings button to save the changes, or click the Cancel Changes button to undo your changes. Help information is shown on the right-hand side of a screen. For additional information, click More. 26 Chapter 5: Configuring the Router The Setup Tab - Advanced Routing
-
 1
1 -
2
-
3
-
4
-
5
-
6
-
7
-
8
-
9
-
10
-
11
-
12
-
13
-
14
-
15
-
16
-
17
-
18
-
19
-
20
-
21
-
22
-
23
-
24
-
25
-
26
-
27
-
28
-
 29
29 -
 30
30 -
 31
31 -
 32
32 -
 33
33 -
 34
34 -
 35
35 -
 36
36 -
 37
37 -
 38
38 -
 39
39 -
40
-
41
-
42
-
43
-
44
-
45
-
46
-
47
-
48
-
49
-
50
-
51
-
52
-
53
-
54
-
55
-
56
-
57
-
58
-
59
-
60
-
61
-
62
-
63
-
64
-
65
-
66
-
67
-
68
-
69
-
70
-
71
-
72
-
73
-
74
-
75
-
76
-
77
-
78
-
79
-
80
-
81
-
82
-
83
-
84
-
85
-
86
-
87
-
88
-
89
-
90
-
91
-
92
-
93
-
94
-
95
-
96
-
97
-
98
-
99
-
100
-
101
-
102
-
103
-
104
-
105
-
106
-
107
-
108
-
109
-
110
 |
 |
