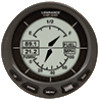
Lowrance LMF-400 Installation and Operation Manual - Page 16
Basic Menu, s, Viewing s Screen Rotation - reset
 |
View all Lowrance LMF-400 manuals
Add to My Manuals
Save this manual to your list of manuals |
Page 16 highlights
2. Use the UP and DOWN keys to select the engine-tank configuration that applies to your vessel and press ENTER. After setting the engine/tank configuration, the Tank Size menu will appear with up to three options (Port Tank, Center Tank and Starboard Tank), depending on the engine tank configuration you chose. (If you selected one tank during Boat Setup, you will be taken directly to the Setting Tank Size Window in Step 4.) 3. Select the desired tank and press ENTER, which will open the Setting Tank Size window. 4. Use the UP and DOWN keys to input the number of gallons the tank will hold and press ENTER. Press EXIT and repeat steps 3 and 4 for each of the remaining tanks. 5. After all tanks on your vessel have been set up, press EXIT repeatedly to get back to the main display. NOTE: If you chose the wrong engine-tank configuration during Boat Setup, you will have to reset your engine-tank configuration to get back to Boat Setup. To reset engine-tank configuration, see enginetank configuration instructions on page 21. Basic Menu The LMF-400 has 13 page screens that can be customized with the data of your choosing. Each page has its own basic menu. Basic menus vary from page to page, but all contain these standard menu options: Pages, Screen, Audio Setup and System Setup. Pages that can be customized also include Customize on the basic menu. Pages Your unit can display up to 16 page screens. You could, for example, add 12 different pages then add some pages more than once, customizing them differently each time. Viewing Pages (Page Screen Rotation) The Page Screen Rotation consists of multiple pages that have been set up for display. Once pages have been added to the page screen rotation, they can be set to scroll across the screen automatically or manually. Use the ENTER and EXIT keys to manually scroll pages across the screen. Pressing the ENTER key moves the scroll in one direction. Pushing the EXIT key moves the scroll in the other direction. You will use the Page Scrolling feature to set up pages for automatic scrolling. See page 14 for more information about Page Scrolling. 10
-
 1
1 -
2
-
3
-
4
-
5
-
6
-
7
-
8
-
9
-
10
-
 11
11 -
 12
12 -
 13
13 -
 14
14 -
 15
15 -
 16
16 -
 17
17 -
 18
18 -
 19
19 -
 20
20 -
 21
21 -
22
-
23
-
24
-
25
-
26
-
27
-
28
-
29
-
30
-
31
-
32
-
33
-
34
-
35
-
36
-
37
-
38
-
39
-
40
-
41
-
42
-
43
-
44
-
45
-
46
-
47
-
48
-
49
-
50
-
51
-
52
-
53
-
54
-
55
-
56
-
57
-
58
-
59
-
60
-
61
-
62
-
63
-
64
-
65
-
66
-
67
-
68
-
69
-
70
-
71
-
72
 |
 |
