MSI 915P COMBO-FR User Guide - Page 85
Introduction to Intel ICH6R SATA RAID
 |
UPC - 816909005899
View all MSI 915P COMBO-FR manuals
Add to My Manuals
Save this manual to your list of manuals |
Page 85 highlights
Introduction to Intel ICH6R SATA RAID After pressing the and keys simultaneously, the following window will appear: (1) Create RAID Volume 1. Select option 1 "Create RAID Volume" and press key. The following screen appears. Then in the Name field, specify a RAID Volume name and then press the or key to go to the next field. 2. Use the arrow keys to select the RAID level (RAID0 or RAID1) best suited to your usage model in RAID Level. 5-3
-
 1
1 -
2
-
3
-
4
-
5
-
6
-
7
-
8
-
9
-
10
-
11
-
12
-
13
-
14
-
15
-
16
-
17
-
18
-
19
-
20
-
21
-
22
-
23
-
24
-
25
-
26
-
27
-
28
-
29
-
30
-
31
-
32
-
33
-
34
-
35
-
36
-
37
-
38
-
39
-
40
-
41
-
42
-
43
-
44
-
45
-
46
-
47
-
48
-
49
-
50
-
51
-
52
-
53
-
54
-
55
-
56
-
57
-
58
-
59
-
60
-
61
-
62
-
63
-
64
-
65
-
66
-
67
-
68
-
69
-
70
-
71
-
72
-
73
-
74
-
75
-
76
-
77
-
78
-
79
-
 80
80 -
 81
81 -
 82
82 -
 83
83 -
 84
84 -
 85
85 -
 86
86 -
 87
87 -
 88
88 -
 89
89 -
 90
90 -
91
-
92
-
93
-
94
-
95
-
96
-
97
-
98
-
99
-
100
-
101
-
102
-
103
-
104
-
105
-
106
-
107
-
108
-
109
-
110
-
111
-
112
-
113
-
114
-
115
-
116
-
117
-
118
-
119
-
120
-
121
-
122
-
123
-
124
-
125
-
126
-
127
-
128
-
129
-
130
-
131
-
132
-
133
 |
 |

5-3
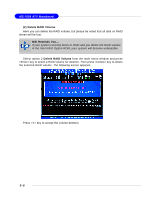
Introduction to Intel ICH6R SATA RAID
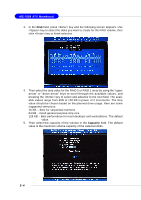
After pressing the <Ctrl> and <I> keys simultaneously, the following window
will appear:
(1) Create RAID Volume
1.
Select option 1 “Create RAID Volume” and press <Enter> key. The following
screen appears. Then in the
Name
field, specify a RAID Volume name and
then press the <TAB> or <Enter> key to go to the next field.
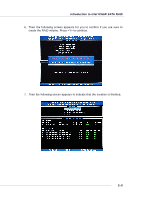
2.
Use the arrow keys to select the RAID level (RAID0 or RAID1) best suited to
your usage model in
RAID Level
.