MSI K7D MASTER User Guide - Page 20
CPU Installation Procedures
 |
UPC - 816909002010
View all MSI K7D MASTER manuals
Add to My Manuals
Save this manual to your list of manuals |
Page 20 highlights
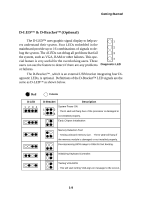
Hardware Setup CPU Installation Procedures 1. Pull the lever sideways away from the socket. Then, raise the lever up to a 90-degree angle. Sliding Plate Open Lever 2. Look for the cut edge. The cut edge should point towards the lever pivot. The CPU will only fit in the correct orientation. Cut edge 3. Hold the CPU down firmly, and then close the lever to Close Lever complete the installation. Overheating will seriously damage the CPU and system, WARNING! always make sure the cooling fan can work properly to protect the CPU from overheating. 2-3
-
 1
1 -
2
-
3
-
4
-
5
-
6
-
7
-
8
-
9
-
10
-
11
-
12
-
13
-
14
-
 15
15 -
 16
16 -
 17
17 -
 18
18 -
 19
19 -
 20
20 -
 21
21 -
 22
22 -
 23
23 -
 24
24 -
 25
25 -
26
-
27
-
28
-
29
-
30
-
31
-
32
-
33
-
34
-
35
-
36
-
37
-
38
-
39
-
40
-
41
-
42
-
43
-
44
-
45
-
46
-
47
-
48
-
49
-
50
-
51
-
52
-
53
-
54
-
55
-
56
-
57
-
58
-
59
-
60
-
61
-
62
-
63
-
64
-
65
-
66
-
67
-
68
-
69
-
70
-
71
-
72
-
73
-
74
-
75
-
76
-
77
-
78
-
79
-
80
-
81
-
82
-
83
-
84
-
85
-
86
-
87
-
88
-
89
-
90
-
91
-
92
-
93
-
94
-
95
-
96
-
97
-
98
-
99
-
100
-
101
-
102
-
103
-
104
-
105
-
106
-
107
-
108
-
109
-
110
-
111
-
112
 |
 |

2-3
Hardware Setup
1.
Pull the lever sideways away
from the socket.
Then, raise
the lever up to a 90-degree
angle.
2.
Look for the cut edge.
The
cut edge should point
towards the lever pivot.
The
CPU will only fit in the
correct orientation.
3.
Hold the CPU down firmly,
and then close the lever to
complete the installation.
CPU Installation Procedures
Open Lever
Cut edge
Sliding
Plate
Close
Lever
Overheating will seriously damage the CPU and system,
always make sure the cooling fan can work properly to
protect the CPU from overheating.
WARNING!