MSI M610 User Manual
MSI M610 Manual
 |
View all MSI M610 manuals
Add to My Manuals
Save this manual to your list of manuals |
MSI M610 manual content summary:
- MSI M610 | User Manual - Page 1
Getting Started Congratulations on purchasing the MSI M610 Series Notebook PC! This first chapter provides a general introduction of your Notebook PC, introducing you to the hardware components. Read on to learn more about the powerful features and multimedia function of your new Notebook PC. 2 - 1 - MSI M610 | User Manual - Page 2
M610 Series Notebook PC 1.1 Before You Begin Unpacking First, unpack the shipping carton and check all items ship the unit in the future. The package should contain the following items: One Notebook PC Recovery CDs Warranty Card High-capacity Li-Ion battery pack AC adapter and power cord 1 - 2 - MSI M610 | User Manual - Page 3
Support. Your Notebook PC is equipped with one of the latest CPU (central processing unit) namely the AMD® Mobile Athlon XP-M for excellent system performance and ultimate mobile function. Integrated Wireless LAN Communication Ports. Support 56K Fax/MODEM (Cable size at , video CD, audio CD, MP3 with - MSI M610 | User Manual - Page 4
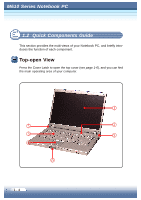
M610 Series Notebook PC 1.2 Quick Components Guide This section provides the multi-views of your Notebook PC, and briefly introduces the function of each component. Top-open View Press the Cover Latch to open the top cover (see page 1-6), and you - MSI M610 | User Manual - Page 5
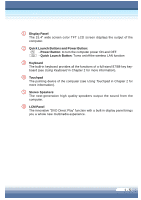
computer. Quick Launch Buttons and Power Button: - Power Button: to turn the computer power ON and OFF - Quick Launch Button: Turns on/off the wireless LAN function Keyboard The built-in keyboard provides all the functions of a full-sized 87/88-key keyboard (see Using Keyboard in Chapter 2 for more - MSI M610 | User Manual - Page 6
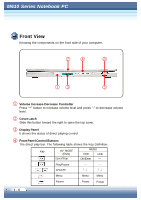
M610 Series Notebook PC Front View Knowing the components on the front side of your computer. Volume Increase-Decrease Controller Press "+" button to increase volume level and press "-" - MSI M610 | User Manual - Page 7
Consumer Infrared It is used to receive the W ireless Remote Control's signal. Audio Port Connectors - Line Out is used for speakers or headphones; - MIC is used for microphones. MIC Line Out 1 - 7 - MSI M610 | User Manual - Page 8
system fully on; OFF - system off. - Wireless LAN (Green): ON - wireless LAN enabled; OFF - wireless LAN disabled. PC Card Slot The computer provides a PC card slot to support one Type-II PC card for expansion functions, such as a second LAN or WLAN card, modem card, memory card, etc. Vent The vent - MSI M610 | User Manual - Page 9
: The USB 2.0 ports allow you to connect USB-interface peripheral devices, such as the mouse, keyboard, modem, external hard disk module, printer, and more. There are two USB ports on the right side of your laptop. VGA Port The 15-pin D-sub VGA port allows you to connect an external monitor or - MSI M610 | User Manual - Page 10
M610 Series Notebook PC Left-side View Knowing the components on the left side of is used to connect a LAN cable for network connection. RJ-11 Connector The computer provides a built-in modem that allows you to connect an RJ-11 telephone line through this connector. W ith the modem, you can make a - MSI M610 | User Manual - Page 11
Optical Storage Device A slim combo DVD+CD-RW or DVD+/-RW drive is available in the computer, depending on the model you purchased. The optical device allows you to use the CD/DVD disc for installing software, accessing data, and playing music/movie on the computer as well as burning CDs or DVDs. 1 - MSI M610 | User Manual - Page 12
M610 Series Notebook PC Bottom View Carefully put the computer upside down, and you can find the core components of the computer. Battery Pack To of the computer. Mini PCI and Memory Compartment The built-in wireless LAN card of the computer is installed in this compartment. This compartment also - MSI M610 | User Manual - Page 13
connect the AC adapter and use the AC power. W hen the AC adapter is connected, the battery is charged immediately. Please NOTE that the AC adapter included in the package is correct for your Notebook PC; using other adapter model may damage the computer or other devices on the computer. Connecting - MSI M610 | User Manual - Page 14
M610 Series Notebook PC Disconnecting the AC Power When you disconnect the AC adapter, of the cord, never pull the cord. 1. The AC adapter included in the package is correct for your Notebook PC; using a different adapter will damage your computer. 2. When unplugging the power cord, always hold the - MSI M610 | User Manual - Page 15
system (such as Microsoft W indows XP in this manual) should start, and you can start to work with your Notebook PC! Power-On Self Test The POST (Power keyboard to see whether they are properly connected and operating. If problems are found during booting, these routines alert the user by sounding - MSI M610 | User Manual - Page 16
M610 Series Notebook PC Turning Off the Computer In Windows, always use the "Shut Down" command to turn off the computer. This is the normal operating procedure that can prevent system problems. 1. Click Start (Œ) from the taskbar, and then select the Turn Off Computer option (•). 2. Click Turn Off - MSI M610 | User Manual - Page 17
the drive. 3. Gently tilt down the top cover when you are closing the cover, and make sure that the cover latches click into place securely. MSI reminds you 1 - 17 - MSI M610 | User Manual - Page 18
Basics of Using Notebook PC This chapter introduces the operating basics for your Notebook PC, including the use of keyboard, touchpad, LCD panel, hard disk drive, and optical storage device. It also includes the advanced features such as DVD Direct Play and communication functions. 2 - 1 - MSI M610 | User Manual - Page 19
positioned (about 90-degree) when operating. Put your hands on the desk naturally to support your wrists. Adjust the angle/position of the LCD panel, so that you can have the optimal view. Avoid using your Notebook PC in the space where may cause your discomfort (such as on the bed). The - MSI M610 | User Manual - Page 20
's height. Setting up your work environment Have a Good Work Habit Having good work habits are important if you have to work with your Notebook PC for long periods of time. Otherwise, you may experience discomfort or injury. Please keep the following tips in mind. Change your posture frequently - MSI M610 | User Manual - Page 21
M610 Series Notebook PC 2.2 Knowing the Keyboard The Notebook PC's keyboard provides all the functions of a full-sized 87/88key keyboard, and an additional [Fn] key for specific functions on the computer. How to use keyboard can divide into four categories: Typewriter keys, Cursor keys, Numeric keys - MSI M610 | User Manual - Page 22
Typewriter Keys The Typewriter Keys The function of the Typewriter keys is the major function of the keyboard, which is similar to the keys on a typewriter. It also provides several keys for special purposes, such as the [Ctrl], [Alt], and [Esc] keys. W hen the lock keys are pressed, the - MSI M610 | User Manual - Page 23
M610 Series Notebook PC Cursor Keys The keyboard provides four cursor (arrow) keys and [Home], [PgUp], [PgDn], [End] keys at the lower right corner, which are used to - MSI M610 | User Manual - Page 24
Lock is activated, you can use these numeric keys to enter numbers and calculations. The Numeric Keys The numeric keys may lose function in some specific software applications. If so, you may use the typewriter keys to input the numbers, or connect an external numeric keypad - MSI M610 | User Manual - Page 25
M610 Series Notebook PC Function Keys Windows Keys You can find the Windows Logo key ( ) and one Application Logo key ( ) on the keyboard, which are used to perform W indows-specific functions, such as opening the Start menu and launching the shortcut menu. For more information of the two keys, - MSI M610 | User Manual - Page 26
2.3 Knowing the Touchpad The touchpad integrated in your computer is a pointing device that compatible with the standard mouse, allowing you to control the computer by pointing the location of the cursor on the screen and making selection with its two buttons. The Touchpad Cursor Movement Area The - MSI M610 | User Manual - Page 27
M610 Series Notebook PC Using the Touchpad The following table and diagrams provide some left button to select. This procedure, called as "point and click", is the basics of operating your Notebook PC. Unlike the traditional pointing device such as the mouse, the whole touchpad can act as a left - MSI M610 | User Manual - Page 28
the touchpad, keep your fingers and the touchpad clean and dry for optimal performance. Do not use excessive force when tapping on the touch pad. MSI reminds you 2 - 11 - MSI M610 | User Manual - Page 29
M610 Series Notebook PC Configuring the Touchpad You can customize the pointing device to on the screen. To configure the touchpad, you can use the standard Microsoft or IBM PS/2 driver in your Windows operating system. The Mouse Properties in Control Panel allows you to change the configuration. - MSI M610 | User Manual - Page 30
dual format recorder, allowing you to record both the -R/RW and +R/RW formats in addition to providing the same support as the Combo DVD+CD-RW drive. 1. The optical storage devices are classified as a Class 1 Laser radiation exposure. 2. Do not touch the lens inside the drive. MSI reminds you 2 - 13 - MSI M610 | User Manual - Page 31
M610 Series Notebook PC Inserting the CD The following instruction describes the general procedure when operating the optical storage device. 1. Confirm that the computer is turned on. 2. Press the Eject Button on the drive's panel (Œ), - MSI M610 | User Manual - Page 32
lift it up from the tray. 4. Push the tray back into the drive. Releasing the CD Manually If you cannot release the CD tray by pressing the Eject Button, you can release it manually: 1. Confirm that the computer is turned off. 2. Insert a pointed object (e.g. a straightened clip) into the Emergency - MSI M610 | User Manual - Page 33
M610 Series Notebook PC 2.5 The Hard Disk Drive Your computer is equipped with a 2.5-inch IDE (Integrated Drive Electronics) hard disk drive. The the computer is turned on. The replacement of hard disk drive should be done by an authorized retailer or service representative. MSI reminds you 2 - 16 - MSI M610 | User Manual - Page 34
2.6 Using the Video Function Configuring the Display Settings Your Notebook PC has been set to a default resolution and colors when shipping: Now, you can change the settings to meet your needs through the operating system. - MSI M610 | User Manual - Page 35
M610 Series Notebook PC Changing the Display Output Device 1. Click Start from the taskbar, and select Control Panel to open the Control Panel window. 2. Double-click the Display - MSI M610 | User Manual - Page 36
2.7 Using the Audio Function Connecting Audio Devices Your Notebook PC is equipped with an audio subsystem. However, you can also connect the external audio devices for a better audio quality when enjoying your music and movie on the computer. The audio-out jack allows you to connect the speakers - MSI M610 | User Manual - Page 37
M610 Series Notebook PC 2.8 DVD Direct Play Function Control Key Function Control Key function in Direct Play mode LCM Vol. down Vol. up Eject & Stop Backward Play & Pause - MSI M610 | User Manual - Page 38
Key Definition Remote Control MENU 00 03 CH-/> 08 VOL+ 0B VOLOD Remote control button definition in any mode ITEM AV_MODE MENU (DVD) DVD LCD PLAY/PAUSE PLAY/PAUSE OK/ENTER OK STOP STOP/EJECT --- --- - MSI M610 | User Manual - Page 39
M610 Series Notebook PC Direct play key definition VOL- VOL+ CH- PLAY/ CH+ LCM STOP -/ +/ PAUSE MENU POWER Direct play key definition in any mode ITEM PLAY/PAUSE - MSI M610 | User Manual - Page 40
Using the Software Applications Provided with your Notebook PC, is a Recovery CD containing useful software applications and required drivers for your system in the even you need to restore your operating system easily and quickly. - MSI M610 | User Manual - Page 41
into the CD/DVD-ROM drive. 3. Choose to restore the operating system from the Recovery CD when prompted. Then, follow the on-screen instructions to complete the procedures. The system will reboot automatically when completed. 4. The system will resume the factory default settings after reboot. 3 - 2 - MSI M610 | User Manual - Page 42
Power Management This chapter shows you how to manage the power effectively, in order to maintain the longest battery life while using your computer. 2 - 1 - MSI M610 | User Manual - Page 43
battery in the package, and it can operate either on the battery's power or AC power. The AC Adapter The AC adapter included in your Notebook computer. Also, it can charge the battery pack when connected. The AC adapter in the package is correct for your Notebook PC; using a different adapter will - MSI M610 | User Manual - Page 44
the actual use of your computer. Charging the Battery The battery pack can be charged while it is installed in the Notebook PC. Connect the AC adapter to the computer, and it starts to charge the battery automatically. Please charge your battery in a normal temperature environment, ranging from 0OC - MSI M610 | User Manual - Page 45
take longer (3~4 hours) to fully charge the battery. 2. The Power Meter only provides an estimated value of the battery power. The operating time allowed depends on the actual use of your computer. 3. For more instructions on using and caring the battery pack, please refer to Taking Care of Your - MSI M610 | User Manual - Page 46
the battery pack 1. Insert the battery pack into the compartment. 2. Slide the battery cover into place and then push downwards to secure the battery pack. 1. Do not try to disassemble the battery pack. 2. Please follow your local laws and regulations to dispose your used battery pack. MSI reminds - MSI M610 | User Manual - Page 47
Windows XP operating system supports ACPI (Advanced Configuration This is helpful to provide you with the maximum battery usage or optimal system performance. Power Options In most appropriate configuration for your computer. The following instructions describe the Power Options setup procedures: 1. - MSI M610 | User Manual - Page 48
5. Under the Alarms tab, you can activate the battery alarm function by checking the options in Low battery alarm and Critical battery alarm fields. Once activated, adjust the slide bar to set up the low or critical power level (the default setting is 10%). Check this option - MSI M610 | User Manual - Page 49
your computer to enter suspend mode immediately. 2. When you are alarmed for low battery power, save your data as soon as possible. If available, connect the AC Do not use a card reader or other storage devices when the battery power is low. The access time may be longer than the time you - MSI M610 | User Manual - Page 50
7. Under the Hibernate tab, you can activate Hibernation by checking the Enable hibernation option. Check this option Hibernation is a very useful function of the Windows operating system. When you activate this function, the current and programs are saved to the hard disk drive. Therefore, you do - MSI M610 | User Manual - Page 51
devices, you should configure the system through BIOS Setup. This chapter provides the information of BIOS Setup Utility, and guides you to configure the system for optimal use. For better Notebook PC performance, the BIOS will be continuously updated. This chapter is for reference only. 2 - 1 - MSI M610 | User Manual - Page 52
options in this chapter are for your references only. The actual setting screens and options on your computer may be different because of BIOS update. MSI reminds you 5 - 2 - MSI M610 | User Manual - Page 53
Control Keys You can use only the keyboard to control the cursor in the BIOS Setup Utility. Move the cursor left to select one menu title. Move the cursor right to select one menu title. Move the cursor up to select one item under the menu title. Move the cursor down to select one item under the - MSI M610 | User Manual - Page 54
, IDE, SuperIO and USB special enhanced configuration. Boot Settings Use this menu to set the Boot functions, including Quick Boot, Quiet Boot, PXE support and 1st Boot Device & 2nd Boot Device sequences. Power Management Setup Use this menu to specify your settings for power management, including - MSI M610 | User Manual - Page 55
" vary depending on the bootable devices you have installed. For example, if you did not install a floppy drive, the setting "Floppy" does not show up. MSI reminds you 5 - 5 - MSI M610 | User Manual - Page 56
M6621000 SSeerriieessNNootteebbooookk PPCC 5.3 System Overview AMIBIOS This menu first shows AMIBIOS information including Version, Build Date, VGA version and EC version. Processor The second field shows Processor Type and Speed. System Memory The third field shows information of System Memory - MSI M610 | User Manual - Page 57
Second The value is set from 00 to 59. It won't make any change to the value of hour and minute by increasing or decreasing value of second. System Date This allows you to set the system date you want (usually the current date). The status is . Use [ENTER], [TAB] or [ - MSI M610 | User Manual - Page 58
M6621000 SSeerriieessNNootteebbooookk PPCC 5.4 Security Settings Security Settings Press and the following sub-menu appears. It first shows the status of Password Installation. It will show "Not Installed" if there is no password installed. Change Supervisor Password To install or change - MSI M610 | User Manual - Page 59
Disabled] displays normal POST messages. [Enabled] displays OEM Logo Instead of POST messages. Default setting is [Enabled]. PXE support Select [Enabled] to activate PXE support. Default setting is [Disabled]. 1st Boot Device It specifies the boot sequence from the available devices. There are three - MSI M610 | User Manual - Page 60
M6621000 SSeerriieessNNootteebbooookk PPCC 5.6 Exit Options Exit Options Press and the following sub-menu appears. Save Changes and Exit Exit system with saving the changes. Discard Changes and Exit Exit system setup without saving any change. Press Enter or ESC can set up this option. - MSI M610 | User Manual - Page 61
Expanding and Upgrading You can expand the capabilities of your Notebook PC and upgrade your system as necessary. This chapter introduces the installation of optional devices/components for your Notebook PC. 2 - 1 - MSI M610 | User Manual - Page 62
) ports on the rear panel of the computer allow you to connect peripheral devices. For the information of these I/O ports, please refer to Quick Components Guide in Chapter 1. Connecting the Peripheral Devices 6 - 2 - MSI M610 | User Manual - Page 63
allows you to use a TV to display the computer images for your specific purpose, such as enjoying your DVD movies. To connect a TV, you as the mouse, keyboard, speakers, modem, external hard disk module, printer, and more. The USB-standard interface supports "plugand-play" technology, so that - MSI M610 | User Manual - Page 64
a network connection. This built-in 10/100 Base-T LAN module supports data transfer rate up to 100Mbps. The following diagram describes the basic connection in a network environment. For more instructions or detailed steps on connecting to the LAN, please ask your MIS staff or network manager for - MSI M610 | User Manual - Page 65
size has to be at least 26 or above. The following diagram provides the basic connection of modem. For more instructions or detailed steps on dialing-up through the modem, please ask your MIS staff or Internet service provider (ISP) for help. 1. To reduce the risk of fire, use only No. 26 AWG or - MSI M610 | User Manual - Page 66
LAN/WLAN card, modem card, and memory card. The following instruction provides you with a basic installation for the PC card, including how to install and remove it. For more information, please refer to the manual of your PC card. Installing the PC card 1. Locate the PC card slot on your notebook - MSI M610 | User Manual - Page 67
of the slot (•). 1. Do not hold the "golden finger" when installing the PC card; otherwise, it may cause interference or damage to the PC card. MSI reminds you 6 - 7 - MSI M610 | User Manual - Page 68
M6621000SSeerrieiessNNootetebbooookkPPCC 6.2 Safely Remove Hardware If you connect any peripheral device to your system, the Safely Remove Hardware icon ( ) will appear on the taskbar. Double-click the icon to bring up the Safely Remove Hardware dialog box. You can see all connected peripheral - MSI M610 | User Manual - Page 69
6.3 Upgrading your System You can upgrade your Notebook PC through the following ways: 1) adding memory to a maximum of 2GB. 2) replacing the hard disk drive. 6 - 9 - MSI M610 | User Manual - Page 70
Caring Your Notebook PC To ensure trouble-free operation and reduce any hazardous risk while working, you should take good care of your computer. This chapter provides the basic guidelines to protect your computer and critical data. 2 - 1 - MSI M610 | User Manual - Page 71
M6621000 SSeerriieessNNootteebbooookkPPCC 7.1 Protecting Your Notebook PC W e understand your Notebook PC is a valuable investment and how your important data stored in your system means to you. Therefore, following are suggestions to protect your system. Locking - MSI M610 | User Manual - Page 72
in the BIOS. To set up the password, please refer to the instruction in Chapter 5. Operating System Password In addition to the boot password, For more information on setting the system password, please refer to the manual or online help of your operating system. 1. Remember the password once they - MSI M610 | User Manual - Page 73
the software. To know more about the computer virus and the Anti Virus application, please refer to the document or online help of the software. MSI reminds you 7 - 4 - MSI M610 | User Manual - Page 74
to meetings for long-time use. If the meeting time is longer than 4 hours, you are recommended to prepare a second battery pack or an AC adapter. Store your Notebook PC in a cool and dry place if you cannot bring it with you. Long-time exposure to temperature and humidity fluctuation may cause - MSI M610 | User Manual - Page 75
M6621000 SSeerriieessNNootteebbooookkPPCC 7.3 Taking Care of Your Computer The guidelines provided in this section are basic good practices to care for your computer. Placing and Operating Your Computer Use the computer in a proper environment where the temperature is between 10OC (50OF) and 35OC ( - MSI M610 | User Manual - Page 76
incorrectly may present a risk of fire or explosion, which could cause serious injury. Only replace the main battery pack with the same or equivalent type of battery. Do not disassemble, short-circuit, or incinerate batteries or expose them to temperatures above +60OC (+140OF). Do not tamper with - MSI M610 | User Manual - Page 77
AC adapter to the system whenever possible. Charging the Battery Pack The battery pack can be charged while it is installed in the Notebook PC. Please NOTE that the following with respect to charging or changing the battery pack: If a charged battery pack is not available, save your work and close - MSI M610 | User Manual - Page 78
charged. 2. The Power Meter only provides an estimated value of the battery power. The operating time allowed depends on the actual use of your computer. 3. For more instructions on using and caring the battery pack, please refer to Taking Care of Your Computer in Chapter 7. MSI reminds you 7 - 9
-
 1
1 -
 2
2 -
 3
3 -
 4
4 -
 5
5 -
 6
6 -
 7
7 -
8
-
9
-
10
-
11
-
12
-
13
-
14
-
15
-
16
-
17
-
18
-
19
-
20
-
21
-
22
-
23
-
24
-
25
-
26
-
27
-
28
-
29
-
30
-
31
-
32
-
33
-
34
-
35
-
36
-
37
-
38
-
39
-
40
-
41
-
42
-
43
-
44
-
45
-
46
-
47
-
48
-
49
-
50
-
51
-
52
-
53
-
54
-
55
-
56
-
57
-
58
-
59
-
60
-
61
-
62
-
63
-
64
-
65
-
66
-
67
-
68
-
69
-
70
-
71
-
72
-
73
-
74
-
75
-
76
-
77
-
78
 |
 |

2 - 1
Congratulations on purchasing the MSI M610 Series Notebook
PC!
This first chapter provides a general introduction of your Note-
book PC, introducing you to the hardware components. Read
on to learn more about the powerful features and multimedia
function of your new Notebook PC.
Getting Started