Maytag MFI2266AES Service Manual - Page 15
Refrigerant Charge
 |
View all Maytag MFI2266AES manuals
Add to My Manuals
Save this manual to your list of manuals |
Page 15 highlights
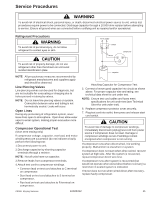
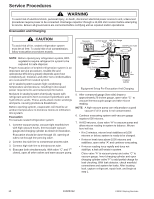
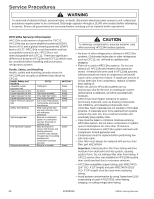
Service Procedures ! WARNING To avoid risk of electrical shock, personal injury, or death, disconnect electrical power source to unit, unless test procedures require power to be connected. Discharge capacitor through a 10,000 ohm resistor before attempting to service. Ensure all ground wires are connected before certifying unit as repaired and/or operational. Charging NOTE: Do not use captured or recycled refrigerant in units. Captured or recycled refrigerant voids any warranty. NOTE: Charge system with exact amount of refrigerant. Refer to unit serial plate for correct refrigerant charge. Inaccurately charged system will cause future problems. Refrigerant Charge Refrigerant charge in all capillary tube systems is critical and exact amount is required for proper performance. Factory charges are shown on serial plate. NOTE: Do not use refrigerant other than shown on serial plate. To charge system: 1. Close valves "A" to vacuum pump and "C" to vacuum gauge and "E" to low side manifold gauge. 2. Set scale on dial-a-charge cylinder for corresponding HFC134a pressure reading. 3. Open valve "F" to charging cylinder and let exact amount of refrigerant flow from cylinder into system. Close valve. Low side gauge pressure should rise shortly after opening charging cylinder valve as system pressure equalizes through capillary tube. If pressure does not equalize, a restriction typically exists at capillary/drier braze joint. 4. If pressure equalizes, open valve "E" to low side manifold gauge and pinch off high side drier process tube. 5. Start compressor and draw remaining refrigerant from charging hoses and manifold into compressor through compressor process tube. 6. To check high side pinch-off drier process tube. Close valve "D" to high side gauge. If high side pressure rises, repeat high side pinch-off and open valve "D". Repeat until high side pinch-off does not leak. 7. Pinch-off compressor process tube and remove charging hose. Braze stub closed while compressor is operating. 8. Disconnect power. Remove charging hose and braze high side drier process tube closed. 9. Recheck for refrigerant leaks. ©2006 Maytag Services 16026312 15
-
 1
1 -
2
-
3
-
4
-
5
-
6
-
7
-
8
-
9
-
 10
10 -
 11
11 -
 12
12 -
 13
13 -
 14
14 -
 15
15 -
 16
16 -
 17
17 -
 18
18 -
 19
19 -
 20
20 -
21
-
22
-
23
-
24
-
25
-
26
-
27
-
28
-
29
-
30
-
31
-
32
-
33
-
34
-
35
-
36
-
37
-
38
-
39
-
40
-
41
-
42
-
43
-
44
-
45
-
46
-
47
-
48
-
49
-
50
-
51
-
52
-
53
-
54
-
55
-
56
-
57
-
58
-
59
-
60
-
61
-
62
-
63
-
64
-
65
-
66
-
67
-
68
-
69
-
70
-
71
 |
 |