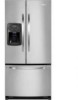
Maytag MFI2266AES Service Manual - Page 48
Handles
 |
View all Maytag MFI2266AES manuals
Add to My Manuals
Save this manual to your list of manuals |
Page 48 highlights
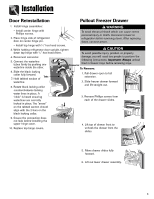
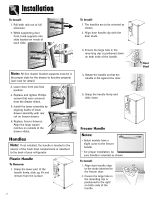
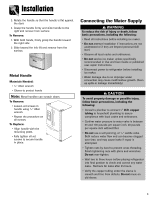
Installation To Install: 1. Pull both rails out to full extension. 2. While supporting door front, hook supports into slots located on inside of each slide. To Install: 1. The handles are to be oriented as shown. 2. Align door handle clip with the door studs. 3. Ensure the large hole in the mounting clip is positioned down on both ends of the handle. Note: All four drawer bracket supports must be in the proper slots for the drawer to function properly (see inset for detail). 3. Lower door front into final position. 4. Replace and tighten Phillips screws that were removed from the drawer slides. 5. Install the lower assembly by aligning hooks of lower drawer assembly with rear rail on freezer drawer. 6. Replace freezer drawers. Align the large square notches on outside of the drawer slides. Handles Note: If not installed, the handle is located in the interior of the fresh food compartment or attached to the back of your refrigerator. Plastic Handle To Remove: 1. Grasp the lower part of the handle firmly, slide up, lift and remove from the surface. 7 4. Rotate the handle so that the handle is flat against the door. 5. Grasp the handle firmly and slide down. Freezer Handle Notes: • Select models have a slight curve to the freezer handle. • For proper installation, be sure handle is oriented as shown. To Install: 1. Align door handle clips to the studs attached to the freezer door. 2. Ensure the large hole in the mounting clip is positioned to the right on both ends of the handle. Door Stud
-
 1
1 -
2
-
3
-
4
-
5
-
6
-
7
-
8
-
9
-
10
-
11
-
12
-
13
-
14
-
15
-
16
-
17
-
18
-
19
-
20
-
21
-
22
-
23
-
24
-
25
-
26
-
27
-
28
-
29
-
30
-
31
-
32
-
33
-
34
-
35
-
36
-
37
-
38
-
39
-
40
-
41
-
42
-
 43
43 -
 44
44 -
 45
45 -
 46
46 -
 47
47 -
 48
48 -
 49
49 -
 50
50 -
 51
51 -
 52
52 -
 53
53 -
54
-
55
-
56
-
57
-
58
-
59
-
60
-
61
-
62
-
63
-
64
-
65
-
66
-
67
-
68
-
69
-
70
-
71
 |
 |
