Maytag MFI2266AES Service Manual - Page 53
Ice and Water - ice maker
 |
View all Maytag MFI2266AES manuals
Add to My Manuals
Save this manual to your list of manuals |
Page 53 highlights
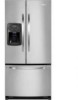
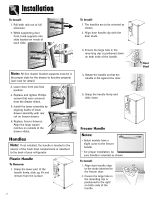
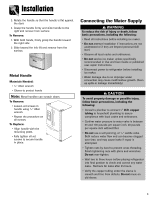
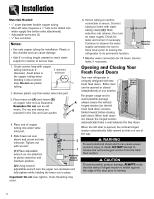
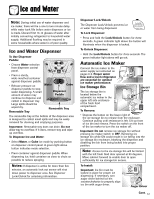
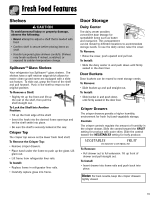
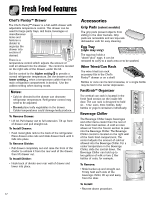
Ice and Water Note: During initial use of water dispenser and ice maker, there will be a one to two minute delay while water tank fills before water dispenses or ice is made. Discard first 10-14 glasses of water after initially connecting refrigerator to household water supply. Additional flushing may be required in some households where water is of poor quality. Ice and Water Dispenser To Use Dispenser Paddle: • Choose Water selection from dispenser control panel. • Press a sturdy, wide-mouthed container against dispenser paddle. • Release pressure on dispenser paddle to stop water dispensing. A small amount of water may continue to dispense and collect in dispenser tray. Large spills should be wiped dry. Removable Tray Water Cube Dispenser Paddle Removable Tray The removable tray at the bottom of the dispenser area is designed to collect small spills and may be easily removed for cleaning and emptying purposes. Important: Removable tray does not drain. Do not allow tray to overflow. If it does, remove tray and wipe up overflow. To Dispense Ice and Water: • Select Water, or Cube ice mode by pushing button on dispenser control panel. A green light above button indicates mode selection. • Press container against dispenser paddle. When dispensing ice, hold container as close to chute as possible to reduce spraying. Notes: If dispenser is active for more than five minutes, an automatic lock out sensor will shut down power to dispenser area. See Dispenser Lock/Unlock for unlocking information. Dispenser Lock/Unlock The Dispenser Lock/Unlock prevents ice or water from being dispensed. To Lock Dispenser: • Press and hold the Lock/Unlock button for three seconds. A green indicator light above the button will illuminate when the dispenser is locked. To Unlock Dispenser: • Hold the Lock/Unlock button for three seconds. The green indicator light above will go out. Automatic Ice Maker Connect the ice maker to the water supply as instructed on pages 8-9. Proper water flow and a level refrigerator are essential for optimal ice maker performance. Ice Storage Bin The ice storage bin is located below the automatic ice maker in the upper left side enclosure of the fresh food compartment. ON/OFF switch To Remove: • Depress the button on the lower right of the ice storage bin to release from the enclosure. Continue pulling until resistance is felt. Lift up front of ice bin and remove. Press the switch on the front of the ice maker to turn the ice maker off. Important: Do not remove ice storage bin without pressing ice maker switch to OFF. Removing ice storage bin while ON could result in ice falling into the ice storage bin enclosure, blocking the dispenser and disabling the bin from being locked into proper position. Note: Access to the ice storage bin will be limited with the left fresh food door opened at 90 degrees. Move cabinet forward to enable door to open sufficiently for ice storage bin access. To Install: Important: Ice bin must be locked in place for proper ice dispensing. If necessary, turn auger driver behind ice bin counterclockwise to properly align ice bin with auger driver. Auger Driver Cont. 12
-
 1
1 -
2
-
3
-
4
-
5
-
6
-
7
-
8
-
9
-
10
-
11
-
12
-
13
-
14
-
15
-
16
-
17
-
18
-
19
-
20
-
21
-
22
-
23
-
24
-
25
-
26
-
27
-
28
-
29
-
30
-
31
-
32
-
33
-
34
-
35
-
36
-
37
-
38
-
39
-
40
-
41
-
42
-
43
-
44
-
45
-
46
-
47
-
 48
48 -
 49
49 -
 50
50 -
 51
51 -
 52
52 -
 53
53 -
 54
54 -
 55
55 -
 56
56 -
 57
57 -
 58
58 -
59
-
60
-
61
-
62
-
63
-
64
-
65
-
66
-
67
-
68
-
69
-
70
-
71
 |
 |