Maytag MFI2266AES Service Manual - Page 51
Using the Controls - control panel does not work
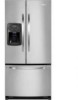 |
View all Maytag MFI2266AES manuals
Add to My Manuals
Save this manual to your list of manuals |
Page 51 highlights
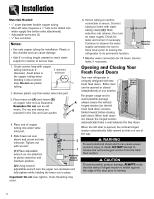
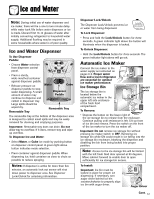
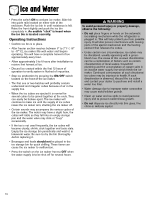
Using the Controls Initial Temperature Setting Temperatures are preset at the factory at 38° F (3° C) in the fresh food compartment and 0° F (-18° C) in the freezer compartment. Adjusting the Control 24 hours after adding food, you may decide that one or both compartments should be colder or warmer. If so, adjust the control as indicated in the Temperature Control Guide below. • Do not change either control more than one degree at a time. Allow temperature to stabilize for 24 hours before making a new temperature adjustment. Temperature Control Guide Refrigerator too cold Set the Refrigerator control to next higher number by pressing the pad. Refrigerator too warm Set the Refrigerator control to next lower number by pressing the pad. Freezer too cold Set the Freezer control to next higher number by pressing the pad. Freezer too warm Set the Freezer control to next lower number by pressing the pad. Turn refrigerator off Press the Freezer pad until "OFF" appears in the display. Press the in either the freezer or refrigerator section to turn back on. Front Fill Button (select models) The Front Fill Button works independently of the dispenser controls, providing an up-front alternative to the dispenser pad for dispensing water. This feature is convenient for filling large items that will not fit into the dispenser area (i.e. sport bottles, pitchers, large pans, coffee pots). This feature allows added convenience of dispensing ice and water simultaneously. To use, choose Cube mode from dispenser control panel. Press container against dispenser pad while pressing the Front Fill button. Water Filter Status Indicator Light When a water filter has been installed in the refrigerator, the yellow Order light will illuminate when 90 percent used OR 11 months have elapsed since the filter has been installed. The red Replace light will illuminate when the rated volume of water has passed through the filter OR 12 months have elapsed since the filter was installed. A new filter should be installed immediately when the Replace light is illuminated. After replacing the filter, press and hold the Reset Filter pad for three seconds. The Order and Replace lights will go off. Light The Light feature can be used to provide light to the dispenser area. The light feature is automatically activated and the indicator light illuminates. There are two methods available for lighting the dispenser - Auto and Continous. The Auto light function activates the dispenser light at half-power when the light sensor detects that the light levels in the room are low. The Continuous light function provides light until deactivated. The On indicator light will illuminate. To Activate Auto Light: Press the Light pad once. The Auto indicator will illuminate. Cont. 10
-
 1
1 -
2
-
3
-
4
-
5
-
6
-
7
-
8
-
9
-
10
-
11
-
12
-
13
-
14
-
15
-
16
-
17
-
18
-
19
-
20
-
21
-
22
-
23
-
24
-
25
-
26
-
27
-
28
-
29
-
30
-
31
-
32
-
33
-
34
-
35
-
36
-
37
-
38
-
39
-
40
-
41
-
42
-
43
-
44
-
45
-
 46
46 -
 47
47 -
 48
48 -
 49
49 -
 50
50 -
 51
51 -
 52
52 -
 53
53 -
 54
54 -
 55
55 -
 56
56 -
57
-
58
-
59
-
60
-
61
-
62
-
63
-
64
-
65
-
66
-
67
-
68
-
69
-
70
-
71
 |
 |
