Maytag MMMF8030PZ Bump Out Kit Installation Instructions - Page 11
No Wall Studs at End Holes
 |
View all Maytag MMMF8030PZ manuals
Add to My Manuals
Save this manual to your list of manuals |
Page 11 highlights
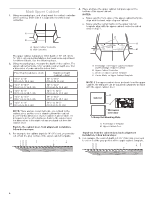
4. Insert lag screw(s) into the hole(s) drilled into wall stud(s) in Step 2 of "Installation for No Wall Studs at End Holes" in the "Drill Holes in Rear Wall" section. 5. Check alignment of mounting plate, making sure it is level. 6. Securely tighten all lag screws and bolts. No Wall Studs at End Holes (Figure 2) Follow the install steps in Figure 1. Wall Stud at End Hole (Figure 4) Follow the install steps in Figure 1. C C A H C D E J B A and B. Two End Holes C. Wall Studs D, E, H, and J. Four Lag Screw Holes Wall Stud at End Hole (Figure 3) Follow the install steps in Figure 1. A H C D E J B A and B. Two End Holes C. Wall Studs D, E, H, and J. Four Lag Screw Holes Checking the hooks have been inserted into the right position During attaching the microwave oven to the bump out kit, check if the bump out kit hanging hooks have been inserted into the microwave oven bottom plate back holes, and the hanging stoppers against the microwave oven back, reference below illustration. If not in position, adjust the microwave. A DG A B C C E,F C A H D E D E,F G A. Wall E. Hanging Hook B. Microwave oven back F. Bottom Plate Back Hole C. Bump Out Kit G. Bottom Plate D. Hanging Stopper C J B A and B. Two End Holes C. Wall Studs D, E, H, and J. Four Lag Screw Holes 11
-
 1
1 -
2
-
3
-
4
-
5
-
 6
6 -
 7
7 -
 8
8 -
 9
9 -
 10
10 -
 11
11 -
 12
12 -
 13
13 -
 14
14 -
 15
15 -
 16
16 -
17
-
18
-
19
-
20
-
21
-
22
-
23
-
24
-
25
-
26
-
27
-
28
-
29
-
30
-
31
-
32
-
33
-
34
-
35
-
36
 |
 |
