Miele Triflex HX2 Operating instructions/Installation instructions - Page 176
Connecting the wall bracket, Figs. 21 + 22, Battery charging state indicator, while charging Fig. 23
 |
View all Miele Triflex HX2 manuals
Add to My Manuals
Save this manual to your list of manuals |
Page 176 highlights
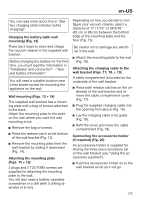
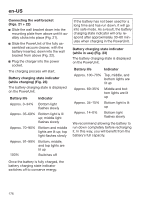
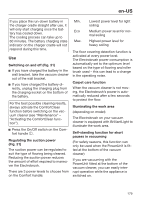
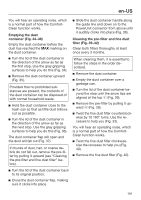
en-US Connecting the wall bracket (Figs. 21 + 22) Slide the wall bracket down into the mounting plate from above until it audibly clicks into place (Fig. 21). Slide the PowerUnit of the fully assembled vacuum cleaner, with the battery inserted, down into the wall bracket from above (Fig. 22). Plug the charger into the power socket. The charging process will start. Battery charging state indicator (while charging) (Fig. 23) The battery charging state is displayed on the PowerUnit. Battery life Indicator Approx. 0-34% Bottom light flashes slowly Approx. 35-69% Bottom light is lit up; middle light flashes slowly Approx. 70-90% Bottom and middle lights are lit up; top light flashes slowly Approx. 91-99% Bottom, middle, and top lights are lit up 100% Switches off If the battery has not been used for a long time and has run down, it will go into safe mode. As a result, the battery charging state indicator will only respond after approximately 30-60 minutes when charging in the PowerUnit. Battery charging state indicator (while in use) (Fig. 23) The battery charging state is displayed on the PowerUnit. Battery life Indicator Approx. 100-70% Top, middle, and bottom lights are lit up Approx. 69-35% Middle and bottom lights are lit up Approx. 34-15% Bottom light is lit up Approx. 14-0% Bottom light flashes slowly We recommend allowing the battery to run down completely before recharging it. In this way, you will benefit from the battery's full capacity. Once the battery is fully charged, the battery charging state indicator switches off to conserve energy. 176
-
 1
1 -
2
-
3
-
4
-
5
-
6
-
7
-
8
-
9
-
10
-
11
-
12
-
13
-
14
-
15
-
16
-
17
-
18
-
19
-
20
-
21
-
22
-
23
-
24
-
25
-
26
-
27
-
28
-
29
-
30
-
31
-
32
-
33
-
34
-
35
-
36
-
37
-
38
-
39
-
40
-
41
-
42
-
43
-
44
-
45
-
46
-
47
-
48
-
49
-
50
-
51
-
52
-
53
-
54
-
55
-
56
-
57
-
58
-
59
-
60
-
61
-
62
-
63
-
64
-
65
-
66
-
67
-
68
-
69
-
70
-
71
-
72
-
73
-
74
-
75
-
76
-
77
-
78
-
79
-
80
-
81
-
82
-
83
-
84
-
85
-
86
-
87
-
88
-
89
-
90
-
91
-
92
-
93
-
94
-
95
-
96
-
97
-
98
-
99
-
100
-
101
-
102
-
103
-
104
-
105
-
106
-
107
-
108
-
109
-
110
-
111
-
112
-
113
-
114
-
115
-
116
-
117
-
118
-
119
-
120
-
121
-
122
-
123
-
124
-
125
-
126
-
127
-
128
-
129
-
130
-
131
-
132
-
133
-
134
-
135
-
136
-
137
-
138
-
139
-
140
-
141
-
142
-
143
-
144
-
145
-
146
-
147
-
148
-
149
-
150
-
151
-
152
-
153
-
154
-
155
-
156
-
157
-
158
-
159
-
160
-
161
-
162
-
163
-
164
-
165
-
166
-
167
-
168
-
169
-
170
-
 171
171 -
 172
172 -
 173
173 -
 174
174 -
 175
175 -
 176
176 -
 177
177 -
 178
178 -
 179
179 -
 180
180 -
 181
181 -
182
-
183
-
184
-
185
-
186
-
187
-
188
-
189
-
190
-
191
-
192
-
193
-
194
-
195
-
196
-
197
-
198
-
199
-
200
 |
 |
