Miele Triflex HX2 Operating instructions/Installation instructions - Page 179
based on the type of flooring and roller
 |
View all Miele Triflex HX2 manuals
Add to My Manuals
Save this manual to your list of manuals |
Page 179 highlights
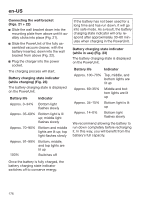
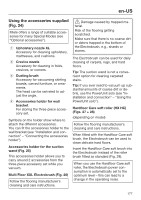
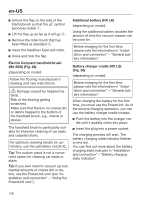
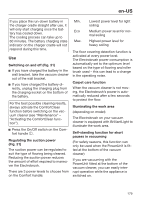
en-US If you place the run-down battery in the charger cradle straight after use, it will only start charging once the battery has cooled down. The cooling process can take up to 60 minutes. The battery charging state indicator on the charger cradle will not respond during this time. Use Switching on and off (Fig. 31) If you have charged the battery in the wall bracket, take the vacuum cleaner out of the wall bracket. If you have charged the battery directly, unplug the charging plug from the charging socket on the bottom of the battery. For the best possible cleaning results, always activate the ComfortClean function before switching on the vacuum cleaner (see "Maintenance" - "Activating the ComfortClean function"). Press the On/Off switch on the Comfort handle . Regulating the suction power (Fig. 31) The suction power can be regulated to suit the type of flooring being cleaned. Reducing the suction power reduces the amount of effort required to maneuver the Electrobrush. There are 3 power levels to choose from on the Comfort handle: Min. Eco Max. Lowest power level for light soiling Medium power level for normal soiling Highest power level for heavy soiling The floor covering detection function is activated at every power level. The Electrobrush power consumption is automatically set to the optimum level based on the type of flooring and roller brush used - this can lead to a change in the operating noise. Carpet care function When the vacuum cleaner is not moving, the Electrobrush's power is automatically reduced after a few seconds to protect the floor. Illuminating the work area (depending on model) The Electrobrush on your vacuum cleaner is equipped with BrilliantLight to illuminate the work area. Self-standing function for short pauses in vacuuming (For safety reasons, this function can only be used when the PowerUnit is fitted at the bottom of the vacuum cleaner) If you are vacuuming with the PowerUnit fitted at the bottom of the vacuum cleaner, you can easily interrupt operation while the appliance is switched on. 179
-
 1
1 -
2
-
3
-
4
-
5
-
6
-
7
-
8
-
9
-
10
-
11
-
12
-
13
-
14
-
15
-
16
-
17
-
18
-
19
-
20
-
21
-
22
-
23
-
24
-
25
-
26
-
27
-
28
-
29
-
30
-
31
-
32
-
33
-
34
-
35
-
36
-
37
-
38
-
39
-
40
-
41
-
42
-
43
-
44
-
45
-
46
-
47
-
48
-
49
-
50
-
51
-
52
-
53
-
54
-
55
-
56
-
57
-
58
-
59
-
60
-
61
-
62
-
63
-
64
-
65
-
66
-
67
-
68
-
69
-
70
-
71
-
72
-
73
-
74
-
75
-
76
-
77
-
78
-
79
-
80
-
81
-
82
-
83
-
84
-
85
-
86
-
87
-
88
-
89
-
90
-
91
-
92
-
93
-
94
-
95
-
96
-
97
-
98
-
99
-
100
-
101
-
102
-
103
-
104
-
105
-
106
-
107
-
108
-
109
-
110
-
111
-
112
-
113
-
114
-
115
-
116
-
117
-
118
-
119
-
120
-
121
-
122
-
123
-
124
-
125
-
126
-
127
-
128
-
129
-
130
-
131
-
132
-
133
-
134
-
135
-
136
-
137
-
138
-
139
-
140
-
141
-
142
-
143
-
144
-
145
-
146
-
147
-
148
-
149
-
150
-
151
-
152
-
153
-
154
-
155
-
156
-
157
-
158
-
159
-
160
-
161
-
162
-
163
-
164
-
165
-
166
-
167
-
168
-
169
-
170
-
171
-
172
-
173
-
 174
174 -
 175
175 -
 176
176 -
 177
177 -
 178
178 -
 179
179 -
 180
180 -
 181
181 -
 182
182 -
 183
183 -
 184
184 -
185
-
186
-
187
-
188
-
189
-
190
-
191
-
192
-
193
-
194
-
195
-
196
-
197
-
198
-
199
-
200
 |
 |
