Miele Triflex HX2 Operating instructions/Installation instructions - Page 56
en-CA
 |
View all Miele Triflex HX2 manuals
Add to My Manuals
Save this manual to your list of manuals |
Page 56 highlights
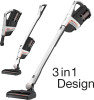
en-CA References to figures The figures referred to in the sections are on the fold-out pages at the end of these operating instructions. Installation and connection Assembling the vacuum cleaner (Fig. 01) You can assemble the vacuum cleaner in 2 different ways. You can place the suction tube either above or below the PowerUnit. Take care to assemble the vacuum cleaner exactly as shown in the diagram. The advantages of placing the PowerUnit at the bottom of the vacuum cleaner are as follows: - Secure self-standing function possible (see "Use" - "Self-standing function for short pauses in vacuuming") - Ergonomic (reduced strain on the wrist) - Convenient cleaning of large surfaces The advantages of placing the PowerUnit at the top of the vacuum cleaner are as follows: - Convenient cleaning underneath furniture - PowerUnit can be removed quickly Using the PowerUnit solo (Fig. 02) The PowerUnit can be used on its own without the suction tube and Electrobrush as a quick way of vacuuming up crumbs and lint in specific areas. Useful tip: This configuration is particularly suitable when using the three-piece accessory set (see "Using the accessories supplied"). Connecting the Comfort handle (Fig. 03) Depending on how you decide to configure your vacuum cleaner, you can connect the Comfort handle to either the suction tube or the PowerUnit. Push the Comfort handle down on to the suction tube connection from above until it audibly clicks into place (left image detail). Slide the Comfort handle along the guide line on the dust container handle and down on to the PowerUnit connector from above until it audibly clicks into place (right image detail). Switch off the vacuum cleaner using the On / Off switch on the front of the Comfort handle if you want to separate the sections. Press the release catch and remove the Comfort handle by pulling it upward (Fig. 04). Connecting the PowerUnit and the suction tube (Fig. 05) Depending on how you decide to configure your vacuum cleaner, the suction tube is located either above or below the PowerUnit. Slide the suction tube along the guide line on the dust container handle and down on to the PowerUnit connector from above until it audibly clicks into place (left image detail). 56
-
 1
1 -
2
-
3
-
4
-
5
-
6
-
7
-
8
-
9
-
10
-
11
-
12
-
13
-
14
-
15
-
16
-
17
-
18
-
19
-
20
-
21
-
22
-
23
-
24
-
25
-
26
-
27
-
28
-
29
-
30
-
31
-
32
-
33
-
34
-
35
-
36
-
37
-
38
-
39
-
40
-
41
-
42
-
43
-
44
-
45
-
46
-
47
-
48
-
49
-
50
-
 51
51 -
 52
52 -
 53
53 -
 54
54 -
 55
55 -
 56
56 -
 57
57 -
 58
58 -
 59
59 -
 60
60 -
 61
61 -
62
-
63
-
64
-
65
-
66
-
67
-
68
-
69
-
70
-
71
-
72
-
73
-
74
-
75
-
76
-
77
-
78
-
79
-
80
-
81
-
82
-
83
-
84
-
85
-
86
-
87
-
88
-
89
-
90
-
91
-
92
-
93
-
94
-
95
-
96
-
97
-
98
-
99
-
100
-
101
-
102
-
103
-
104
-
105
-
106
-
107
-
108
-
109
-
110
-
111
-
112
-
113
-
114
-
115
-
116
-
117
-
118
-
119
-
120
-
121
-
122
-
123
-
124
-
125
-
126
-
127
-
128
-
129
-
130
-
131
-
132
-
133
-
134
-
135
-
136
-
137
-
138
-
139
-
140
-
141
-
142
-
143
-
144
-
145
-
146
-
147
-
148
-
149
-
150
-
151
-
152
-
153
-
154
-
155
-
156
-
157
-
158
-
159
-
160
-
161
-
162
-
163
-
164
-
165
-
166
-
167
-
168
-
169
-
170
-
171
-
172
-
173
-
174
-
175
-
176
-
177
-
178
-
179
-
180
-
181
-
182
-
183
-
184
-
185
-
186
-
187
-
188
-
189
-
190
-
191
-
192
-
193
-
194
-
195
-
196
-
197
-
198
-
199
-
200
 |
 |
