Miele Triflex HX2 Operating instructions/Installation instructions - Page 181
it audibly clicks into place Fig. 38.
 |
View all Miele Triflex HX2 manuals
Add to My Manuals
Save this manual to your list of manuals |
Page 181 highlights
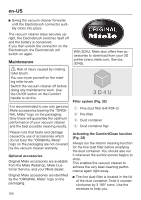
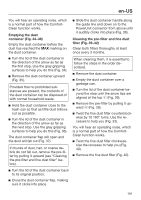
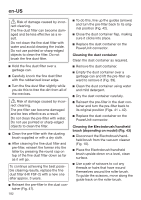
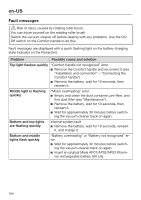
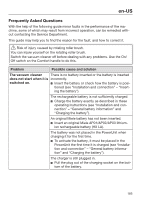
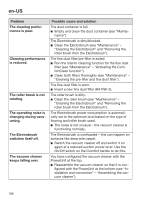
en-US You will hear an operating noise, which is a normal part of how the ComfortClean function works. Emptying the dust container (Fig. 34-38) Empty the dust container before the dust has reached the MAX marking on the dust container. Slide the dust container handle along the guide line and down on to the PowerUnit connector from above until it audibly clicks into place (Fig. 38). Cleaning the pre-filter and fine dust filter (Fig. 39-42) Clean both filters thoroughly at least once every 3 months. Turn the lid of the dust container in the direction of the arrow as far as the first stop. Use the gray gripping surfaces to help you do this (Fig. 34). Remove the dust container upward (Fig. 35). Provided that no prohibited substances are present, the contents of the dust container can be disposed of with normal household waste. Hold the dust container close to the trash can so that as little dust billows out as possible. Turn the lid of the dust container in the direction of the arrow as far as the next stop. Use the gray gripping surfaces to help you do this (Fig. 36). The dust container flap will open and the dust will fall out (Fig. 37). If chunks of dust, hair, or coarse debris do not fall out, remove the pre-filter by pulling it upward (see "Cleaning the pre-filter and fine dust filter" below). When cleaning them, it is essential to follow the steps in the order described. Remove the dust container. Empty the dust container over a garbage can. Turn the lid of the dust container beyond the stop until the arrow tips are aligned at the top a (Fig. 39). Remove the pre-filter by pulling it upward b (Fig. 39). Twist the fine dust filter counterclockwise by 10 180° turns. Use the recesses to help you (Fig. 33). You will hear an operating noise, which is a normal part of how the ComfortClean function works. Twist the fine dust filter clockwise. Use the recesses to help you (Fig. 40). Remove the fine dust filter (Fig. 40). Turn the lid of the dust container back to its original position. Close the dust container flap, making sure it clicks into place. 181
-
 1
1 -
2
-
3
-
4
-
5
-
6
-
7
-
8
-
9
-
10
-
11
-
12
-
13
-
14
-
15
-
16
-
17
-
18
-
19
-
20
-
21
-
22
-
23
-
24
-
25
-
26
-
27
-
28
-
29
-
30
-
31
-
32
-
33
-
34
-
35
-
36
-
37
-
38
-
39
-
40
-
41
-
42
-
43
-
44
-
45
-
46
-
47
-
48
-
49
-
50
-
51
-
52
-
53
-
54
-
55
-
56
-
57
-
58
-
59
-
60
-
61
-
62
-
63
-
64
-
65
-
66
-
67
-
68
-
69
-
70
-
71
-
72
-
73
-
74
-
75
-
76
-
77
-
78
-
79
-
80
-
81
-
82
-
83
-
84
-
85
-
86
-
87
-
88
-
89
-
90
-
91
-
92
-
93
-
94
-
95
-
96
-
97
-
98
-
99
-
100
-
101
-
102
-
103
-
104
-
105
-
106
-
107
-
108
-
109
-
110
-
111
-
112
-
113
-
114
-
115
-
116
-
117
-
118
-
119
-
120
-
121
-
122
-
123
-
124
-
125
-
126
-
127
-
128
-
129
-
130
-
131
-
132
-
133
-
134
-
135
-
136
-
137
-
138
-
139
-
140
-
141
-
142
-
143
-
144
-
145
-
146
-
147
-
148
-
149
-
150
-
151
-
152
-
153
-
154
-
155
-
156
-
157
-
158
-
159
-
160
-
161
-
162
-
163
-
164
-
165
-
166
-
167
-
168
-
169
-
170
-
171
-
172
-
173
-
174
-
175
-
 176
176 -
 177
177 -
 178
178 -
 179
179 -
 180
180 -
 181
181 -
 182
182 -
 183
183 -
 184
184 -
 185
185 -
 186
186 -
187
-
188
-
189
-
190
-
191
-
192
-
193
-
194
-
195
-
196
-
197
-
198
-
199
-
200
 |
 |
