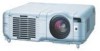
NEC MT860 User Manual - Page 24
Correcting the Horizontal and Vertical Key, stone Distortion 3D Reform
 |
UPC - 050927239212
View all NEC MT860 manuals
Add to My Manuals
Save this manual to your list of manuals |
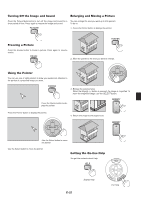
Page 24 highlights
CAUTION: Do not use the tilt-foot for purposes other than originally intended. Misuses such as gripping the tilt-foot or hanging on the wall can cause damage to the projector. Zoom Use the ZOOM Button (+/-) to fine adjust the image size on the screen Correcting the Horizontal and Vertical Keystone Distortion (3D Reform) Use the 3D Reform feature to correct keystone (trapezoidal) distortion to make the top or bottom and the left or right side of the screen longer or shorter so that the projected image is rectangular. In the following description, 3D Reform (Cornerstone) correction can be done with the USB mouse or remote control, cabinet buttons. When using the USB connected to the projector Preparation: Connect the USB mouse to the projector. See page E-26. 1. Project an image so that the screen is smaller than the area of the raster. You can use ZOOM +/- button to enlarge or reduce an image size within a range of +/-15%. 2. Pick up any one of the corners and align the corner of the screen with the one of the image. (The drawing shows the upper right corner.) Projected image Focus Use the FOCUS Button (+/-) to obtain the best focus. Screen 3. Press the 3D REFORM button on the remote control. The Cornerstone adjustment screen is displayed. The Cornerstone adjustment screen will disappear when you move the USB mouse cursor. Using Auto Focus (not available on MT860) Press and hold the AUTO ADJUST button on the cabinet or AUTO ADJ button on the remote control for a minimum of 2 seconds. The focus pattern will be displayed for a moment and then the best focus will be automatically obtained. NOTE: The Auto Functions have two options: Focus and Wall Color Correction. When the AUTO ADJUST or AUTO ADJ button is pressed and held for a minimum of 2 seconds, either item can be executed. You can decide in advance which item will be enabled at the time of execution. From the Advanced menu, select [Projector Options] → [Auto Functions]. You can turn on or off "Focus" and "Wall Color Correction". See page E-47. 4. Point to one of the remaining 3 corners and left-click on it. Left-click on the corner. Screen NOTE: Just pressing quickly the AUTO ADJUST button on the cabinet or AUTO ADJ button on the remote control will enable the Auto Adjust feature instead of the Auto Focus feature. 5. Do the above step 4 for the other two corners so that the projected area becomes smaller than the screen. Screen E-20 Left-click on each corner.
-
 1
1 -
2
-
3
-
4
-
5
-
6
-
7
-
8
-
9
-
10
-
11
-
12
-
13
-
14
-
15
-
16
-
17
-
18
-
 19
19 -
 20
20 -
 21
21 -
 22
22 -
 23
23 -
 24
24 -
 25
25 -
 26
26 -
 27
27 -
 28
28 -
 29
29 -
30
-
31
-
32
-
33
-
34
-
35
-
36
-
37
-
38
-
39
-
40
-
41
-
42
-
43
-
44
-
45
-
46
-
47
-
48
-
49
-
50
-
51
-
52
-
53
-
54
-
55
-
56
-
57
-
58
-
59
-
60
-
61
-
62
-
63
-
64
-
65
-
66
-
67
-
68
-
69
-
70
 |
 |
