NEC MT860 User Manual - Page 25
Left-click on OK.
 |
UPC - 050927239212
View all NEC MT860 manuals
Add to My Manuals
Save this manual to your list of manuals |
Page 25 highlights
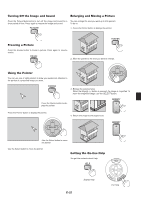
6. To complete the procedure, right-click anywhere on the screen. The confirmation screen is displayed. 4. Use the SELECT ̆̄̇̈ button to select one icon which points in the direction you wish to move the projected image frame. 7. Left-click on "OK". This completes the Cornerstone adjustment. * To return the Cornerstone adjustment to the default settings, leftclick on "Reset" in Step 7. You can save your Cornerstone changes. The changes are saved when you turn off the projector. To do so, select [Projector Options] → [Setup] → [Page 4]. Select the 3D Reform Save check box. This is not selected at the time of shipment. Screen * There are limitations of shapes which can be corrected using the Cornerstone adjustment. When adjusting the Cornerstone beyond these limits, you will get the message "Out of adjustment range!" and no correction can be done. Should this happen, do the Cornerstone adjustment again within the allowable range. * Due to limitations of accuracy within internal processes, there may be some discrepancy of positions between the mouse cursor and corrected shape or one corner and the other 3 corners. 5. Press the ENTER button. 6. Use the SELECT ̆̄̇̈ button to move the projected image frame as shown on the example. 7. Press the ENTER button. When using the remote control or cabinet buttons: 1. Project an image so that the screen is smaller than the area of the raster. 2. Pick up any one of the corners and align the corner of the screen with the one of the image. Screen Projected image 8. Use the SELECT ̆̄̇̈ button to select another icon which points in the direction. Screen (The drawing shows the upper right corner.) 3. Press the 3D REFORM button on the remote control. Screen On the Cornerstone adjustment screen, select "Exit" and then "OK", or press the CANCEL button on the remote control. The confirmation screen is displayed. The CORNERSTONE adjustment screen is displayed. NOTE: Press the 3D REFORM button to toggle between "Cornerstone" and "Keystone." 9. Press the SELECT ̇ or ̈ button to highlight the [OK] and press the ENTER button. This completes the keystone correction. Selecting "Cancel" will return to the adjustment screen without saving changes (Step 3). Selecting "Reset" will return to the factory default. Selecting "Undo" will exit without saving changes. NOTE: To return the 3D Reform correction setting values to the factory default, press and hold the 3D REFORM button for a minimum of 2 seconds. E-21
-
 1
1 -
2
-
3
-
4
-
5
-
6
-
7
-
8
-
9
-
10
-
11
-
12
-
13
-
14
-
15
-
16
-
17
-
18
-
19
-
 20
20 -
 21
21 -
 22
22 -
 23
23 -
 24
24 -
 25
25 -
 26
26 -
 27
27 -
 28
28 -
 29
29 -
 30
30 -
31
-
32
-
33
-
34
-
35
-
36
-
37
-
38
-
39
-
40
-
41
-
42
-
43
-
44
-
45
-
46
-
47
-
48
-
49
-
50
-
51
-
52
-
53
-
54
-
55
-
56
-
57
-
58
-
59
-
60
-
61
-
62
-
63
-
64
-
65
-
66
-
67
-
68
-
69
-
70
 |
 |
