NEC NP-PX2201UL User Manual - Page 58
Adjust boundaries of a projected image [EDGE BLENDING], PRESET] or [GAMMA CORRECTION] etc.
 |
View all NEC NP-PX2201UL manuals
Add to My Manuals
Save this manual to your list of manuals |
Page 58 highlights
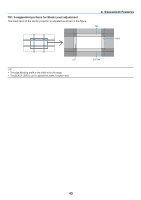
3. Convenient Features 3-9. Adjust boundaries of a projected image [EDGE BLENDING] This projector is equipped with an "EDGE BLENDING Function" that makes the edges (boundaries) of the projection screen indistinguishable. NOTE: • Before performing the EDGE BLENDING function, place the projector in the correct position so that the image becomes square in the appropriate size, and then make optical adjustments (lens shift, focus, and zoom). • Adjust the brightness of each projector using [LIGHT ADJUST] under [SETUP]. In addition, adjust the picture quality with the various adjustment functions such as [PICTURE] → [PRESET] or [GAMMA CORRECTION] etc. The following procedure shows an example of four projectors in a 2 × 2 layout. Projected area Projected area Projected area Edge Blending area Projected area 38
-
 1
1 -
2
-
3
-
4
-
5
-
6
-
7
-
8
-
9
-
10
-
11
-
12
-
13
-
14
-
15
-
16
-
17
-
18
-
19
-
20
-
21
-
22
-
23
-
24
-
25
-
26
-
27
-
28
-
29
-
30
-
31
-
32
-
33
-
34
-
35
-
36
-
37
-
38
-
39
-
40
-
41
-
42
-
43
-
44
-
45
-
46
-
47
-
48
-
49
-
50
-
51
-
52
-
 53
53 -
 54
54 -
 55
55 -
 56
56 -
 57
57 -
 58
58 -
 59
59 -
 60
60 -
 61
61 -
 62
62 -
 63
63 -
64
-
65
-
66
-
67
-
68
-
69
-
70
-
71
-
72
-
73
-
74
-
75
-
76
-
77
-
78
-
79
-
80
-
81
-
82
-
83
-
84
-
85
-
86
-
87
-
88
-
89
-
90
-
91
-
92
-
93
-
94
-
95
-
96
-
97
-
98
-
99
-
100
-
101
-
102
-
103
-
104
-
105
-
106
-
107
-
108
-
109
-
110
-
111
-
112
-
113
-
114
 |
 |
