NEC NP-VE281 Users Manual - Page 30
Adjust the Tilt Foot, Adjusting the left and right tilt of an image [Rear foot]
 |
View all NEC NP-VE281 manuals
Add to My Manuals
Save this manual to your list of manuals |
Page 30 highlights
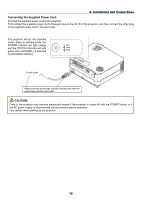
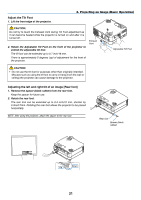
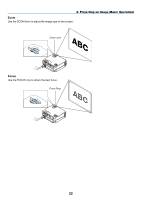
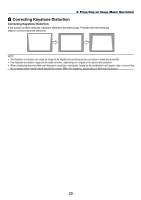
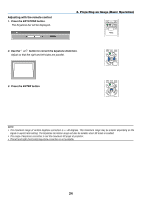
Adjust the Tilt Foot 1. Lift the front edge of the projector. 3. Projecting an Image (Basic Operation) CAUTION: Do not try to touch the Exhaust Vent during Tilt Foot adjustment as it can become heated while the projector is turned on and after it is turned off. Exhaust 2 Vent 2. Rotate the Adjustable Tilt Foot on the front of the projector to extend the adjustable tilt foot. The tilt foot can be extended up to 0.7 inch/18 mm. There is approximately 5 degrees (up) of adjustment for the front of the projector. 1 Adjustable Tilt Foot CAUTION: • Do not use the tilt-foot for purposes other than originally intended. Misuses such as using the tilt foot to carry or hang (from the wall or ceiling) the projector can cause damage to the projector. Adjusting the left and right tilt of an image [Rear foot] 1. Remove the spacer (black rubber) from the rear foot. Keep the spacer for future use. 2. Rotate the rear foot. The rear foot can be extended up to 0.4 inch/10 mm, shorten by 0.3inch/7mm. Rotating the rear foot allows the projector to be placed horizontally. NOTE: After using the projector, attach the spacer to the rear foot. Rear foot Spacer (black rubber) Up Down 21
-
 1
1 -
2
-
3
-
4
-
5
-
6
-
7
-
8
-
9
-
10
-
11
-
12
-
13
-
14
-
15
-
16
-
17
-
18
-
19
-
20
-
21
-
22
-
23
-
24
-
 25
25 -
 26
26 -
 27
27 -
 28
28 -
 29
29 -
 30
30 -
 31
31 -
 32
32 -
 33
33 -
 34
34 -
 35
35 -
36
-
37
-
38
-
39
-
40
-
41
-
42
-
43
-
44
-
45
-
46
-
47
-
48
-
49
-
50
-
51
-
52
-
53
-
54
-
55
-
56
-
57
-
58
-
59
-
60
-
61
-
62
-
63
-
64
-
65
-
66
-
67
-
68
-
69
-
70
-
71
-
72
-
73
-
74
-
75
-
76
-
77
-
78
-
79
-
80
-
81
-
82
-
83
-
84
-
85
-
86
-
87
-
88
 |
 |
