Netgear JWNR2000v2 JWNR2000 User Manual - Page 44
Push Button Configuration, Using the Physical Push Button
 |
View all Netgear JWNR2000v2 manuals
Add to My Manuals
Save this manual to your list of manuals |
Page 44 highlights
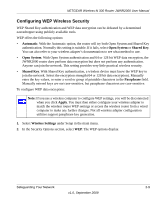
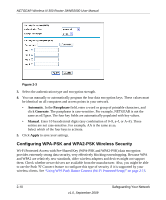
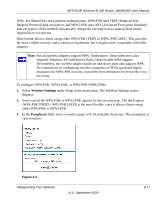
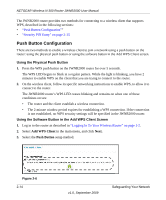
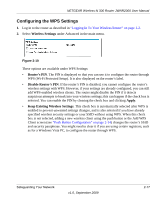
NETGEAR Wireless-N 300 Router JWNR2000 User Manual The JWNR2000 router provides two methods for connecting to a wireless client that supports WPS, described in the following sections: • "Push Button Configuration"" • "Security PIN Entry" on page 2-15 Push Button Configuration There are two methods to enable a wireless client to join a network using a push button on the router: using the physical push button or using the software button in the Add WPS Client screen. Using the Physical Push Button 1. Press the WPS push button on the JWNR2000 router for over 5 seconds. The WPS LED begins to blink in a regular pattern. While the light is blinking, you have 2 minutes to enable WPS on the client that you are trying to connect to the router. 2. On the wireless client, follow its specific networking instructions to enable WPS, to allow it to connect to the router. The JWNR2000 router's WPS LED ceases blinking and remains on when one of these conditions occurs: • The router and the client establish a wireless connection. • The 2-minute window period expires for establishing a WPS connection. If the connection is not established, no WPS security settings will be specified in the JWNR2000 router. Using the Software Button in the Add WPS Client Screen 1. Log in to the router as described in "Logging In To Your Wireless Router" on page 1-2. 2. Select Add WPS Client in the main menu, and click Next. 3. Select the Push Button setup method. Figure 2-6 2-14 v1.0, September 2009 Safeguarding Your Network
-
 1
1 -
2
-
3
-
4
-
5
-
6
-
7
-
8
-
9
-
10
-
11
-
12
-
13
-
14
-
15
-
16
-
17
-
18
-
19
-
20
-
21
-
22
-
23
-
24
-
25
-
26
-
27
-
28
-
29
-
30
-
31
-
32
-
33
-
34
-
35
-
36
-
37
-
38
-
 39
39 -
 40
40 -
 41
41 -
 42
42 -
 43
43 -
 44
44 -
 45
45 -
 46
46 -
 47
47 -
 48
48 -
 49
49 -
50
-
51
-
52
-
53
-
54
-
55
-
56
-
57
-
58
-
59
-
60
-
61
-
62
-
63
-
64
-
65
-
66
-
67
-
68
-
69
-
70
-
71
-
72
-
73
-
74
-
75
-
76
-
77
-
78
-
79
-
80
-
81
-
82
-
83
-
84
-
85
-
86
-
87
-
88
-
89
-
90
-
91
-
92
-
93
-
94
-
95
-
96
-
97
-
98
-
99
-
100
-
101
-
102
-
103
-
104
-
105
-
106
-
107
-
108
-
109
-
110
-
111
-
112
-
113
-
114
-
115
-
116
-
117
-
118
-
119
-
120
-
121
-
122
-
123
-
124
-
125
-
126
-
127
-
128
-
129
-
130
-
131
-
132
-
133
-
134
-
135
-
136
-
137
-
138
 |
 |
