Netgear PTV2000 PTV2000 User Manual - Page 12
Adapter Properties, Resizing the TV Picture - software
 |
UPC - 606449076523
View all Netgear PTV2000 manuals
Add to My Manuals
Save this manual to your list of manuals |
Page 12 highlights
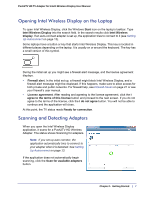
Push2TV HD TV Adapter for Intel® Wireless Display User Manual Adapter Properties Select the Adapter tab to display this screen: • Adapter name. This is either the default name or the name you choose in the initial set up process. It is okay to change the name at any time. Just type a new name. If the default name is deleted and the Name field is left empty, the application restores the name to the previous value. The valid character set for adapter names includes upper-case and lower-case letters A through Z, numbers, and punctuation marks, also defined as ASCII characters 32 through 126. • Network address. This is the IP (Internet Protocol) address. • Adapter ID. A preset and unchangeable number set by the adapter. • Adapter manufacturer. NETGEAR. • Adapter model. This is the model of the adapter currently connected. • Adapter hardware version. The version of the current hardware. • Adapter firmware version. The version of the application. If a Web update is required, click the Update Available button. • Automatically connect. Allows this adapter to be set as the auto-connect adapter. See Setting Up Autoconnect on page 13 for more details. • Register. Register your adapter to obtain support and get the latest software updates. • Audio/Visual Tuning. See Resizing the TV Picture on page 12 and Testing the Audio on page 13. Resizing the TV Picture If the laptop display is cropped or not filling the entire TV screen, the image needs to be adjusted. To adjust the TV image click the Properties button. On the Adapter properties screen click the Resize TV picture button. On the next screen, click the plus icon to increase the size, or the minus icon to decrease the size. When the image is correct, click OK to return to the previous screen. If the image still does not fit the entire TV screen, try adjusting the TV settings. 12 | Chapter 2. Wireless Display Settings
-
 1
1 -
2
-
3
-
4
-
5
-
6
-
 7
7 -
 8
8 -
 9
9 -
 10
10 -
 11
11 -
 12
12 -
 13
13 -
 14
14 -
 15
15 -
 16
16 -
 17
17 -
18
-
19
-
20
-
21
-
22
-
23
-
24
-
25
-
26
-
27
-
28
-
29
-
30
 |
 |
