Netgear WC7500 User Manual - Page 174
Building, Floor, Group Name, Apply, Select the building from
 |
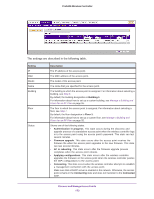
View all Netgear WC7500 manuals
Add to My Manuals
Save this manual to your list of manuals |
Page 174 highlights
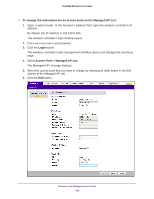
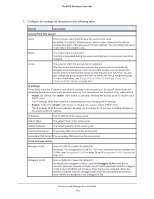
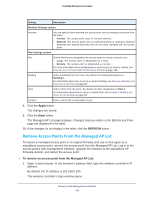
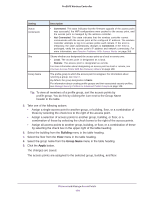
ProSAFE Wireless Controller Setting Status (continued) Site Group Name Description • Connected. This state indicates that the firmware upgrade of the access point was successful, the WiFi configurations were pushed to the access point, and the access point is managed by the wireless controller. • Not Connected. This state indicates that the wireless controller cannot communicate with the access point at the configured IP address. The wireless controller attempts to log in to access points each minute. If the error is temporary, the state automatically changes to Connected. If the error is prolonged, verify the access point's IP address and network connectivity. For more information, see Resolve Problems With Access Points on page 355. Shows whether you designated the access point as a local or remote one: • Local. The access point is designated as a local. • Remote. The access point is designated as remote. For more information about designating an access point as local or remote, see Discover Access Points With the Discovery Wizard on page 158. The profile group to which the access point is assigned. For information about selecting a group, see Step 8. By default, the group designation is basic. For information about creating profile groups and their associated security profiles, see Manage Security Profiles for Advanced Profile Groups on page 128. Tip: To view all members of a profile group, sort the access points by profile group. You do this by clicking the icon next to the Group Name header in the table. 5. Take one of the following actions: • Assign a single access point to another group, or building, floor, or a combination of these by selecting the check box to the right of the access point. • Assign a selection of access points to another group, building, or floor, or a combination of these by selecting the check boxes to the right of the access points. • Assign all access points to another group, building, or floor, or a combination of these by selecting the check box in the upper right of the table heading. 6. Select the building from the Building menu in the table heading. 7. Select the floor from the Floor menu in the table heading. 8. Select the group name from the Group Name menu in the table heading. 9. Click the Apply button. The changes are saved. The access points are assigned to the selected group, building, and floor. Discover and Manage Access Points 174
-
 1
1 -
2
-
3
-
4
-
5
-
6
-
7
-
8
-
9
-
10
-
11
-
12
-
13
-
14
-
15
-
16
-
17
-
18
-
19
-
20
-
21
-
22
-
23
-
24
-
25
-
26
-
27
-
28
-
29
-
30
-
31
-
32
-
33
-
34
-
35
-
36
-
37
-
38
-
39
-
40
-
41
-
42
-
43
-
44
-
45
-
46
-
47
-
48
-
49
-
50
-
51
-
52
-
53
-
54
-
55
-
56
-
57
-
58
-
59
-
60
-
61
-
62
-
63
-
64
-
65
-
66
-
67
-
68
-
69
-
70
-
71
-
72
-
73
-
74
-
75
-
76
-
77
-
78
-
79
-
80
-
81
-
82
-
83
-
84
-
85
-
86
-
87
-
88
-
89
-
90
-
91
-
92
-
93
-
94
-
95
-
96
-
97
-
98
-
99
-
100
-
101
-
102
-
103
-
104
-
105
-
106
-
107
-
108
-
109
-
110
-
111
-
112
-
113
-
114
-
115
-
116
-
117
-
118
-
119
-
120
-
121
-
122
-
123
-
124
-
125
-
126
-
127
-
128
-
129
-
130
-
131
-
132
-
133
-
134
-
135
-
136
-
137
-
138
-
139
-
140
-
141
-
142
-
143
-
144
-
145
-
146
-
147
-
148
-
149
-
150
-
151
-
152
-
153
-
154
-
155
-
156
-
157
-
158
-
159
-
160
-
161
-
162
-
163
-
164
-
165
-
166
-
167
-
168
-
 169
169 -
 170
170 -
 171
171 -
 172
172 -
 173
173 -
 174
174 -
 175
175 -
 176
176 -
 177
177 -
 178
178 -
 179
179 -
180
-
181
-
182
-
183
-
184
-
185
-
186
-
187
-
188
-
189
-
190
-
191
-
192
-
193
-
194
-
195
-
196
-
197
-
198
-
199
-
200
-
201
-
202
-
203
-
204
-
205
-
206
-
207
-
208
-
209
-
210
-
211
-
212
-
213
-
214
-
215
-
216
-
217
-
218
-
219
-
220
-
221
-
222
-
223
-
224
-
225
-
226
-
227
-
228
-
229
-
230
-
231
-
232
-
233
-
234
-
235
-
236
-
237
-
238
-
239
-
240
-
241
-
242
-
243
-
244
-
245
-
246
-
247
-
248
-
249
-
250
-
251
-
252
-
253
-
254
-
255
-
256
-
257
-
258
-
259
-
260
-
261
-
262
-
263
-
264
-
265
-
266
-
267
-
268
-
269
-
270
-
271
-
272
-
273
-
274
-
275
-
276
-
277
-
278
-
279
-
280
-
281
-
282
-
283
-
284
-
285
-
286
-
287
-
288
-
289
-
290
-
291
-
292
-
293
-
294
-
295
-
296
-
297
-
298
-
299
-
300
-
301
-
302
-
303
-
304
-
305
-
306
-
307
-
308
-
309
-
310
-
311
-
312
-
313
-
314
-
315
-
316
-
317
-
318
-
319
-
320
-
321
-
322
-
323
-
324
-
325
-
326
-
327
-
328
-
329
-
330
-
331
-
332
-
333
-
334
-
335
-
336
-
337
-
338
-
339
-
340
-
341
-
342
-
343
-
344
-
345
-
346
-
347
-
348
-
349
-
350
-
351
-
352
-
353
-
354
-
355
-
356
-
357
-
358
-
359
-
360
-
361
-
362
-
363
-
364
-
365
-
366
-
367
-
368
-
369
-
370
-
371
 |
 |
