Netgear WGX102 WGX102v2 Reference Manual - Page 50
Wireless Channels, on C-7
 |
View all Netgear WGX102 manuals
Add to My Manuals
Save this manual to your list of manuals |
Page 50 highlights
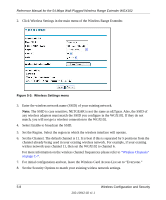
Reference Manual for the 54 Mbps Wall-Plugged Wireless Range Extender WGX102 2. Click Wireless Settings in the main menu of the Wireless Range Extender. Figure 5-3: Wireless Settings menu 3. Enter the wireless network name (SSID) of your existing network. Note: The SSID is case sensitive; NETGEAR is not the same as nETgear. Also, the SSID of any wireless adapters must match the SSID you configure in the WGX102. If they do not match, you will not get a wireless connection to the WGX102. 4. Select Enable to broadcast the SSID. 5. Set the Region. Select the region in which the wireless interface will operate. 6. Set the Channel. The default channel is 11. It is best if this is separated by 5 positions from the channel already being used in your existing wireless network. For example, if your existing wirless network uses channel 11, then set the WGX102 to channel 6. For more information on the wireless channel frequencies please refer to "Wireless Channels" on page C-7. 7. For initial configuration and test, leave the Wireless Card Access List set to "Everyone." 8. Set the Security Options to match your existing wirless network settings. 5-8 Wireless Configuration and Security 202-10042-02 v1.1
-
 1
1 -
2
-
3
-
4
-
5
-
6
-
7
-
8
-
9
-
10
-
11
-
12
-
13
-
14
-
15
-
16
-
17
-
18
-
19
-
20
-
21
-
22
-
23
-
24
-
25
-
26
-
27
-
28
-
29
-
30
-
31
-
32
-
33
-
34
-
35
-
36
-
37
-
38
-
39
-
40
-
41
-
42
-
43
-
44
-
 45
45 -
 46
46 -
 47
47 -
 48
48 -
 49
49 -
 50
50 -
 51
51 -
 52
52 -
 53
53 -
 54
54 -
 55
55 -
56
-
57
-
58
-
59
-
60
-
61
-
62
-
63
-
64
-
65
-
66
-
67
-
68
-
69
-
70
-
71
-
72
-
73
-
74
-
75
-
76
-
77
-
78
-
79
-
80
-
81
-
82
-
83
-
84
-
85
-
86
-
87
-
88
-
89
-
90
-
91
-
92
-
93
-
94
-
95
-
96
-
97
-
98
-
99
-
100
-
101
-
102
-
103
-
104
-
105
-
106
-
107
-
108
-
109
-
110
-
111
-
112
-
113
-
114
-
115
-
116
-
117
-
118
-
119
-
120
-
121
-
122
-
123
-
124
-
125
-
126
-
127
-
128
-
129
-
130
-
131
-
132
-
133
-
134
-
135
-
136
-
137
-
138
-
139
-
140
-
141
-
142
-
143
-
144
-
145
-
146
-
147
-
148
-
149
-
150
-
151
-
152
-
153
-
154
-
155
-
156
-
157
-
158
-
159
-
160
-
161
-
162
-
163
-
164
-
165
-
166
-
167
-
168
-
169
 |
 |
