Netgear WGX102 WGX102v2 Reference Manual - Page 76
IZARD, CON WIRELESS, RANGE, EXTENDER, Appendix C, Preparing Your, Network - password
 |
View all Netgear WGX102 manuals
Add to My Manuals
Save this manual to your list of manuals |
Page 76 highlights
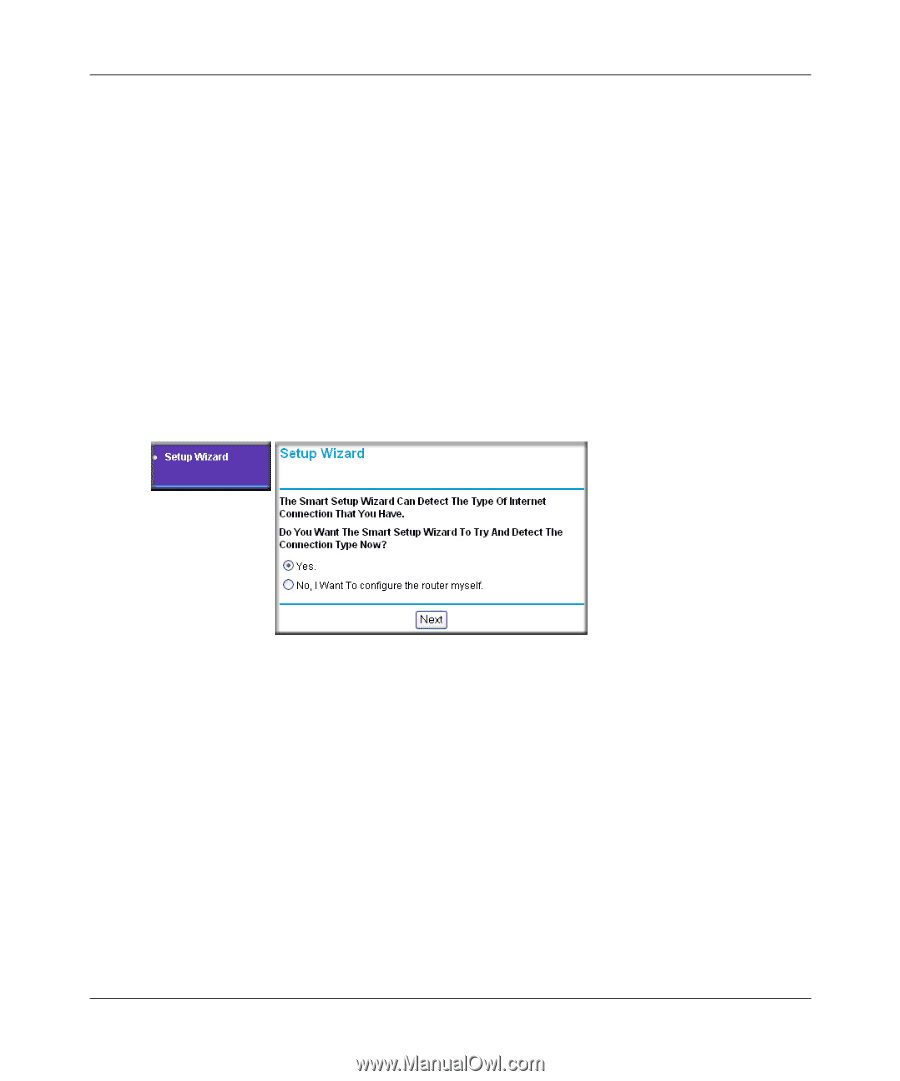
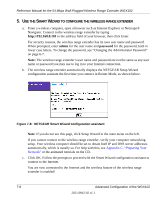
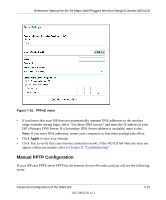
Reference Manual for the 54 Mbps Wall-Plugged Wireless Range Extender WGX102 5. USE THE SMART WIZARD TO CONFIGURE THE WIRELESS RANGE EXTENDER a. From a wireless computer, open a browser such as Internet Explorer or Netscape® Navigator. Connect to the wireless range extender by typing http://192.168.0.101 in the address field of your browser, then click Enter. For security reasons, the wireless range extender has its own user name and password. When prompted, enter admin for the user name and password for the password, both in lower case letters. To change the password, see "Changing the Administrator Password" on page 6-7. Note: The wireless range extender's user name and password are not the same as any user name or password you may use to log in to your Internet connection. b. The wireless range extender automatically displays the NETGEAR Setup Wizard configuration assistant the first time you connect in Router Mode, as shown below: Figure 7-8: NETGEAR Smart Wizard configuration assistant Note: If you do not see this page, click Setup Wizard in the main menu on the left. If you cannot connect to the wireless range extender, verify your computer networking setup. Your wireless computer should be set to obtain both IP and DNS server addresses automatically, which is usually so. For help with this, see Appendix C, "Preparing Your Network" or the animated tutorials on the CD. c. Click OK. Follow the prompts to proceed with the Smart Wizard configuration assistant to connect to the Internet. You are now connected to the Internet and the wireless feature of the wireless range extender is enabled! 7-8 Advanced Configuration of the WGX102 202-10042-02 v1.1
-
 1
1 -
2
-
3
-
4
-
5
-
6
-
7
-
8
-
9
-
10
-
11
-
12
-
13
-
14
-
15
-
16
-
17
-
18
-
19
-
20
-
21
-
22
-
23
-
24
-
25
-
26
-
27
-
28
-
29
-
30
-
31
-
32
-
33
-
34
-
35
-
36
-
37
-
38
-
39
-
40
-
41
-
42
-
43
-
44
-
45
-
46
-
47
-
48
-
49
-
50
-
51
-
52
-
53
-
54
-
55
-
56
-
57
-
58
-
59
-
60
-
61
-
62
-
63
-
64
-
65
-
66
-
67
-
68
-
69
-
70
-
 71
71 -
 72
72 -
 73
73 -
 74
74 -
 75
75 -
 76
76 -
 77
77 -
 78
78 -
 79
79 -
 80
80 -
 81
81 -
82
-
83
-
84
-
85
-
86
-
87
-
88
-
89
-
90
-
91
-
92
-
93
-
94
-
95
-
96
-
97
-
98
-
99
-
100
-
101
-
102
-
103
-
104
-
105
-
106
-
107
-
108
-
109
-
110
-
111
-
112
-
113
-
114
-
115
-
116
-
117
-
118
-
119
-
120
-
121
-
122
-
123
-
124
-
125
-
126
-
127
-
128
-
129
-
130
-
131
-
132
-
133
-
134
-
135
-
136
-
137
-
138
-
139
-
140
-
141
-
142
-
143
-
144
-
145
-
146
-
147
-
148
-
149
-
150
-
151
-
152
-
153
-
154
-
155
-
156
-
157
-
158
-
159
-
160
-
161
-
162
-
163
-
164
-
165
-
166
-
167
-
168
-
169
 |
 |