Netgear WNDAP620 Reference Manual - Page 39
Mounting plate, Screws and, wall supports, Detach the mounting plate from the wireless access point.
 |
View all Netgear WNDAP620 manuals
Add to My Manuals
Save this manual to your list of manuals |
Page 39 highlights
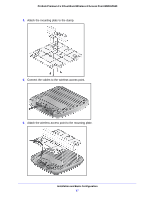
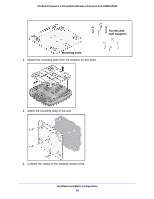
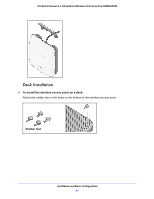
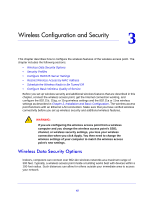
ProSafe Premium 3 x 3 Dual-Band Wireless-N Access Point WNDAP620 Screws and wall supports Mounting plate 2. Detach the mounting plate from the wireless access point. 3. Attach the mounting plate to the wall. 4. Connect the cables to the wireless access point. Installation and Basic Configuration 39
-
 1
1 -
2
-
3
-
4
-
5
-
6
-
7
-
8
-
9
-
10
-
11
-
12
-
13
-
14
-
15
-
16
-
17
-
18
-
19
-
20
-
21
-
22
-
23
-
24
-
25
-
26
-
27
-
28
-
29
-
30
-
31
-
32
-
33
-
 34
34 -
 35
35 -
 36
36 -
 37
37 -
 38
38 -
 39
39 -
 40
40 -
 41
41 -
 42
42 -
 43
43 -
 44
44 -
45
-
46
-
47
-
48
-
49
-
50
-
51
-
52
-
53
-
54
-
55
-
56
-
57
-
58
-
59
-
60
-
61
-
62
-
63
-
64
-
65
-
66
-
67
-
68
-
69
-
70
-
71
-
72
-
73
-
74
-
75
-
76
-
77
-
78
-
79
-
80
-
81
-
82
-
83
-
84
-
85
-
86
-
87
-
88
-
89
-
90
-
91
-
92
-
93
-
94
-
95
-
96
-
97
-
98
-
99
-
100
-
101
-
102
-
103
-
104
-
105
-
106
-
107
-
108
-
109
-
110
-
111
-
112
-
113
-
114
-
115
-
116
-
117
-
118
-
119
-
120
-
121
-
122
-
123
-
124
-
125
-
126
-
127
-
128
-
129
-
130
-
131
-
132
-
133
-
134
-
135
-
136
-
137
-
138
-
139
-
140
-
141
-
142
-
143
-
144
-
145
-
146
-
147
-
148
-
149
-
150
-
151
-
152
-
153
-
154
-
155
-
156
-
157
-
158
-
159
-
160
-
161
-
162
-
163
-
164
-
165
-
166
-
167
-
168
-
169
-
170
-
171
-
172
 |
 |

Installation and Basic Configuration
39
ProSafe Premium 3 x 3 Dual-Band Wireless-N Access Point WNDAP620
2.
Detach the mounting plate from the wireless access point.
3.
Attach the mounting plate to the wall.
4.
Connect the cables to the wireless access point.
Mounting plate
Screws and
wall supports