Netgear WNDR4700 Installation Guide
Netgear WNDR4700 Manual
 |
View all Netgear WNDR4700 manuals
Add to My Manuals
Save this manual to your list of manuals |
Netgear WNDR4700 manual content summary:
- Netgear WNDR4700 | Installation Guide - Page 1
http://support.netgear.com. CENTRIA WNDR4700/WNDR4720 Installation Guide NETGEAR, Inc. 350 East Plumeria Drive San Jose, CA 95134, USA September 2012 Package Contents The box contains the following items. If any items are incorrect, missing, or damaged, contact your NETGEAR dealer. CENTRIA Hard - Netgear WNDR4700 | Installation Guide - Page 2
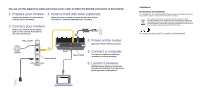
and connect your router or follow the detailed instructions in this booklet. 1. Prepare your modem. 3. Insert a hard disk drive (optional). Unplug your modem. If it has a battery backup, remove the battery. When the router is turned off, install the hard disk drive as described in "Install an HDD - Netgear WNDR4700 | Installation Guide - Page 3
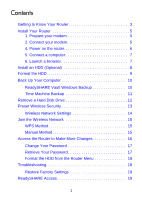
a Hard Disk Drive 12 Preset Wireless Security 13 Wireless Network Settings 14 Join the Wireless Network 15 WPS Method 15 Manual Method 15 Access the Router to Make More Changes 16 Change Your Password 17 Retrieve Your Password 17 Format the HDD from the Router Menu 18 Troubleshooting 18 - Netgear WNDR4700 | Installation Guide - Page 4
ReadySHARE Printer 20 ReadySHARE Cloud 21 NETGEAR genie App 22 NETGEAR genie Mobile App 23 2 - Netgear WNDR4700 | Installation Guide - Page 5
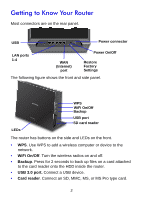
Getting to Know Your Router Most connectors are on the rear panel. USB Power connector LAN ports 1-4 WAN (Internet) port Power On/Off Restore Factory Settings The following figure shows the front and side panel. LEDs WPS WiFi On/Off Backup USB port SD card reader The router has buttons on - Netgear WNDR4700 | Installation Guide - Page 6
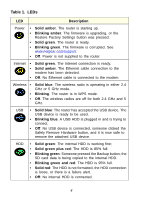
is upgrading, or the Restore Factory Settings button was pressed. • Solid green. The router is ready. • Blinking green. The firmware is corrupted. See www.netgear.com/support. • Off. Power is not supplied to the router. Internet • Solid green. The Internet connection is ready. • Solid amber. The - Netgear WNDR4700 | Installation Guide - Page 7
the cable between your modem and that router. Now your modem should be turned off and cabled only to the wall jack for your Internet service. 2. Connect your modem. 1 DSL or cable Internet Modem 2 Router b a Modem a. Plug in and turn on your modem. (Replace the batteries if you removed them - Netgear WNDR4700 | Installation Guide - Page 8
3. Install a hard disk drive (optional). 3 For details, see Install an HDD (Optional) on page 8. 4. Power on the router. Modem Router On/Off 4 a. Connect the power adapter to the router - Netgear WNDR4700 | Installation Guide - Page 9
6. Launch a browser. 6 • If a web page does not open, close and reopen the browser and type http://routerlogin.net in the address bar, or see Troubleshooting on page 18. • If you installed an HDD, you can format it when prompted, or do that later. • During installation, you can download and - Netgear WNDR4700 | Installation Guide - Page 10
Install an HDD (Optional) You can install a hard disk drive (HDD) in the router. The router supports 3.5 inch SATA HDDs (both 0.75 and 1-inch thickness). Visit www.netgear.com/CENTRIA_HD for list of compatible hard drives. Caution: To protect your equipment, always turn off the router before - Netgear WNDR4700 | Installation Guide - Page 11
HDD does not have to be reformatted. If the HDD has not yet been formatted, you are prompted to format the HDD. Caution: Formatting the hard disks erases any data stored on it. You can follow the prompts to do so, or wait until later and log in to the router - Netgear WNDR4700 | Installation Guide - Page 12
1. Install CENTRIA using a PC, Mac, tablet, or smartphone. 3. To back up your Mac, use Apple Time Machine. 2. To back up your Windows computers, install ReadySHARE Vault on each PC. Caution: NETGEAR assumes no responsibility for lost data and does not offer data recovery services if a drive fails - Netgear WNDR4700 | Installation Guide - Page 13
automatically backs up your computer. To back up a Mac onto an HDD in the router: 1. From your Mac Desktop, open Macintosh HD or Finder. 2. Select WNDR4700 from the SHARED list in the left menu. 3. Click the Connect As button. 4. In the pop-up window, select Registered User, and enter admin as - Netgear WNDR4700 | Installation Guide - Page 14
Caution: To protect your equipment, always turn off the router before removing or inserting a hard disk drive (HDD). To remove the hard disk drive (HDD): 1. Turn off the router with the Power On/Off button. 2. Open the router side door and release the internal latch as shown. 3. Grab the - Netgear WNDR4700 | Installation Guide - Page 15
for every device, like a serial number, to protect and maximize your wireless security. This information is on the label on the bottom of the product. NETGEAR recommends that you do not change the preset WiFi network name (SSID) and network key (password). If you do change 13 - Netgear WNDR4700 | Installation Guide - Page 16
the settings, the security SSID and password on the bottom of the product no longer apply. Wireless Network Settings Record the default preset wireless settings that are printed on the label in the space below for easy reference. WiFi network name (SSID): Network key (password): If you change the - Netgear WNDR4700 | Installation Guide - Page 17
the manual method to join your wireless network. WPS Method WPS lets you join your WiFi network without typing the password. If your wireless device supports WPS device that is trying to join the network. Follow the WPS instructions that came with your computer or wireless device to join the network. - Netgear WNDR4700 | Installation Guide - Page 18
Access the Router to Make More Changes After you use NETGEAR genie to set up the router, you can log in to the router to view or change its for the user name and password for the password. The router BASIC Home screen displays: See the user manual for more information about the router screens. 16 - Netgear WNDR4700 | Installation Guide - Page 19
the router. 2. Select Administration > Set Password to display the Set Password screen: 3. Type your old password and type the new password twice. NETGEAR recommends that you use the password recovery feature when you change your password. 4. Select the Enable Password Recovery check box. 5. You are - Netgear WNDR4700 | Installation Guide - Page 20
use this method to format the HDD. Caution: Formatting the hard disk drive erases any files stored on the drive. To format an hdd: 1. Select ADVANCED > Storage > Advanced Settings. 2. Click the Format Internal Hard Drive button. Troubleshooting If you turn off the router when an HDD is installed - Netgear WNDR4700 | Installation Guide - Page 21
settings are restored. ReadySHARE Access ReadySHARE lets you access and share the HDD inside the router or a USB drive connected the router USB router. To access the internal HDD or USB device from Windows: The readyshareconnect.exe file is available to download here: www.netgear.com/readyshare. - Netgear WNDR4700 | Installation Guide - Page 22
to the router's USB port and access it wirelessly. To set up ReadySHARE netgear.com/readyshare). c. Select the language. 3. If prompted, select the printer and click the Connect button for each computer. Once the connection is established on the first computer, the status changes to Manually - Netgear WNDR4700 | Installation Guide - Page 23
manual by clicking the Documentation link in the router management router interface or visiting http://support.netgear.com. ReadySHARE Cloud ReadySHARE Cloud gives you remote access Follow the instructions to register your router with the ReadySHARE Cloud server. 3. Invite others to access the shared - Netgear WNDR4700 | Installation Guide - Page 24
Manage parental controls to protect devices in your network from inappropriate content. • ReadySHARE. Access a connected USB device or printer. You can also download ReadySHARE Vault from this screen. • Support. Support FAQs are available on your computer without an Internet connection. You can get - Netgear WNDR4700 | Installation Guide - Page 25
, and it displays the dashboard screen. To use this app, you need a WiFi connection from your phone or iPad to your NETGEAR home network. • Manage WiFi settings and guest access for your home network. • View a map of your network. • Set up or manage Parental Controls. • Use traffic meter to check - Netgear WNDR4700 | Installation Guide - Page 26
, transmitted, transcribed, stored in a retrieval system, or translated into any language in any form or by any means without the written permission of NETGEAR, Inc. DO NOT stack equipment, or place equipment in tight spaces or in drawers. Be sure that your equipment at least 2 inches (5 cm
-
 1
1 -
 2
2 -
 3
3 -
 4
4 -
 5
5 -
 6
6 -
 7
7 -
8
-
9
-
10
-
11
-
12
-
13
-
14
-
15
-
16
-
17
-
18
-
19
-
20
-
21
-
22
-
23
-
24
-
25
-
26
 |
 |
NETGEAR, Inc.
350 East Plumeria Drive
San Jose, CA 95134, USA
September 2012
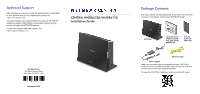
Technical Support
After installing your device, locate the serial number on the label
of your product and use it to register your product at
.
You must register your product before you can use NETGEAR
telephone support. NETGEAR recommends registering your
product through the NETGEAR website.
For product updates and web support, visit
.
CENTRIA WNDR4700/WNDR4720
Installation Guide
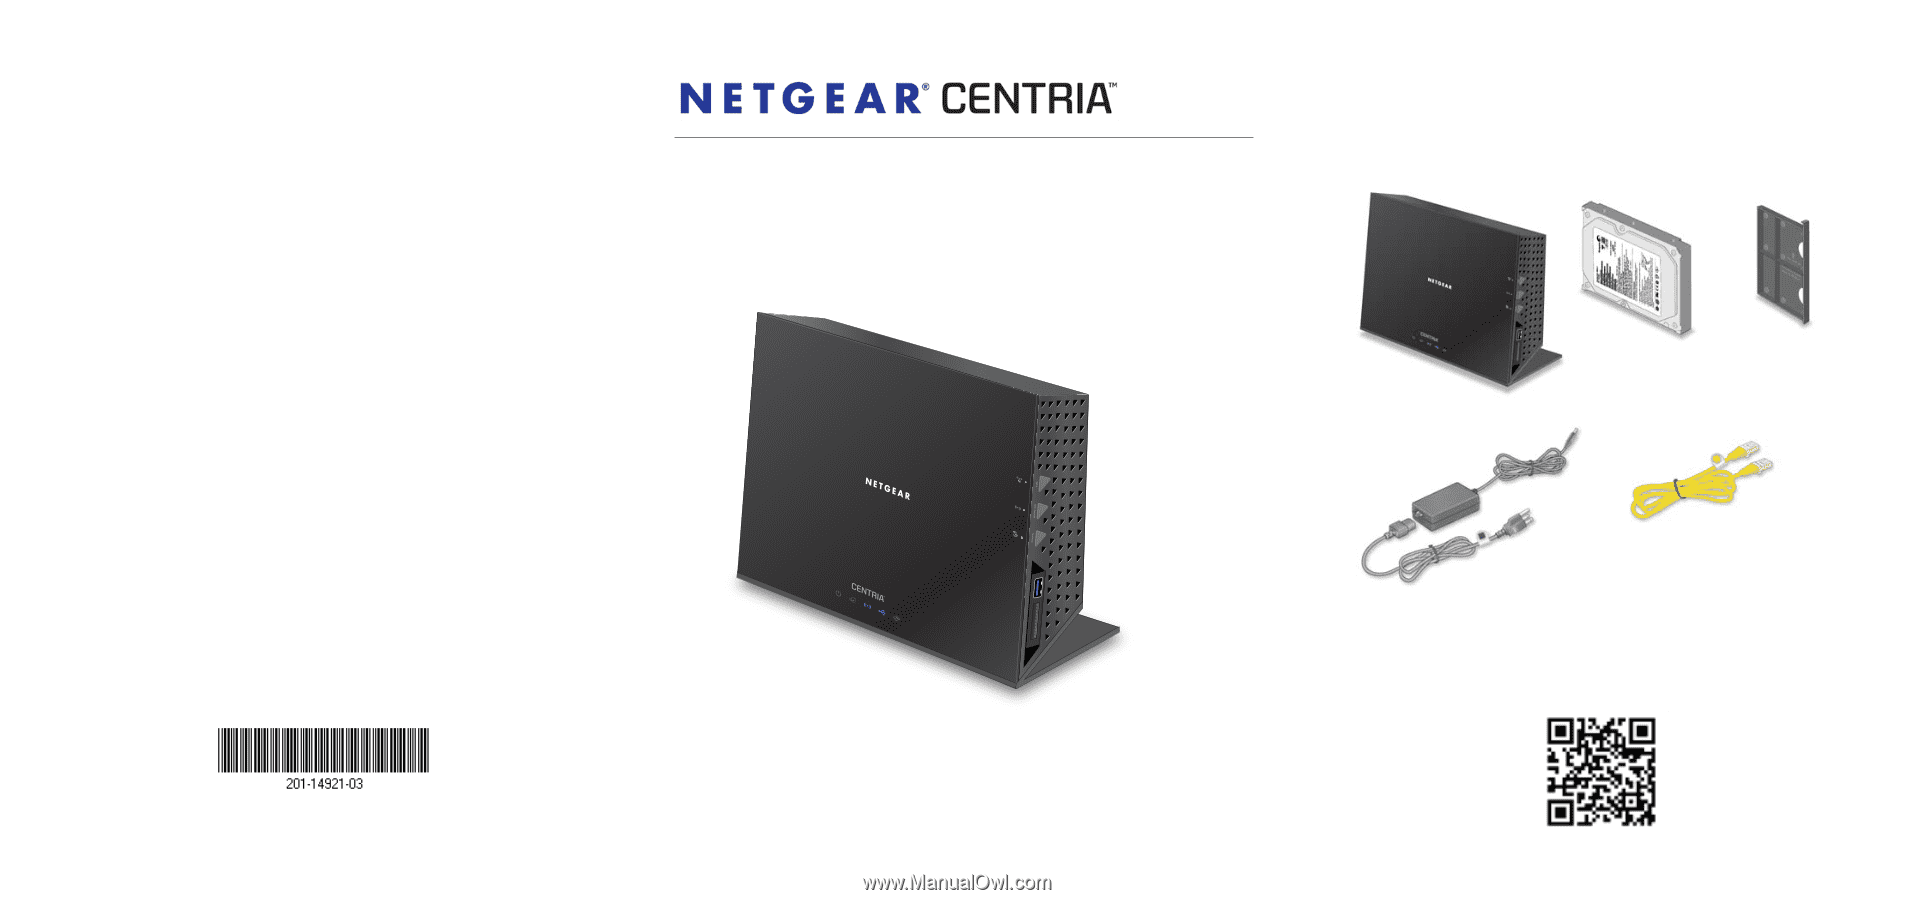
Package Contents
The box contains the following items. If any items are incorrect,
missing, or damaged, contact your NETGEAR dealer.
To view the CENTRIA Installation video, use this QR code.
Ethernet cable
Power adapter
CENTRIA
Tray for
Hard disk drive
Note:
Your hard disk drive was shipped external to CENTRIA to
protect it from any accidental damage. Always remove the hard drive
from the internal slot when shipping CENTRIA.
(HDD) included
only with model
0.75-inch
HDD only
WNDR4720