Oki C941dn C911dn/C931dn/C941dn Advanced User's Guide - Page 47
Printing on user-selected paper sizes (custom s and lengthy printing
 |
View all Oki C941dn manuals
Add to My Manuals
Save this manual to your list of manuals |
Page 47 highlights
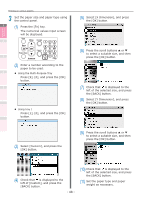
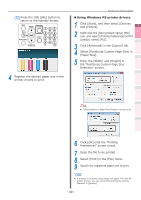
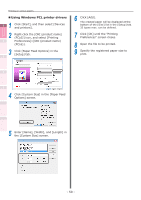
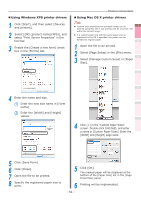
Funciones de impresión útiles Concordar los colores Utilización de software de utilidades Printing on user-selected paper sizes (custom pages and lengthy printing) Register the desired paper size in the printer driver, and specify when printing. [Sizes that can be fed from the MultiPurpose Tray (Settable custom sizes)] Width: 64 to 330mm Length: 89 to 1321mm [Sizes that can be fed from the MultiPurpose Tray] Trays 1/2/3/4/5 Width: 99 to 330mm Length: 147 to 457mm [Sizes where 2-sided printing is possible] Width: 99 to 330mm Length: 147 to 483mm Note zz If printing smaller paper than width 99mm and length 147mm, feed from the Multi-Purpose Tray and output to the face-up stacker. zz Set the paper size to portrait length, and set in the device. zz Not usable with some applications. zz If feeding from the Multi-Purpose Tray, support the paper manually for paper lengths that are not fully supported by the paper supporter. zz If feeding from the paper trays (tray 1, (optional) trays 2 to 5), press the scroll buttons or on the device control panel, and select [Menu]>[Tray Configuration]>[Set Tray 1]>[Paper Size]>[Custom]. zz If there is no paper in the tray, setting the function to switch automatically to a tray in which paper of the same size has been set, the default settings will be enabled (i.e., the check box will be enabled). If the paper runs out during printing, paper will feed from another tray. Disable (i.e., uncheck) the check box when printing custom size paper from a designated tray only. Printing on various papers 1 Set the paper. Memo zz You can print by manually feeding one page at a 1 time from the Multi-Purpose Tray. For details, see "Printing single sheets manually" (P.81). Setting in the Multi-Purpose Tray Setting the paper orientation 2 "#$ 3 4 Setting in the paper tray Setting the paper orientation 5 Apéndice Índice 2 If outputting to the face-up stacker, open the face-up stacker. Set the print surface face-up to output. Memo zz You can output to the face-down stacker. Config de red Comprobar y cambiar la configuración de la impresora utilizando el panel de control - 47 - Face-up stacker
-
 1
1 -
2
-
3
-
4
-
5
-
6
-
7
-
8
-
9
-
10
-
11
-
12
-
13
-
14
-
15
-
16
-
17
-
18
-
19
-
20
-
21
-
22
-
23
-
24
-
25
-
26
-
27
-
28
-
29
-
30
-
31
-
32
-
33
-
34
-
35
-
36
-
37
-
38
-
39
-
40
-
41
-
 42
42 -
 43
43 -
 44
44 -
 45
45 -
 46
46 -
 47
47 -
 48
48 -
 49
49 -
 50
50 -
 51
51 -
 52
52 -
53
-
54
-
55
-
56
-
57
-
58
-
59
-
60
-
61
-
62
-
63
-
64
-
65
-
66
-
67
-
68
-
69
-
70
-
71
-
72
-
73
-
74
-
75
-
76
-
77
-
78
-
79
-
80
-
81
-
82
-
83
-
84
-
85
-
86
-
87
-
88
-
89
-
90
-
91
-
92
-
93
-
94
-
95
-
96
-
97
-
98
-
99
-
100
-
101
-
102
-
103
-
104
-
105
-
106
-
107
-
108
-
109
-
110
-
111
-
112
-
113
-
114
-
115
-
116
-
117
-
118
-
119
-
120
-
121
-
122
-
123
-
124
-
125
-
126
-
127
-
128
-
129
-
130
-
131
-
132
-
133
-
134
-
135
-
136
-
137
-
138
-
139
-
140
-
141
-
142
-
143
-
144
-
145
-
146
-
147
-
148
-
149
-
150
-
151
-
152
-
153
-
154
-
155
-
156
-
157
-
158
-
159
-
160
-
161
-
162
-
163
-
164
-
165
-
166
-
167
-
168
-
169
-
170
-
171
-
172
-
173
-
174
-
175
-
176
-
177
-
178
-
179
-
180
-
181
-
182
-
183
-
184
-
185
-
186
-
187
-
188
-
189
-
190
-
191
-
192
-
193
-
194
-
195
-
196
-
197
-
198
-
199
-
200
-
201
-
202
-
203
-
204
-
205
-
206
-
207
-
208
-
209
-
210
-
211
-
212
-
213
-
214
-
215
-
216
-
217
-
218
-
219
-
220
-
221
-
222
-
223
-
224
-
225
-
226
-
227
-
228
-
229
-
230
-
231
-
232
-
233
-
234
-
235
-
236
-
237
-
238
-
239
-
240
-
241
-
242
-
243
-
244
-
245
-
246
-
247
-
248
-
249
-
250
-
251
-
252
-
253
-
254
-
255
-
256
-
257
-
258
-
259
-
260
-
261
-
262
-
263
-
264
-
265
-
266
-
267
-
268
-
269
-
270
-
271
-
272
-
273
-
274
-
275
-
276
-
277
-
278
-
279
-
280
-
281
-
282
-
283
-
284
-
285
-
286
-
287
-
288
-
289
-
290
-
291
-
292
-
293
-
294
-
295
-
296
-
297
-
298
-
299
-
300
-
301
-
302
-
303
-
304
-
305
-
306
-
307
-
308
-
309
-
310
-
311
-
312
-
313
-
314
-
315
-
316
-
317
-
318
-
319
-
320
 |
 |
