Olympus 2500L C-2500L Digital Camera Instructions (English) - Page 44
Setting Menus
 |
UPC - 050332295131
View all Olympus 2500L manuals
Add to My Manuals
Save this manual to your list of manuals |
Page 44 highlights
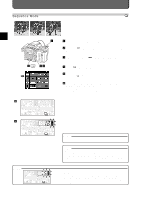
Setting Menus Menus can be displayed on the LCD monitor so that you can select and set up camera features. This section explains the menu format and how to operate them. A Item Available user-setting A About Menus Cursor Setting Menus 1 Press the [ ] button. The first menu will appear on the LCD monitor. 1 2 Press the top and bottom points of the jog dial until aligning the 2 cursor on the item you want to set. 1 3 Press the right point of the jog dial to align the cursor with the setting. 4 Press the [OK] button. This will enter the setting. 3 4 OK B 1 or OK E-38 B How to Switch the Page of Menus 4 items are displayed on each menu. You can scroll through these items in order to get to the next menu. Using the top and bottom points of the jog dial, you can switch the Pages of menus. Closing Menus Close menus after settings. 1 Select one of the menu items and then press the [ the [OK] button. Menu vanishes from the LCD monitor. ] button or NOTE • Select the menu items and then press the [OK] button to enter the setting. The setting will be canceled and remain previous settings if you press the [ ] button without pressing the [OK] button. MEMO • If the shutter is released while a menu is displayed, the current set- tings will apply to the shot. When the menu button is pressed after shooting, the menu used in the last setting can be recalled without returning to the first menu page. This is convenient when you want to shoot multiple pictures with different settings.
-
 1
1 -
2
-
3
-
4
-
5
-
6
-
7
-
8
-
9
-
10
-
11
-
12
-
13
-
14
-
15
-
16
-
17
-
18
-
19
-
20
-
21
-
22
-
23
-
24
-
25
-
26
-
27
-
28
-
29
-
30
-
31
-
32
-
33
-
34
-
35
-
36
-
37
-
38
-
 39
39 -
 40
40 -
 41
41 -
 42
42 -
 43
43 -
 44
44 -
 45
45 -
 46
46 -
 47
47 -
 48
48 -
 49
49 -
50
-
51
-
52
-
53
-
54
-
55
-
56
-
57
-
58
-
59
-
60
-
61
-
62
-
63
-
64
-
65
-
66
-
67
-
68
-
69
-
70
-
71
-
72
-
73
-
74
-
75
-
76
-
77
-
78
-
79
-
80
-
81
-
82
-
83
-
84
-
85
-
86
-
87
-
88
-
89
-
90
-
91
-
92
-
93
-
94
-
95
 |
 |
