Olympus 2500L C-2500L Digital Camera Instructions (English) - Page 62
Clearing All the Frames, Displaying Images on TV - printer
 |
UPC - 050332295131
View all Olympus 2500L manuals
Add to My Manuals
Save this manual to your list of manuals |
Page 62 highlights
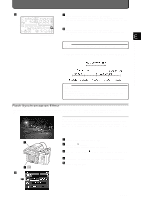
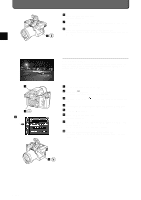
Clearing All the Frames The entire SmartMedia / CompactFlash can be cleared as follows. 1 Set the mode dial to . 2 Press the [SM/CF] button and select the card to clear all the frames. 1 3 Press the [ ] button. The menu will appear on the LCD monitor. 2 3 4 Align the cursor with (or in the case of CompactFlash) with the top/bottom point of the jog dial. 5 Select with the right / left point of the jog dial. 6 Press the [OK] button. 4 The screen confirming whether all images should be erased will be displayed. 7 Select "YES" with the right point of the jog dial. 8 Press the [OK] button. All images on the card will be erased. MEMO • Only images which are not write-protected are erased. • To erase protected images, first cancel the protection and then perform the above procedure, or reformat the card. • The above procedure only erases images in the DCF (Design rule for Camera File system) format. To erase images in other formats, you must erase them frame by frame. Displaying Images on TV Using the included video cable, you can display pictures you have taken on a TV. Even without a personal computer, you can enjoy viewing your photographs on a big screen. 1 Plug the video cable into the camera's video output connector. NOTE • Check that the power to the TV and camera is OFF before connect- ing the cable. To video-IN connector on TV 2 Plug the other end of the video cable into the TV's video input jack. Video-OUT connector 3 Turn ON the TV. 4 Set the mode dial to . 4 5 5 Turn power to the camera ON. The image in the SmartMedia will appear on the TV. 6 Select the images for playback with the jog dial. MEMO • Because of TV adjustments, the image can appear off-center. There is nothing wrong with the equipment. • Depending on the type of TV you use, a black frame may appear around the images. This black frame will appear in printouts if sent 6 from the TV to a video printer. • It is recommended to use the AC adapter (sold separately). E-56
-
 1
1 -
2
-
3
-
4
-
5
-
6
-
7
-
8
-
9
-
10
-
11
-
12
-
13
-
14
-
15
-
16
-
17
-
18
-
19
-
20
-
21
-
22
-
23
-
24
-
25
-
26
-
27
-
28
-
29
-
30
-
31
-
32
-
33
-
34
-
35
-
36
-
37
-
38
-
39
-
40
-
41
-
42
-
43
-
44
-
45
-
46
-
47
-
48
-
49
-
50
-
51
-
52
-
53
-
54
-
55
-
56
-
 57
57 -
 58
58 -
 59
59 -
 60
60 -
 61
61 -
 62
62 -
 63
63 -
 64
64 -
 65
65 -
 66
66 -
 67
67 -
68
-
69
-
70
-
71
-
72
-
73
-
74
-
75
-
76
-
77
-
78
-
79
-
80
-
81
-
82
-
83
-
84
-
85
-
86
-
87
-
88
-
89
-
90
-
91
-
92
-
93
-
94
-
95
 |
 |
