Olympus 2500L C-2500L Digital Camera Instructions (English) - Page 45
EE-39
 |
UPC - 050332295131
View all Olympus 2500L manuals
Add to My Manuals
Save this manual to your list of manuals |
Page 45 highlights
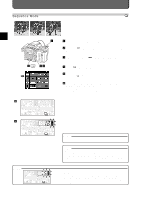
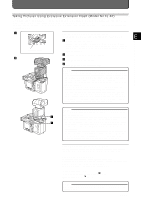
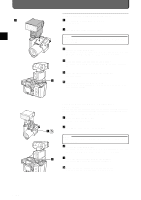
Setting Resolution Resolution is available as SQ (standard quality), HQ (high quality) and SHQ (super high quality). Definition increases in this order. Resolution can be selected as follows. 1 1 Set the mode dial to "P", "A" or "M". 2 Press the [ ] button. E The first menu will appear on the LCD monitor. Other Ways to Use Your Camera 2 3 3 Align the cursor with dial. with the top / bottom point of the jog 4 Press the right / left point of the jog dial to select a resolution from SQ, HQ and SHQ. To cancel the setting, press the button. 5 Press the [ok] button. The resolution will be entered and the cursor will return to . The selected resolution will appear on the control panel. (See the illustration A .) 4 MEMO • Pictures taken at SQ or SHQ resolution can be saved in one of two A file formats: SQ: 640 x 512 pixels / 1280 x 1024 pixels ,SHQ: JPEG/TIFF. For an explanation on how to set file format, see "Selecting Image Size for SQ Images" (P. 39) and "Specifying File Format (JPEG/TIFF) for SHQ Images" (P. 40) . 1 2 3 4 Selecting Image Size for SQ Images With SQ images, you can select the size of the images. Obviously, the smaller the size, the more images can be stored on a card. 1 Set the mode dial to "P", "A" or "M". 2 Press the [ ] button. The first menu will appear on the LCD monitor. 3 Align the cursor with dial. with the top / bottom point of the jog 4 Select [SQ] with the right / left point of the jog dial. 5 Using the top/bottom point of the jog dial, select image size: "640 ן512 (1/8)" or "1280 ן1024 (1/8)". To cancel the setting, press the button. 6 Press the [OK] button. The file size will be set and the cursor will return to . E-39
-
 1
1 -
2
-
3
-
4
-
5
-
6
-
7
-
8
-
9
-
10
-
11
-
12
-
13
-
14
-
15
-
16
-
17
-
18
-
19
-
20
-
21
-
22
-
23
-
24
-
25
-
26
-
27
-
28
-
29
-
30
-
31
-
32
-
33
-
34
-
35
-
36
-
37
-
38
-
39
-
 40
40 -
 41
41 -
 42
42 -
 43
43 -
 44
44 -
 45
45 -
 46
46 -
 47
47 -
 48
48 -
 49
49 -
 50
50 -
51
-
52
-
53
-
54
-
55
-
56
-
57
-
58
-
59
-
60
-
61
-
62
-
63
-
64
-
65
-
66
-
67
-
68
-
69
-
70
-
71
-
72
-
73
-
74
-
75
-
76
-
77
-
78
-
79
-
80
-
81
-
82
-
83
-
84
-
85
-
86
-
87
-
88
-
89
-
90
-
91
-
92
-
93
-
94
-
95
 |
 |
