Olympus 2500L C-2500L Digital Camera Instructions (English) - Page 50
Taking Pictures Using Extension Flash
 |
UPC - 050332295131
View all Olympus 2500L manuals
Add to My Manuals
Save this manual to your list of manuals |
Page 50 highlights
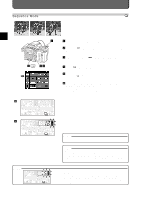
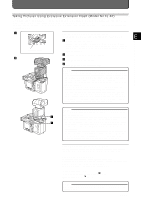
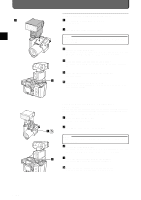
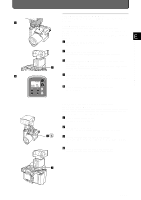
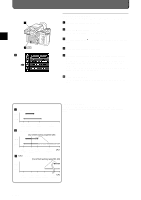
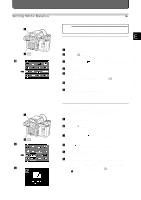
1 E-44 Taking Pictures Using Extension Flash 1 Check that the built-in flash is retracted. If not, retract it. 2 Turn ON power to the extension flash. NOTE • To override flash emission from the exclusive extension flash, set its power to OFF. 3 Select one of the flash modes. The flash has four modes: Auto-flash, Red-eye reducing flash, and Fill-in flash. See "Flash Mode Selection" (P. 21) for more information. 4 Press the shutter release button down halfway. The orange lamp and the green lamp inside the viewfinder will light up. 5 Press the shutter release button down all the way. The flash will fire. 2 6 Check that the flash has fired correctly. If the flash has fired correctly, the auto check lamp on the extension flash will start blinking. 1 2 Using Both Extension Flash and Built-In Flash Simultaneously You can use both the extension flash and the built-in flash simultaneously. Shadows can be reduced by bouncing the extension flash light off of ceilings or walls. Please experiment for best results. 1 Press the flash pop-up button. The built-in flash will popup. 2 Turn ON the power to the extension flash. NOTE • To override flash emission from the exclusive extension flash, set its power to OFF. 3 Select one of the flash modes. The flash has four modes: Auto-flash, Red-eye reducing flash, and Fill-in flash. See "Flash Mode Selection" (P. 21) for more information. 4 Press the shutter release button down halfway. The orange lamp inside the viewfinder will light up. 5 Press the shutter release button down all the way. Both the extension flash and the built-in flash will fire.
-
 1
1 -
2
-
3
-
4
-
5
-
6
-
7
-
8
-
9
-
10
-
11
-
12
-
13
-
14
-
15
-
16
-
17
-
18
-
19
-
20
-
21
-
22
-
23
-
24
-
25
-
26
-
27
-
28
-
29
-
30
-
31
-
32
-
33
-
34
-
35
-
36
-
37
-
38
-
39
-
40
-
41
-
42
-
43
-
44
-
 45
45 -
 46
46 -
 47
47 -
 48
48 -
 49
49 -
 50
50 -
 51
51 -
 52
52 -
 53
53 -
 54
54 -
 55
55 -
56
-
57
-
58
-
59
-
60
-
61
-
62
-
63
-
64
-
65
-
66
-
67
-
68
-
69
-
70
-
71
-
72
-
73
-
74
-
75
-
76
-
77
-
78
-
79
-
80
-
81
-
82
-
83
-
84
-
85
-
86
-
87
-
88
-
89
-
90
-
91
-
92
-
93
-
94
-
95
 |
 |
