Olympus 2500L C-2500L Digital Camera Instructions (English) - Page 47
EE-41
 |
UPC - 050332295131
View all Olympus 2500L manuals
Add to My Manuals
Save this manual to your list of manuals |
Page 47 highlights
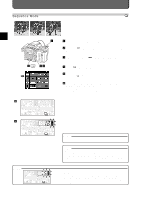
Setting ISO Rating You can set ISO rating to that of 35mm film. There are 3 ratings: 100, 200 and 400. The higher the level, the better photographs taken in dark places or photographs of rapidly moving objects come out. 1 1 Set the mode dial to "P", "A" or "M". Other Ways to Use Your Camera 2 3 2 Press the [ ] button. The first menu will appear on the LCD monitor. E 3 Align the cursor with dial. with the top/ bottom point of the jog 4 Select the ISO rating from "100", "200" and "400" with the right / left point of the jog dial. To cancel the setting, press the button. 5 Press the [OK] button. The speed will be set and the cursor will return to . "ISO" will appear on the control panel when you select "200" or "400". MEMO • When you select "100", "ISO" will not appear on the control panel. That's because "100" is the standard. • Though photographs taken in dark places come out better the higher the ISO rating is, the images will be grainy. Learn to use this effect to your advantage. • In the M mode, the maximum selectable shutter speed varies depending on the ISO rating. ISO Max. 100 1/2 sec. 200 1/4 sec. 400 1/8 sec. Setting Sharpness 1 2 3 A Sharpness is the degree of clarity of an image. This camera lets you select between NORMAL and SOFT. NORMAL renders the standard degree of image clarity, whereas SOFT softens edges of images. While NORMAL is adequate for an appreciation of prints, SOFT is for image editing on your computer. See the results for yourself, but SOFT adds atmospheric effect to images, while NORMAL just makes them clear. 1 Set the mode dial to "P", "A" or "M". 2 Press the [ ] button. The first menu will appear on the LCD monitor. 3 Align the cursor with dial. with the top / bottom point of the jog 4 Select from "NORMAL" and "SOFT" with the right / left point of the cross the button. To cancel the setting, press the button. 5 Press the [OK] button. The sharpness will be entered and the cursor will return to . E-41
-
 1
1 -
2
-
3
-
4
-
5
-
6
-
7
-
8
-
9
-
10
-
11
-
12
-
13
-
14
-
15
-
16
-
17
-
18
-
19
-
20
-
21
-
22
-
23
-
24
-
25
-
26
-
27
-
28
-
29
-
30
-
31
-
32
-
33
-
34
-
35
-
36
-
37
-
38
-
39
-
40
-
41
-
 42
42 -
 43
43 -
 44
44 -
 45
45 -
 46
46 -
 47
47 -
 48
48 -
 49
49 -
 50
50 -
 51
51 -
 52
52 -
53
-
54
-
55
-
56
-
57
-
58
-
59
-
60
-
61
-
62
-
63
-
64
-
65
-
66
-
67
-
68
-
69
-
70
-
71
-
72
-
73
-
74
-
75
-
76
-
77
-
78
-
79
-
80
-
81
-
82
-
83
-
84
-
85
-
86
-
87
-
88
-
89
-
90
-
91
-
92
-
93
-
94
-
95
 |
 |
