Olympus 2500L C-2500L Digital Camera Instructions (English) - Page 55
EE-49
 |
UPC - 050332295131
View all Olympus 2500L manuals
Add to My Manuals
Save this manual to your list of manuals |
Page 55 highlights
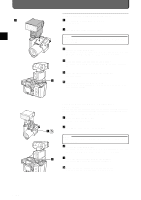
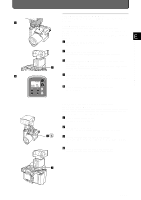
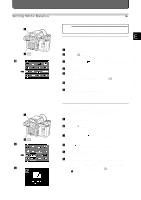
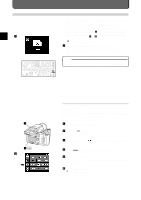
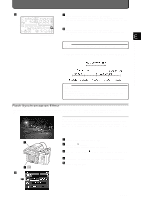
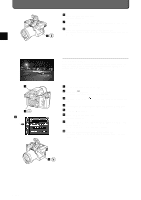
Setting White Balance By setting the white balance, images are not affected by the surrounding light. MEMO 1 • For more information on white balancing, see "Taking Natural Color Pictures Under Fluorescent Light" (P. 64). Auto White Balancing E In auto white balancing, white light is automatically detected and balanced against the overall color of the photograph. It can be set as follows. Other Ways to Use Your Camera 2 3 1 Set the mode dial to "P", "A" or "M". 2 Press the [ ] button. The first menu will appear on the LCD monitor. 3 Align the cursor with dial. with the top / bottom point of the jog 4 Select [AUTO] with the right / left point of the jog dial. 5 Press the [OK] button. When the [OK] button is pressed again or the [ pressed, the menu will disappear. ] button is 6 Press the shutter release button down halfway to lock the focus on the subject. 7 Press the shutter release button down all the way. 1 2 4 6 White Balancing with Reference A white balancing reference can be used when colors do not come out right with auto white balancing. In this mode, the camera memorizes a white light as a reference for balancing white against the overall color of the image. 1 Set the mode dial to "P", "A" or "M". 2 Press the [ ] button. The first menu will appear on the LCD monitor. 3 Align the cursor with dial. with the top / button point of the jog 4 Select with the right / left point of the jog dial. 5 Press the [OK] button. The selection display of settings will appear on the LCD monitor. 6 To set white balancing again, position a white sheet of paper or have someone hold it so that it is illuminated by a light source. Then, focus on the paper so that it fills the viewfinder and press the [OK] button. To use the previous setting, press the [ ] button and move to step 7 . E-49
-
 1
1 -
2
-
3
-
4
-
5
-
6
-
7
-
8
-
9
-
10
-
11
-
12
-
13
-
14
-
15
-
16
-
17
-
18
-
19
-
20
-
21
-
22
-
23
-
24
-
25
-
26
-
27
-
28
-
29
-
30
-
31
-
32
-
33
-
34
-
35
-
36
-
37
-
38
-
39
-
40
-
41
-
42
-
43
-
44
-
45
-
46
-
47
-
48
-
49
-
 50
50 -
 51
51 -
 52
52 -
 53
53 -
 54
54 -
 55
55 -
 56
56 -
 57
57 -
 58
58 -
 59
59 -
 60
60 -
61
-
62
-
63
-
64
-
65
-
66
-
67
-
68
-
69
-
70
-
71
-
72
-
73
-
74
-
75
-
76
-
77
-
78
-
79
-
80
-
81
-
82
-
83
-
84
-
85
-
86
-
87
-
88
-
89
-
90
-
91
-
92
-
93
-
94
-
95
 |
 |
