Olympus DS-2400 DS-2400 Instructions (English) - Page 48
Changing the USB Class USB Class - driver
 |
UPC - 050332165335
View all Olympus DS-2400 manuals
Add to My Manuals
Save this manual to your list of manuals |
Page 48 highlights
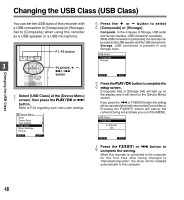
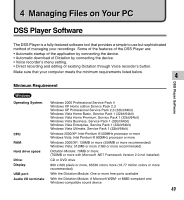
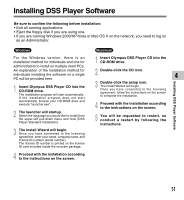
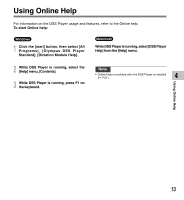
Changing the USB Class (USB Class) You can set the USB class of this recorder with a USB connection to [Composite] or [Storage]. Set to [Composite] when using this recorder as a USB speaker or a USB microphone. F1, F3 button 3 PLAY/OK PLAY/OK,+, -, 9, 0 button Changing the USB Class 1 Select [USB Class] at the [Device Menu] screen, then press the PLAY/OK or 9 button. Refer to P.34 regarding each menu item settings. Device Menu Beep Power Save Time & Date USB Class Reset Settings Format BACK EXIT 2 Press the + or - button to select [Composite] or [Storage]. Composite...In the 3 classes of Storage, USB audio and human interface, USB connection is possible. While USB connection in [composite], the recorder can be used as the USB speaker and the USB microphone. Storage...USB connection is possible in only Storage class. USB Class Composite Storage BACK EXIT 3 Press the PLAY/OK button to complete the setup screen. [Composite Set] or [Storage Set] will light up on the display, and it will return to the [Device Menu] screen. If you press the 0 or F1(BACK) button the setting will be cancelled and it will return to the [Device Menu]. Pressing the F3(EXIT) button will cancel the contents being set and take you out of the MENU. USB Class Composite Storage Composite Set BACK EXIT 4 Press the F3(EXIT) or 0 button to complete the setting. When this recorder is connected to the computer for the first time after being changed to "Remote(Composite)", the driver will be installed automatically to the computer. 48
-
 1
1 -
2
-
3
-
4
-
5
-
6
-
7
-
8
-
9
-
10
-
11
-
12
-
13
-
14
-
15
-
16
-
17
-
18
-
19
-
20
-
21
-
22
-
23
-
24
-
25
-
26
-
27
-
28
-
29
-
30
-
31
-
32
-
33
-
34
-
35
-
36
-
37
-
38
-
39
-
40
-
41
-
42
-
 43
43 -
 44
44 -
 45
45 -
 46
46 -
 47
47 -
 48
48 -
 49
49 -
 50
50 -
 51
51 -
 52
52 -
 53
53 -
54
-
55
-
56
-
57
-
58
-
59
-
60
-
61
-
62
-
63
-
64
 |
 |
