Olympus LS-10 LS-10 Instructions (English) - Page 12
Setting Time and Date [Time & Date] - remote control
 |
UPC - 050332162358
View all Olympus LS-10 manuals
Add to My Manuals
Save this manual to your list of manuals |
Page 12 highlights
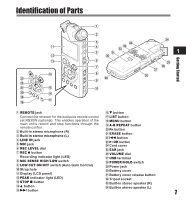
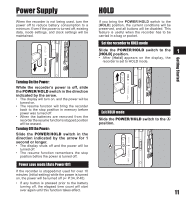
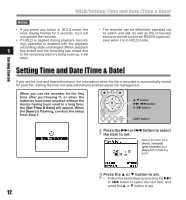
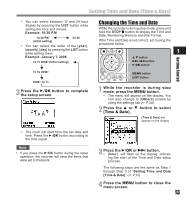
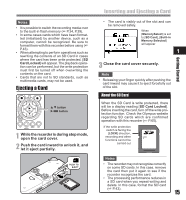
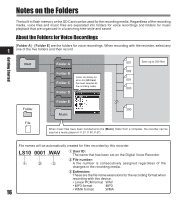
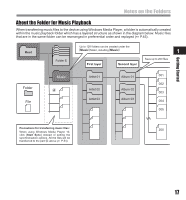
Getting Started HOLD/Setting Time and Date [Time & Date] Notes • If you press any button in HOLD mode, the clock display flashes for 2 seconds, but it will not operate the recorder. • If HOLD is applied during playback (record- ing), operation is disabled with the playback (recording) state unchanged (When playback 1 has ended and the recording has ended due to the remaining memory being used up, it will stop). • The recorder can be effectively operated via its switch and dial, as well as the connected exclusive remote control set RS30W (optional), even when it is in HOLD mode. Setting Time and Date [Time & Date] If you set the time and date beforehand, the information when the file is recorded is automatically stored for each file. Setting the time and date beforehand enables easier file management. When you use the recorder for the first time after purchasing it, or when the batteries have been inserted without the device having been used in a long time, the [Set Time & Date] will appear. When the [hour] is flashing, conduct the setup from Step 1. 2 3 button 9 0 button `/OK button LIST button 1 Press the 9 or 0 button to select the item to set. Select the item from [hour], [minute], [year] [month] and [day] with a flashing point 2 Press the 2 or 3 button to set. • Follow the same steps by pressing the 9 or 0 button to select the next item, and press the 2 or 3 button to set. 12
-
 1
1 -
2
-
3
-
4
-
5
-
6
-
 7
7 -
 8
8 -
 9
9 -
 10
10 -
 11
11 -
 12
12 -
 13
13 -
 14
14 -
 15
15 -
 16
16 -
 17
17 -
18
-
19
-
20
-
21
-
22
-
23
-
24
-
25
-
26
-
27
-
28
-
29
-
30
-
31
-
32
-
33
-
34
-
35
-
36
-
37
-
38
-
39
-
40
-
41
-
42
-
43
-
44
-
45
-
46
-
47
-
48
-
49
-
50
-
51
-
52
-
53
-
54
-
55
-
56
-
57
-
58
-
59
-
60
-
61
-
62
-
63
-
64
-
65
-
66
-
67
-
68
-
69
-
70
-
71
 |
 |
