Olympus LS-10 LS-10 Instructions (English) - Page 20
Recording - manual record levels
 |
UPC - 050332162358
View all Olympus LS-10 manuals
Add to My Manuals
Save this manual to your list of manuals |
Page 20 highlights
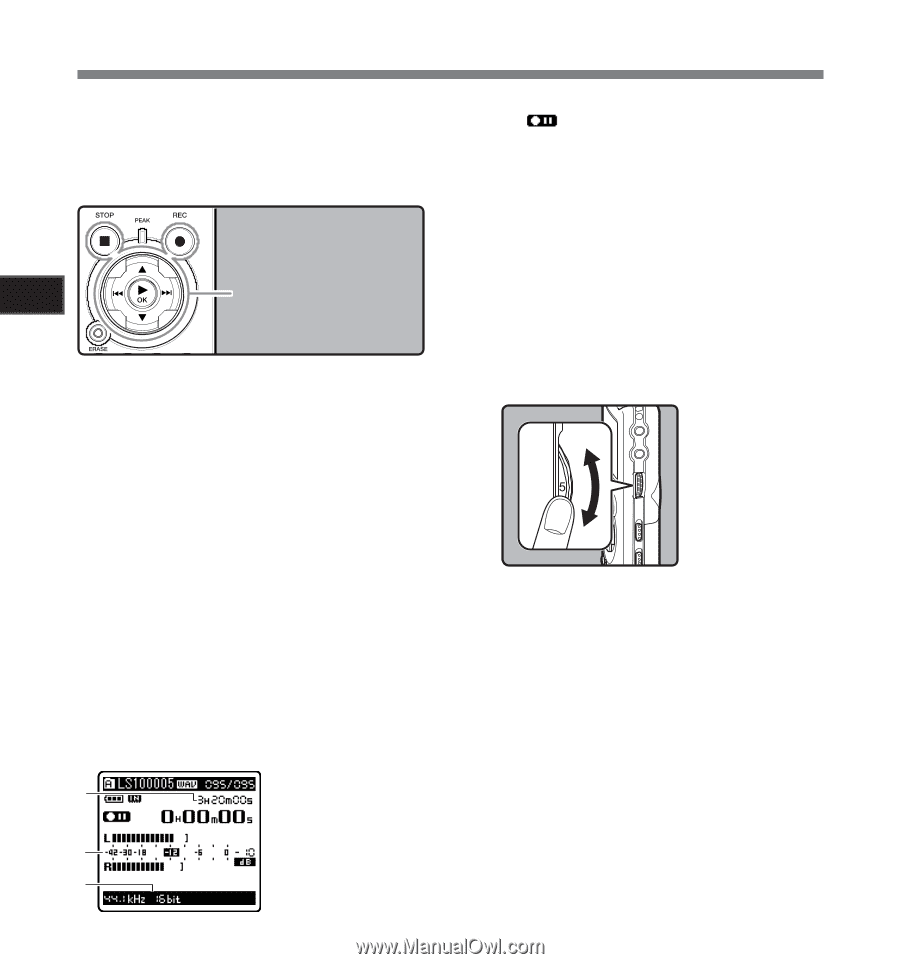
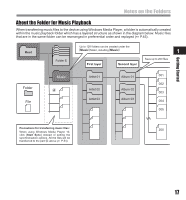
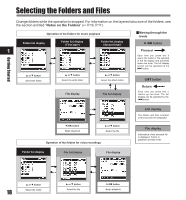
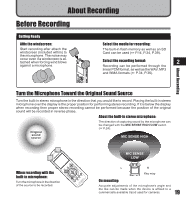
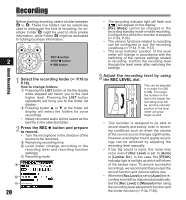
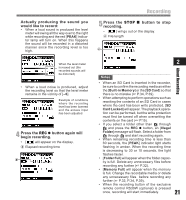
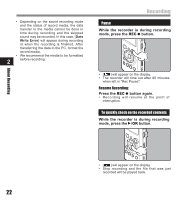
Recording Before starting recording, select a folder between A to E. These five folders can be selectively used to distinguish the kind of recording; for example, Folder A might be used to store private information, while Folder B might be dedicated to holding business information. REC s button 2 STOP 4 button `/OK button About Recording 1 Select the recording folder (☞ P.16 to P.18). How to change folders: 1 Pressing the LIST button at the file display while stopped will return you to the next higher level. Pressing the LIST button repeatedly will bring you to the folder list display. 2 Pressing button 2 or 3 at the folder list display will select the folders for voice recordings. • Newly recorded audio will be saved as the last file in the selected folder. 2 Press the REC s button and prepare to record. • Turn the microphone in the direction of the source to be recorded. a Remaining recording time b Level meter (change according to the recording level and recording function settings) c Recording mode a b c 20 • The recording indicator light will flash and [ ] will appear on the display. • [Rec Mode] cannot be changed in the recording standby mode or while recording. Configure this while the recorder is stopped (☞ P.34, P.36). • The various functions related to recording can be configured to suit the recording conditions (☞ P.34, P.36, P.37). • The level indicator position of the level meter will change in accordance with the switching of the various settings related to recording. Confirm the recording level through the level meter after switching the settings. 3 Adjust the recording level by using the REC LEVEL dial. This can be adjusted in a range from [0] to [10]. The larger the number on the dial is the higher the recording level will be, and the indicator position of the level meter will grow larger as well • This recorder is designed to be able to record cleanly and evenly, even in recording conditions such as when the volume of the source sound changes significantly. However, even higher sound quality recordings can be achieved by adjusting the recording level manually. • If too big sound is input, the noise may occur even if [Rec Level] is set to [Auto] or [Limiter On]. In this case, the [PEAK] indicator light is not light up which will inform of the excess input. To ensure successful recordings, we recommend that you test the record function and volume before use. • When the [Rec Level] is set to [Auto] the recording level will be adjusted automatically. Set the [Rec Level] to [Manual] when using the recording level adjustment function and the limiter function (☞ P.34, P.36).
-
 1
1 -
2
-
3
-
4
-
5
-
6
-
7
-
8
-
9
-
10
-
11
-
12
-
13
-
14
-
 15
15 -
 16
16 -
 17
17 -
 18
18 -
 19
19 -
 20
20 -
 21
21 -
 22
22 -
 23
23 -
 24
24 -
 25
25 -
26
-
27
-
28
-
29
-
30
-
31
-
32
-
33
-
34
-
35
-
36
-
37
-
38
-
39
-
40
-
41
-
42
-
43
-
44
-
45
-
46
-
47
-
48
-
49
-
50
-
51
-
52
-
53
-
54
-
55
-
56
-
57
-
58
-
59
-
60
-
61
-
62
-
63
-
64
-
65
-
66
-
67
-
68
-
69
-
70
-
71
 |
 |